
Job Tickets
The job ticket is the foundation of Clients & Profits. It's an electronic job jacket that manages nearly everything you do, tracking estimates, schedules, costs, billings, and profit. A job ticket is opened for every project the shop gets, including internal work, client presentations, and pro-bonojobs.
Any new work should be opened as a job ticket, as it happens. A job ticket can be opened anytime after it is conceived, and certainly before the work begins. It's important to open new jobs as soon as possible, since purchase orders and time can't be tracked without a job number.
Existing jobs can be cloned into new jobs. Cloning makes an exact duplicate of an old job, including its estimates but not due dates, status, or cost and billing amounts. Cloned jobs get the next automatic job number.
Almost everything about a job ticket can be edited as needed. Changes can be made to jobs at any point during its lifetime, as needed. The changes you make to jobs take affect when they are saved; so anyone who prints a job report will see your changes immediately.
A job can be deleted before any work has begun. But once a job has costs, hours, or billings it can’t be deleted. This prevents jobs from mysteriously disappearing with unbilled costs. Deleting a job is permanent and irreversible. However, the deleted job’s diary entries aren’t affected, allowing anyone to see who deleted the job.
The Add jobs tasks window allows you to add tasks to a new job ticket once it's been saved. Like job tickets, changes can be made to job tasks at any point during the job's life -- including after the job is closed. The changes you make to job tasks take affect when they are saved.
A job task can be deleted before any costs, time, purchase orders, or billings have been added to it. Once a job task has activity, it can't be deleted. Like jobs, this feature prevents billable tasks from being deleted and, therefore, not billed. Once a job task is deleted, it is gone forever. The same task can be added back to the job later if needed.
If you always bill jobs based on a fixed estimate, then you’ll use the estimate billing option often. If you generally bill jobs at completion, the estimate billing option is useful when you sometimes need to bill a job -- or any part of it -- up front (such as a big printing job, or the first job for a new client).
Use these buttons to print job reports, labels, or estimates. Job reports can be printed for all jobs or jobs for just one client, project, or AE/Team. The lists can also be printed for a range of status codes and dates. You can easily see all the jobs currently in-progress, or all the jobs opened for a specific client this year.
Jobs can be searched by job number, name, client, project, template type, client contact, or last added. Use the forward and backward arrows to browse previous and next job numbers in your database, or enter a job name or number in the search field.
You could browse one-by-one to stumble across the errant job, but who's got that much time? You don't, and that's why there's Power Search. You can search for jobs using what little you know, then quick scan through the results to find what you need. You can even memorize your favorite searches.
This menu will automatically list recently viewed jobs. So if you're looking for a job that you've worked on recently, it will more than likely appear here. Simply select it from this menu and it will automatically open.
Use these links to see the current job's creative brief, work order, estimate, change orders, traffic:deadlines, print specs, RFQs, homeBase, or Work In Progress.
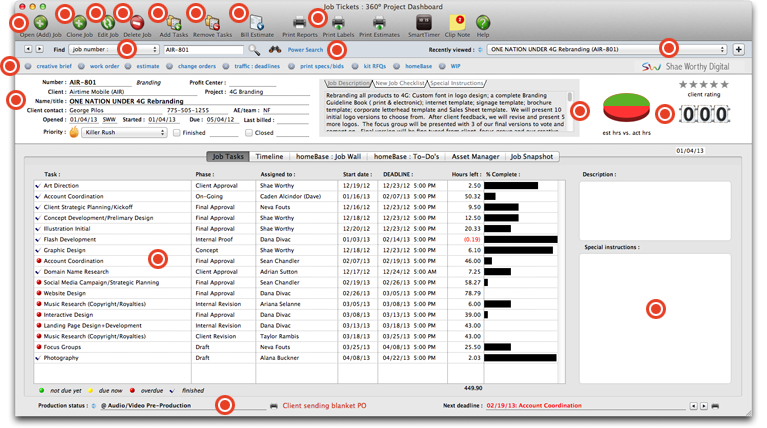
The job's vital information is displayed here, including job number, name, client, project, client contact, date the job was opened, date it's due to be finished, and the date it was last billed. You can change the job's priority using the priority drop-down menu. If the job has been finished, click the finished checkbox. To close the job, click the closed checkbox.
The job's description, new job checklist, and any special instructions can be seen here by clicking the appropriate panes.
This Gantt Chart shows how your shop is doing in actual hours spent on the job vs the hours estimated on the original estimate. To the right, the number of days before this job is due. If the numbers are red, the job is behind schedule. The client rating indicates how happy the client was with the finished job.
Job tasks are listed here, along with the current phase the task is in, the person responsible to complete each task, the start date, due date, hours left to complete the task, and a visual chart showing percentage of completion. Once the black bar fills this column, the task is finished.
The production status appears here.To change production status, click on the traffic:deadlines link and then use the status tab to update Production and Finance status. The next deadline for this job will appear on the right.
Select a task from the list on the left and the task's description and special instructions (if any) will appear here.
To review a task’s special instructions, double-click on the task. If the task has special instructions, you’ll be able to see them. Click the close window box or press tab to close the Special Instructions window.
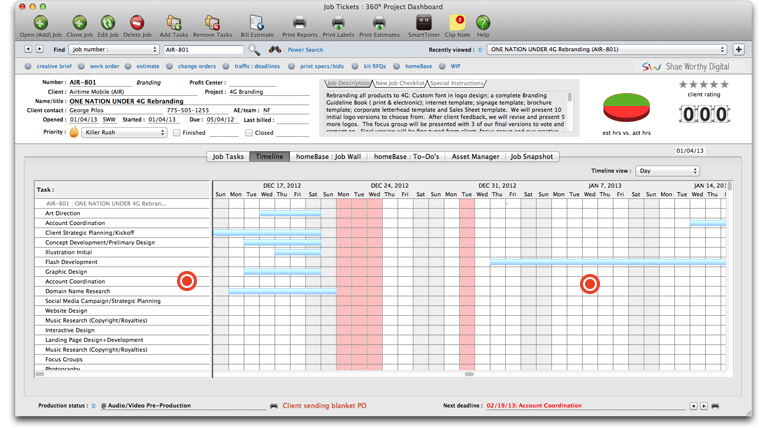
The Job Timeline window displays a job’s schedule in an easy-to-read visual format with each scheduled task sorted by its start date. Up to six months of a job’s schedule can appear at one time, but you can scroll from month to month using the previous and next toolbar buttons. The entire job’s start and due dates appear in the upper-right corner of the Job Timeline window for reference.
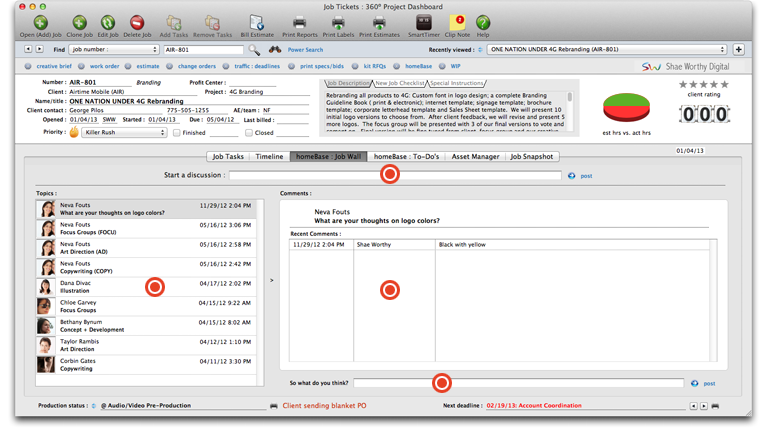
To start a Job Wall discussion, enter a discussion topic here, then click the post button to the right.
Other topics already being discussed on this job will appear here, along with the staffer who opened the topic.
Comments for each topic appear here.
To leave a comment on a topic, enter it here, then click the post button on the right.
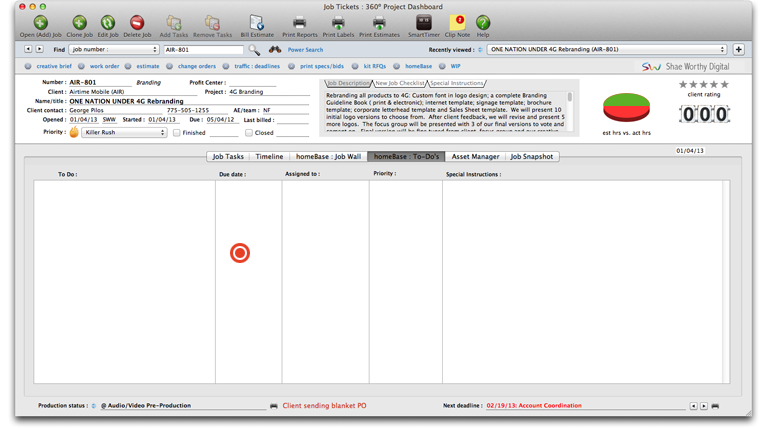
Tasks left to do on this job (if any) will appear here - the task, due date, the person it was assigned to, the task's priority, and any special instructions. If the To-Do's pane is empty, guess what? Everything's done!
To organize files better, create a sub-folder by clicking this link. Sub-folders are a good way to organize files by type. For instance, you can create a separate folder for fonts, illustrations, page layouts, Photoshop files, etc.
For more details about the asset manager, click here.
The Clients & Profits asset manager helps your creatives, production staff, and AEs better organize a job's digital elements -- graphic files, word processing documents, page layouts, web pages, Flash files, fonts, and more. With all of a job’s assets in one place, there’s no more searching for disks or roaming the servers looking for a certain file.
Click on an asset and the description of the currently selected asset will appear here, if a description has been made available.
For more details about the asset manager, click here.
You can open the selected file by simply clicking this link. Clients & Profits automatically detects assets by type, so it knows which program is used to open each individual one. If the application needed to open the selected asset isn't available on your computer, an error window will appear, prompting you to locate the necessary application.
A thumbnail preview of the file selected will appear here.
For more details about the asset manager, click here.
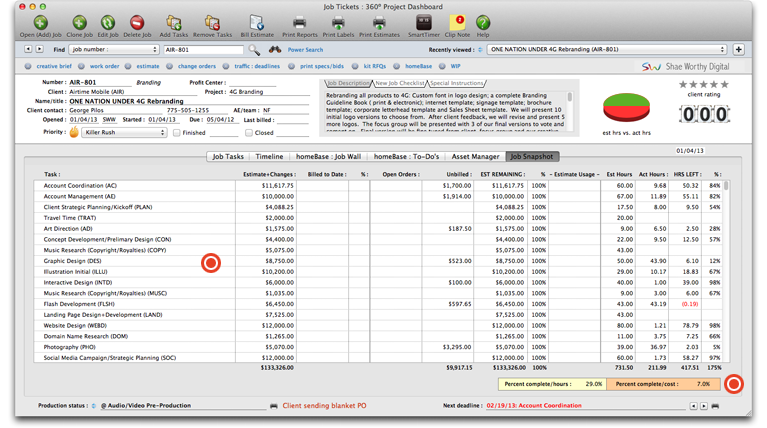
The Job Snapshot enables account executives to catch any problems before they become serious- and expensive or troublesome to fix. The Job Snapshots window supplies account executives, account coordinators, and others with an up-to-the minute snapshot of a job's progress. Quick calculations show the job's remaining estimate and profitability.
The percentage of hours needed to complete this job is shown here, as well as the percentage of completed costs on the job.
Open a Job Ticket
1 From the Job Ticket window, choose Edit > Add
New Job.
The
Add New Job window opens.
2 Enter the client number.
The job’s client should be the one who is most responsible for either
paying for or approving the work. The job is then numbered automatically.
3 Enter the job number.
A new job is numbered automatically, but you can enter your own number. A job
number must be unique, so the same number can’t be used twice. Otherwise,
the job number can contain any combination of ten letters, numbers, and characters.
It can’t exceed 10 characters.
The automatic job number can be changed. To enter your own number, type in your
new number over the automatic number. Using your own custom number, however,
may interrupt the automatic numbering for upcoming jobs.
If
your job number appears as Automatic, your job numbering preference
is set to always prevent duplicates. If enabled, this preferences causes
the job to be numbered when it is saved.
4 Select a job type/spec sheet.
Spec sheets automate jobs. The job type’s spec sheet, including its estimate
disclaimer, description, and tasks, can be copied to new jobs. Double-clicking
on a spec sheet copies its settings and traffic milestones to the new job automatically.
When the job is saved, the spec sheet’s template (i.e., its tasks) will
be added automatically.
Edit a Job
1 From the Job Tickets window, click on the Specs link.
"Where's that InDesign file?"
When a job is closed, the location of its InDesign layouts, Photoshop images, and other digital files can be stored on the job ticket. The name of the DVD-R, CD-R, tape backup, file server, etc. can be entered into the archived on field. When someone needs a job’s art, they can find its location here.
2 Make your changes, then click Save.
You can change the job type/spec sheet once the job is saved. Changing the job type also changes the job’s user fields, estimate options, and disclaimer -- replacing what you’ve already entered. However, selecting a different spec sheet doesn’t change the job’s tasks.
To change the job number
Since a job ticket can contain hundreds of costs, time entries, and billings, its job number can’t be simply edited. Instead, a special Re-number utility changes the job ticket and all of its activity at once.
1 Choose Setup > Utilities > Re-number.
2 Select the job number option.
3 Enter the job’s current number, then enter the job’s new number.
4 Click OK.
Renumbering a job can be very time-consuming if it is a very active job. Since every time entry, vendor payable, check, job billing, change order, and diary entry needs to be renumbered, renumbering can take several minutes.
To change the job’s client number
The client number can’t be simply edited. Since a client’s job could have dozens of costs, time entries, checks, and billings, Clients & Profits needs to change the client number on all of the activity. A special re-number utility makes it easy.
1 Choose Setup > Utilities > Re-number.
2 Select the one job’s client option.
3 Enter the job number.
Tabbing past the job number displays its client number (the one that’s being changed). The new client number will replace the old one on the job ticket, tasks, costs -- everything except billings, which keep the same client.
4 Enter the job’s new client number, then click OK.
Clone a Job
Existing jobs can be cloned into new jobs. Cloning makes an exact duplicate of an old job, including its estimates but not due dates, status, or cost and billing amounts. Cloned jobs get the next automatic job number.
1 From the Job Ticket window, find the job you wish to clone then click the button, (or choose Edit > Clone).
The Clone Job window opens, including all of the details from the job you've just cloned.
2 Enter the client, client number, name/title, etc.
3 Click Save.
Delete a Job
A job can be deleted before any work has begun. But once a job has costs, hours, or billings it can’t be deleted. This prevents jobs from mysteriously disappearing with unbilled costs. Deleting a job is permanent and irreversible. However, the deleted job’s diary entries aren’t affected, allowing anyone to see who deleted the job.
1 From the Job Ticket window, find the job you wish to delete.
2 Click the button, or choose Edit > Delete Job.
Avoid using the deleted job’s number over again. If a new job is opened using a deleted job’s number, you’ll see the deleted job’s diary entries.
Client Contacts
The client contact that you enter in the Job Description window will appear on Estimates and A/R invoices. Contacts include the people responsible for the job, those who receive the statements and other contacts that may need to be referenced. Your agency contact is entered below the client contact, and will also appear on the printed Estimate and A/R invoice.
To edit billing information
A job ticket can have billing information specifically designed for corporate accounting systems. This option makes tracking chargebacks for different departments, cost centers, and accounts easy and mostly automatic. Billing information is typically used by in-house agencies or by agencies with corporate clients who need better accountability. It appears only on printed invoices. To edit the job’s billing information, choose Edit > Edit Job > Billing Information.
Cost centers and account codes are entered manually when the job is opened, or any time thereafter. Any percentage of the job’s estimate and billing amount can be split between the nine cost centers. The percentage amounts are broken down on the printed estimate and invoice, based on the job’s total estimate and billing, respectively. The job billing information has no affect on your own general ledger or profitability reports -- so you may not need it.
Associating open jobs with client projects
A job ticket is opened for every project the shop gets, including internal work, client presentations, and pro-bono jobs. The project associated with this job can be selected from the Client Projects lookup list (Lookup > Client Projects).
It is imperative when adding or editing a client project in this window that you use the Client Projects Lookup list to enter the project that this job belongs to. Click inside of the projects field, then choose Lookup > Client Projects. Double-click the project from the lookup list, and it will appear in this field. It's important to use the lookup list to avoid any input errors that may be caused by manually typing the name of the project in. If the name of the client project is off by a single letter, the job will not show up in the client project.
The Job Lists report lists jobs by project name. Jobs are grouped by project name, showing the job number, job name, start and due dates, and production status. Jobs without project names are listed first.
Add Tasks
If the job was added with a job type/spec sheet, the tasks from the spec sheet will be copied to the new job automatically. Otherwise, you'll need to add tasks to the job. Job tasks are needed before the job can be estimated or scheduled, but can be added later. Tasks can even be added while you’re working elsewhere in Clients & Profits X. Once a job has tasks, purchase orders can be added and time can be tracked on time cards.
The Add jobs tasks window allows you to add tasks to a new job ticket once it's been saved. Like job tickets, changes can be made to job tasks at any point during the job's life -- including after the job is closed. The changes you make to job tasks take affect when they are saved.
Re-assign Tasks
The resource is the person, place, or thing responsible for completing the task. It can be a staff member, a vendor, or a freelance employee. Lookup lists can be used to find a staff member or vendor. The resource is not limited to existing staffers or vendors, so anything or anyone can be entered. The lead time should be entered as the number of days needed to complete this task.
Remove Task
A job task can be deleted before any costs, time, purchase orders, or billings have been added to it. Once a job task has activity, it can't be deleted. Like jobs, this feature prevents billable tasks from being deleted and, therefore, not billed. Once a job task is deleted, it is gone forever. The same task can be added back to the job later if needed.
1 From the Job Ticket window, click once on a task to select it.
2 Click on the button (or choose Edit > Remove Job Task).
You can remove several job tasks at once by selecting several tasks together with your mouse, then clicking the Remove Tasks button. Or, press and hold the Command/Apple key (on a Mac) or the Control key (in Windows) then click on the tasks you wish to delete.
Edit a creative brief
The creative brief explains to the client the agency's creative process for a particular job.
The creative brief is a worksheet that creatives and account service can use to define the job’s creative, production, and strategic goals. It provides focus and direction for those managing and working on the job. It can be used to document the strategic, creative steps the agency will perform to design and produce the work. The creative brief helps outline what needs to be accomplished by the work; they focus on what needs to be done to start working; and track the necessary, minute details.
Typically, the creative brief was written by the account executive or creative director in a word processor, then attached to the printed estimate. Its usual function was to supplement and justify the job’s estimate amounts.
With Clients & Profits X, the creative brief is an integral function of the electronic job jacket. Like the work order, the creative brief is just another part of the job ticket. Because it’s part of the job ticket, anyone with access to jobs can see it. And because it’s on-line, changes that anyone makes to the creative brief updates the database instantly. Users will always be looking at the most up-to-date version on the creative brief.
Creative briefs aren’t required. Each job ticket has its own special creative brief. A creative brief contains eight sections, each with its own customizable heading and body. Not all of these sections need to be used; only the sections that have text will appear on the printed creative brief report.
The printed creative brief can be attached to the printed estimate for the client’s review, or printed separately and distributed internally. Since creative briefs can be viewed on-line, anyone can see them from their own computer.
The steps in the creative brief can be preset for each job type/spec sheet. When a job is added for a job type, its creative brief headings are copied to the new job. This option will make your creative briefs more consistent, since the same types of jobs will always have the same creative brief headings. Also, these headings can be customized on any particular job without affecting other jobs or the job type/spec sheet itself. For more information, see the Creative Brief FAQ.
To edit the job’s creative brief
1 From the Job Tickets window, find the job you wish to edit.
2 Click on the Creative Brief link, or choose Edit > Edit Job > Creative Brief.
Inside the creative process.
The creative brief documents for the client the creative process your agency follows to produce the work. The steps in the creative brief are completely customizable, from job to job.
3 Make your changes.
4 Click Save.
To print a creative brief
There are two ways to print a creative brief:
1 Open the Creative Brief window, then choose File > Print Window
or,
1 From the Job Tickets window, choose File > Print Reports > Job Production.2 Enter the job number then choose the Creative Brief report option.
3 Click Print.
Editing a job's printing specs
When a job involves large amounts of printing, its printing specifications can be described in a detailed, on-line form.
The Printing Specifications form explains to the vendor the specific printing requirements for a particular job. It is a worksheet that production people can use to define a print job's physical characteristics, such as flat size, binding, and cover stock. It replaces any manual print ordering form you may be using now.
With Clients & Profits X, printing specifications is an integral function of the electronic job jacket. Like the work order and creative brief, it is just another part of the job ticket. Because it's part of the job ticket, anyone with access to jobs can see it. And because it's on-line, changes that anyone makes to the printing specifications form updates the database instantly. Users will always be looking at the most up-to-date printing specifications for the job.
Since printing specifications can be viewed on-line, anyone can see them from their own computer.
Printing specifications are optional, and only apply to jobs that involve printing. The printing specifications form itself is comprehensive, but it isn't customizable. The names of the field labels can't be changed. In addition, not all of the form's sections need to be used. The sections that have no text will appear blank on the printed Printing Specifications form.
Only one printing specifications form can be edited and printed per job. If a job contains several large printing components (e.g., member directory, services handbook, marketing kit, etc.), it's better to set up each component as a separate job ticket. These related jobs can be associated together by setting up a project for the client.
To edit the job's printing specifications
1 From the Job Tickets window, find the job you wish to edit.
2 Click on the Printing Specifications link, or choose Edit > Edit Job > Printing Specifications.
On-line printing specifications. Dozens of specific characteristics about a print job can be entered on-line. Anyone with access to jobs can see, change, and print an up-to-date Printing Specifications form.
3 Make your changes.
4 Click Save.
To print a job's printing specifications
There are two ways to print the job's printing specifications form:
1 Open the Printing Specifications window, then choose File > Print Window
or,
1 From the Job Tickets window, choose File > Print Reports > Job Production.
2 Enter the job number then choose the Printing Specifications report option.
Change Work Order
Change orders document changes made to a job's estimate after it has been authorized.
They prevent potentially costly misunderstandings between the agency and the client when a job has gone over budget.
When a change is requested (by either the client or the agency, it doesn't matter), a change order can be added then printed. The printed estimate, it only shows the cost and description of the change being requested. The client signs off on a change order just like they sign off on an estimate, giving the authorization to exceed the job's estimate. A new change order is printed automatically when it is saved.
Change orders are better than printing a revised estimate, since it doesn't remind the client of the job's total cost. Clients see only the change order amount. A change order doesn't affect the job's original estimate, either. Instead, a separate change order amount is tracked for each job task.
To see a job's change orders
1 From the Job Ticket window, click the Change Orders link or choose Edit > Change Orders.
The Change Orders window opens, listing the job's change orders sorted by date (newest entries first). Entries can be resorted by clicking on the different column headings (i.e., when who, what). The sort order can be reversed by clicking on the sort buttons in the toolbar.
To approve a change order
Once a change order has been approved, it can no longer be edited or deleted, so make sure all the information is entered correctly before approving it.
1 From the Change Order window, highlight the change order you wish to approve.
2 Click the approve button.
3 A message box will open, click Yes to approve the change order.
Approved change orders. When a client signs off on a change order, it can be marked as approved in Clients & Profits X. Approved change orders can't be changed, keeping your job costs accurate.
To print a change order
Change orders can be printed as many times as necessary. The change order uses the same template as estimates, so it can be set up so that the shop's logo prints on it, or so that it prints on your letterhead.
1 From the Changer Order window, highlight the change order you wish to print.
2 Click the print button.
Much like the job's estimate, change orders now print using the roll-up tasks.
To add a change order
Change orders can be added at any time to document any changes needed to complete the job. Change orders can be added for changes the client wants or is needed by the agency itself. Click here for step-by-step instructions.
To edit a change order
Unapproved change orders can be edited at any time. Virtually everything on the change order, except for the number, can be edited. Each time a change order is edited, you will be prompted to reprint the change order.
To delete a change orderDeleting a change order deducts its amounts from the change order totals on job tasks. Only unapproved change orders can be deleted.
1 From the Change Order window, highlight the change order you wish to delete.
2 Click on the delete button.
E-mailing a change order
For clients or shops that like to have change orders e-mailed to them, Clients & Profits X allows you to email a change order as a PDF file.
Edit a Work Order
A work order can be printed from a job ticket. The printed work order can then be distributed throughout the production department as the job is started. It gives the production staff everything they need to know to start the job: client, job name/title, client contacts, initial budget, start date and due date, AE/team, the job's traffic milestones, and detailed instructions.
The work order's topics can be pre-defined as part of the job type/spec sheet, so that all jobs of the same type have the same work order topics. These topics aren't required; if none are entered, the work order will work like before. But if a work order has topics, it will print like the creative brief. The sketch/scan/photo appears on the printed work order.
Work Orders can also include a shipping address (which can be copied from the client's address) and a photo or sketch of the work being produced. The photo/sketch doesn't appear on the printed work order; instead, it's there for an on-line reference after the job is closed.
To edit the job's work order
1 Choose Production > Job Ticket to open the Job Ticket window.
2 From the Job Ticket window, find the job you wish to edit.
3 Click the Work Order/Job Request link (or choose Edit > Edit Job > Work Order).
The Work Order/Job Request window opens, showing the job request's topics, special instructions, and photo/sketch.
4 Make your changes.
5Click Save.
To paste a graphic into the Photo/Sketch window
1Open the graphic in Photoshop (or similar graphics program), then copy the graphic to your clipboard.
2 Return to Clients & Profits X. From the Job Ticket window, click the Work Order/Job Requests link.
The Work Order window will open.
3Select the Sketch/Photo tab, then click inside the photo area and choose Edit > Paste. The graphic will appear in the Photo/Sketch field.
4Click Save.
The graphic you've pasted will now appear in the Job Ticket window. If you never need to delete the image from the work order window, simply click inside of the picture field then choose Edit > Cut. Click save, and the graphic will no longer appear on the Job Ticket's work order.
To print a work order
1 From the Job Ticket window, choose File > Print > Print Reports, or click on the print reports button.
The Print Job Reports window opens.
2Select the Work Order checkbox in the Print Job Production Reports list.
3 Click Print.
When account execs update the job's work order, it can be easily reprinted then distributed throughout the production department. Or, creatives can look up the job's work order from their own desk using Clients & Profits X.
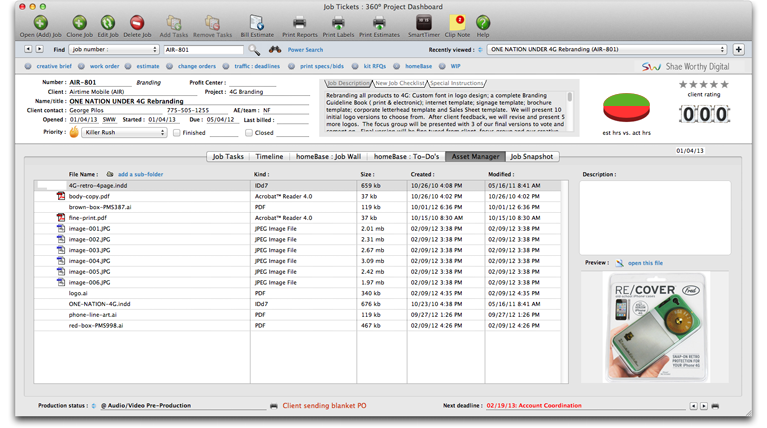
View Assets
The Asset Manager helps you organize and track all of the art files, elements, and other digital collateral for a job ticket. The Clients & Profits X asset manager helps your creatives, production staff, and AEs better organize a job's digital elements -- graphic files, word processing documents, page layouts, web pages, Shockwave files, fonts, and more. With all of a job’s assets in one place, there’s no more searching for disks or roaming the servers looking for a certain file. Each asset includes a thumbnail and description plus the ability to open the file with a single mouse click.
The asset manager will also keep track of acquisition, ownership and usage information that other asset management systems don't. This optional information can be used to build a complete accounting of your shop's job digital assets.
How the asset manager works The asset manager doesn't actually store your digital files. Instead, it displays the contents of a specially designated server on your network -- the art server -- where your job's file will be saved. This server can be a dedicated server (i.e., all it does is store art files) or can be an art folder inside an existing file server. The art server will contain a folder (i.e., subdirectory) for every job you do. To use Clients & Profits X to track your assets you'll need to enter the name of the art server in preferences, then get the creative, production, and art departments to start saving all of their digital files into the art server. When you set up the asset manager's preferences, Clients & Profits X will create a folder on your art server for every existing open job. Thereafter, a new job folder will be created automatically every time a new job is opened. Do note that there is no live link between the C&P database and the art server so one will not affect the other in terms of stability or ability to make backups.
Using the asset manager
The asset manager is part of the job ticket. Clicking on the assets link from the Job Ticket window displays the contents of the job's folder on the art server. All of the files that have been created for the job are listed.
The assets list includes file name, kind and application icon, file size, and modification date. This information is supplied from the art server (i.e., it is not stored inside the Clients & Profits X database).
The asset manager will only display the contents of the job's folder one level deep. Digital files can be stored inside user-created folders inside the job folder. However, the asset manager can't display files stored inside folders inside of these folders. The job folder should not have folders stored inside folders.
To see a job's assets
1 From the Job Ticket window click on the assets link.
The Asset Manager window opens, displaying the contents of the job's folder on the art server. All of the files that have been created for the job are listed. The list will be empty if the job folder on the art server has no files or if the name of the art server in asset manager preferences has not been entered by your system manager.
To browse through a job's assets
1 Click the buttons to select the previous or next assets in the list.
To see (and edit) a job asset's ownership and usage information
1 Double-click on an asset in the Asset Manager window.
The Job Asset Info window opens, displaying the digital file's name, location and description as well as its ownership details, acquisition date, source of acquisition, copyright information, author and phone, and usage restrictions. A thumbnail of the file appears on the right. The keywords listed under the thumbnail are the search words for the Find Asset tool.
2 Make your changes then click Save.
To open a digital art file
Once you've selected a digital art file, you can open it using the application that created it by clicking the open file link. Clients & Profits X will open the file's application (e.g., Photoshop, Quark, etc.) then open the file. If you don't have the file's application (i.e., Photoshop) on your computer, the file won't open.
To search for digital art files across all jobs
If you use Clients & Profits X to track the ownership and usage information for your job assets, digital files can be searched for by name, keyword, and other fields from the Find Job Assets button.
The Find Job Assets function can only search for assets that have been given file information.
Update Traffic
The Job Traffic window is a snapshot of a job's progress, highlighting the major turning points (milestones), task progress, priority, and status of the job ticket. Everything you need to keep track of a job's progress is in the Job Traffic window, from managerial and staff assignments, major due dates, and status.
Everything you need to keep track of a job’s progress is in the Job Traffic window, from manager and staff assignments, major due dates, and status. The Days Until Due counter is an illuminated reminder of the approaching deadline to help you meet your goals.
The Job Traffic window provides a manager’s perspective on the job’s progress with a days until due counter, unfinished task list, and roomy status notes field.
With the active days counter and unfinished tasks list, traffic managers can easily see what needs to be completed to get the job finished on time.
Click the link for a quick overview of the job’s history or to add a job diary entry with notes about what is going on with the job.
To update a job's traffic information
1 From the job ticket window, click the link.
The traffic window opens, displaying the job's priority, production and billing status, traffic assignments, milestones, dates, and unfinished tasks.
2 Enter the job's traffic details, which include:
The job’s priority can be changed by clicking on the pop-up menu and choosing one of the six customizable priority levels. A job diary entry will be created each time the job’s priority is changed.
Status The production status and billing status can be changed by entering a new status code over the old status code. If you’re not sure which status code to use, choose Status Codes from the Lookup menu. Double-click on a status code from the Lookup window. The status code will be copied to the Traffic window automatically. A job diary entry will be created each time the production or billing status code is changed.
Dates The job’s start date and due date can be changed in the Traffic window. Changing these dates here doesn’t affect the job schedule (so Work to Do reports won’t be affected). To change the start and due dates for job tasks, use the Reschedule function in the Job Schedule window once the Traffic changes are saved. You can also enter the date closed for the job in this window.
Days due The days until due counter keep a running tab on how close the shop is to meeting the job’s due date. The numbers normally appear in green, but when the job is overdue, they turn red and begin counting the days overdue.
Status note The status note supplements the job’s current production or billing status. It lets you enter a brief description that appears on the Job Ticket window, on some job lists, and traffic reports.
Traffic assignments The job’s traffic assignments (i.e., traffic names) are the initials of the creative and production people most responsible for getting the work done. Traffic reports can be printed for any one of the job’s traffic names.
Client status notes/comments/next steps The client status notes/comments/next steps can be used to create progress reports for clients (see the Client Status report in the Job Lists) with any kind of information you want.
Milestones If the job was added using a job type/spec sheet, its traffic milestones can be edited. Jobs without a job type won’t show milestones.
Unfinished tasks The job’s unfinished tasks are listed for an overall view of what needs to be completed. This field shows the task, who it is assigned to, and when it is due. When tasks are marked done, they no longer appear on the list.
3 Click Save.
To clear the job's traffic information
1 Click the button to erase the job's dates, statuses, milestones, and notes to start over.
To print the job's traffic report
1 Click the button to print this job's traffic report.
View a Job's Timeline
The Job Timeline is a graphic representation of when the tasks for a job are scheduled to be worked on.
The timeline is a job task management tool. With the schedule visually displayed, you can see if it sets realistic goals. Using the tools and links, you can add special task instructions, reschedule tasks, reassign them to other staffers, and more.
The Job Timeline window displays a job’s schedule in an easy-to-read visual format with each scheduled task sorted by its start date. Up to six months of a job’s schedule can appear at one time, but you can scroll from month to month using the previous and next toolbar buttons. The entire job’s start and due dates appear in the upper-right corner of the Job Timeline window for reference.
To open the Job Timeline window
1 Choose Production > Job Tickets.
2 Find the job whose timeline you wish to review.
You can either scroll through the jobs using the previous and next toolbar buttons, or find them using the Find Job search tool. If you don’t remember the job number, click on the find more link to search by client, sequence, production or billing status, and more.
3 Click the timeline link in the lower-left corner of the Job Ticket window.
The Job Timeline window opens. Once you’ve opened the Job Timeline, you can get additional task information, like special instructions or estimate amounts. You can also reschedule the entire job, reassign tasks between resources, or clear the entire job schedule.
To review a task’s special instructions
1 Click on the task to select it.
2 Click the special instructions link.
If the task has special instructions, you’ll be able to see them.
3 Click the close window box or press tab to close the Special Instructions window.
To review a task’s estimate amount
1 Click on the task to select it.
2Click the task estimate link.
The Lookup Estimate window opens. If the task has estimate information, you’ll be able to see it in this window.
3 Click the close window box to close the Lookup Estimate window.
To view the scheduling calendar
1 Click the calendar link.
2 The Calendar window opens.
You’ll see the current month displayed. Small, non-interactive calendars for the prior and next month after are also displayed to the right of the current, interactive month’s calendar. You can make any month interactive by choosing it from the pop-up menus. Click on any day in the current month to see which tasks -- and what resources -- are scheduled for that day.
3 Click the close window box to close the Calendar window.
To scroll from month to month in the Job Timeline window
1 To scroll backward one month at a time, click the button.
The timeline moves backward one month each time you click the button.
2 To scroll forward one month at a time, click the button.
The timeline moves forward one month each time you click the button.
To clear this job’s schedule
1 Click the button.
2 A dialog box opens asking if you wish to clear this job’s schedule.
If you click Yes, the job’s schedule will be cleared. If you click No, the job’s schedule remains.
To reschedule this job’s schedule
1 Click the button.
2 The Reschedule Tasks window opens.
You can reschedule based upon a new start date or due date for the entire job.
3 Click on either the Start date or Due date option to use to reschedule this job.
The current start or due date will automatically appear in the Current date field.
4 Type the new date.
5Click OK.
Any unfinished task on this job is rescheduled based upon the new start or due date of the entire job. The dates are automatically scheduled based on the lead time added when the task was set up.
To reassign scheduled tasks to someone else
1 Click the toolbar button.
2 The Reassign Deadlines window opens.
3 Enter the initials of the staffer who you wish to remove from whatever task(s) on this job they are scheduled to do.
4 Press Tab.
5 Enter the initials of the staffer who you wish to assign to replace the staffer you’ve removed.
6Click OK.
The task or tasks that were assigned to the original staffer are now assigned to the staffer you’ve indicated should take over the work. The reassigned tasks will now appear on the new staffer’s work-to-do report and Weekly Task Planner.
To print this job’s schedule
1 Click the toolbar button.
A report listing the job’s schedule will be printed.
To print this job’s timeline
1 Click the button.
A report displaying the job’s timeline will be printed. The timeline prints horizontally, so be sure to check your paper orientation before pressing Print in your print dialog box.
Printing Job Reports
Job reports can be printed for all jobs or jobs for just one client, project, or AE/Team. The lists can also be printed for a range of status codes and dates. You can easily see all the jobs currently in-progress, or all the jobs opened for a specific client this year. Account executives can print a list of their own job tickets, seeing the job’s essential specifications. Production managers can get a list of all the jobs currently in-progress.
Reports can be printed for many jobs selected by a production or billing status range and a date range.
Job reports can be printed to either the printer or screen. By using Print Destinations under the File menu, you can export to a spreadsheet-compatible text file, print in PDF or HTML format or even e-mail your job report.
To print job reports
1 From the Job Ticket window, click the button or choose File > Print > Print Reports.
The Print Job Reports window opens, prompting you to select one of various types of job reports:
Everything someone needs to know about a job’s production can be printed here, including production specifications, schedule and traffic details.
Job accounting reports help keep you well informed about the most important parts of your business: jobs, costs, billings, and profits.
Job list reports give you an overview of your jobs. The Job Lists can be printed for all jobs or jobs for just one client, project, or AE/Team. The lists can also be printed for a range of status codes and dates.
Job Summary reports give you an overview of each job. The reports provide a way to evaluate the progress of jobs. The reports can be sorted by project code, job type, client, or AE/team.
Job Analysis reports compare estimates to actual billings and budgets to actual costs. Potential problems can be spotted before they become real problems.
Miscellaneous job reports are reports that aren't used for production, accounting, or analysis. Instead, these reports have special purposes and are used infrequently. They are printed like other job reports.
Editing a job's estimate
Estimates are not “created” separately from the job ticket. Instead, estimates are an integral part of the job and its tasks. Estimates are based on the tasks you’ve added to a job; in fact, tasks are the basis of the estimate. So the details you enter for a task -- the task name, group, sort -- is what the client sees on the printed estimate. This is very important: Jobs are estimated by job task only. Unless a job ticket has tasks, you can’t edit its estimate.
A job ticket has only one estimate, but that estimate is flexible. Since a job can have many tasks, you’ve got the ability to make very detailed estimates for your clients. An estimate can be revised any number of times as needed (estimate revisions are numbered automatically, and appear at the top of the printed estimate). Revisions are retained, so previous estimates can be reprinted.
Estimates can be revised and reprinted as many times as needed. Printing an estimate doesn’t affect its production or billing status. Estimates print on letterhead, and have several customizable options.
Estimates feature three different customizable estimate amounts. All three columns can be used when estimating large jobs with either phases or differently-priced options.
Or a single column can be used for less complex jobs.
The names of the three estimate amounts are customizable. They can be used to handle jobs with multiple print quantities (e.g., 1M, 2M, 5M).
Or they can be used to show revisions (e.g., Original, Revised, Final). Or, they can offer a client a choice of qualities (e.g., 1-color, 2-color, 4-color). For flexibility, any one of the three amounts can be shown on the printed estimate. Or, you can show all three amounts on the same page -- giving your client an easy way to choose which estimate to authorize. In addition, all three amounts can be combined together to show a total estimate.
Estimates also have a unique, powerful feature: the estimate pop-up worksheet to speed up estimating. The worksheet lets you budget time for up to four different staff members and up to four different costs for each task. The task’s estimate is calculated automatically based on your entries, replacing your calculator.
An estimate’s column headings can be included as part of the job type/spec sheet. When a new job is opened with this spec sheet, the column headings are copied automatically. (The estimate’s column headings can be fine-tuned while you’re editing the estimate amounts, which only affects the job being edited). For more information, see the Estimating FAQ.
To edit a job’s estimate
1 From the Job Tickets window, find the job whose estimate you wish to edit.
2 Click the Estimate link (or choose Edit > Edit Jobs > Estimate Amounts).
Estimate costs in obsessive detail.
Each job task features a pop-up estimate worksheet that shows exactly how the estimate amount was calculated. Time for up to four staff members can be estimated for each task.
3 Enter the staff initials, hours, and billing rates for the people who will work on this task.
After entering someone’s initials, pressing Tab enters the staffer’s billing rate automatically. The total labor amount is calculated whenever you enter hours, then press Tab. Any billing rate can be entered for estimate purposes; the actual billing rate will be determined by the job and task’s bill rate setting.
4 Enter the task’s expenses (i.e., purchases) and a markup.
Anything you plan to purchase to complete this task can also be entered in the task’s estimate worksheet, such as printing, freelance comps, or travel. Up to four different costs can be included, which are totaled up in the Total Budget amount. A markup can be entered for the total budget, which becomes part of the task’s total estimate.
4 Click Save.
The worksheet’s total, including any markup, is copied to the task’s estimate amount. The worksheet is just an on-line scratch pad for calculating estimate amounts. The task’s estimate amount can still be fine-tuned on the estimate window, regardless of the what’s on the worksheet. The task’s estimate worksheet can be changed any time.
To add a new job task while estimating
New tasks can be added to a job ticket while editing the job’s estimate. Tasks can be added by opening the Task Table lookup list, selecting a task, then dragging it onto the Estimate window. The task is instantly part of the job ticket.
If you’re limited in Access Privileges to only see tasks from a certain group, only tasks that belong to that group will appear. Otherwise, the lookup list shows all active tasks.
Adding a task by dragging it from the lookup list doesn’t let you customize its details. To add a task that can be customized:
1 Click the button.
The Add New Task window opens, prompting you to enter a task code.
2 Enter the task’s information, then click Save.
Tabbing past the task code copies the task’s description, group, sort, G/L accounts, etc. to the new job task, where they can be edited. The changes you make to this task will appear on this estimate immediately.
To remove a job task while estimating
Job tasks can be removed from job tickets while editing the estimate. A task can’t be deleted if it has costs, time, or billings. To remove a task, click into its budget or estimate fields to select it, then click the Remove Task button.
To clear a job’s estimate
The job’s entire estimate can be erased with a single mouse click. Use this shortcut when the estimate is all wrong and needs to be created from scratch. This shortcut is much faster than manually deleting each task’s estimate. To erase the job’s estimate, click the Clear button.
To copy an estimate amount
Estimate amounts can be copied from one column to the next using the Copy Amounts shortcut. This shortcut is especially useful when you’re estimating three variations of the job (e.g., 2-color, 4-color, and 6-color versions of the same brochure). You’ll enter the estimate amounts into the first column, then click the Copy Amounts button.
The estimate amounts are copied into the second column. If the second column is selected, the estimate amounts are copied into the last column. Once the estimate amounts are copied, they can be freely edited.
Revising estimates
Clients & Profits X automatically tracks the various revisions to a job’s estimate. The job starts with an original estimate, which can be changed many times before it is presented to the client. But once the client sees the estimate, any changes requested by the client should be reflected in “revised” estimate. Each official revision gets its own revision number, which is generated automatically. The revision number appears on the printed estimate to help you and your client keep track of the various versions of the job’s estimate. Once the client approves it, no more revisions are made to the estimate.
A job’s original estimate can be changed many times before it is printed for the client’s approval. To make the first official revision, choose New Revision from the Show Est Rev pop-up menu. The original estimate is saved, but the new revision becomes the current estimate. When the first revision’s estimate amounts are saved, they’ll appear on the printed estimate. Every time the estimate is edited, users can decide whether the changes should be a new revision; if so, they’ll choose New Revision from the pop-up menu each time.
The pop-up menu
will list the number of prior revisions, along with an option to recall the job’s original estimate amounts. To recall a previous revision, simply choose it from the pop-up menu. In addition, a previous revision can be made current by clicking the Make Current button. A new revision will be created using the previous rev’s amounts.
Choosing a final estimate
Although a job can have up to three different estimates, only one is considered the final estimate. It is the one of which the client approves. The final estimate’s amounts appear on the job ticket window, job summaries, and other reports. The Final Estimate pop-up menu shows the names of your estimate columns, along with options for “none” (i.e., no estimate) and “all” (i.e., when all estimate amounts are combined). Choosing one of the three estimates makes it final. This selection isn’t saved unless the estimate is saved.
When a client says “ok.”
Although a job can have three versions of an estimate, only one becomes the “final” estimate. The final estimate’s amounts appear on job reports to compare estimate vs. actual billings. Amounts from the “final estimate” are also used for estimate billing.
Approving estimates
Each job estimate can be approved online to indicate that the client has approved the estimate. Estimate approval is a user-defined access privilege, so only certain people can be allowed to approve estimates. Anyone with the access privilege can approve estimates. If a user can approve estimates, they can approve estimates for any client. Once the client approves it, no more revisions can be made to the estimate.
An estimate can only be approved if it has amounts. Estimates can also be unapproved if, for some reason, the client balks and changes its mind. For better security, an estimate can only be unapproved by the person who original approved it. A diary entry is saved automatically whenever an estimate is approved or unapproved. Also, the job’s traffic assignments are notified via e-mail whenever an estimate is approved or unapproved.
"Hands down, this Clients & Profits Helpdesk is the best of any support team." -- Kate Mistler, Fabiano Communications

© Clients & Profits, Inc.