
Media Orders
Purchase, insertion, and broadcast orders account for purchases you make from vendors on a client’s behalf. They are not required by Clients & Profits, but give you control over your purchases. That’s because purchase orders provide written verification for the goods and services you order.
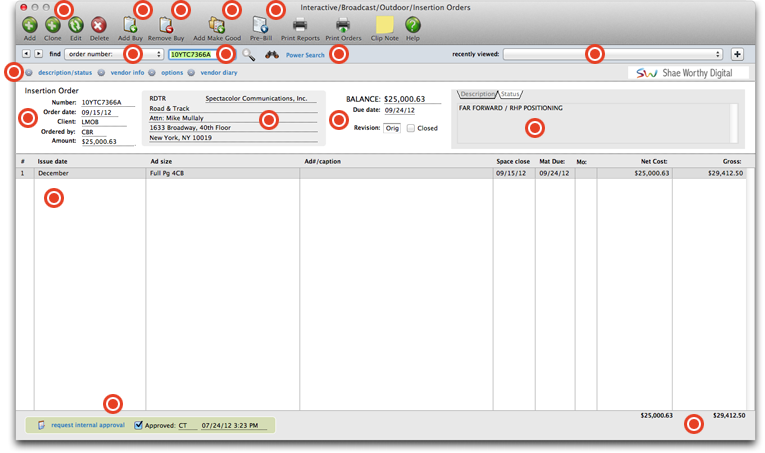
Use these buttons to add, clone, edit, or delete media orders. Step-by-step instructions can be found below.
To add a media buy, click the Add Buy button. A media order can contain dozens of different media buys for one vendor. Each media buy can specify a different ad to run, another set of run dates, or a special space buy for a certain ad. Each media buy will appear as a separate line on the printed insertion order, as well as the client's A/R invoice.
Select the media buy you wish to remove by clicking once to highlight it. Once the media buy is selected, click the remove buy button. An alert will appear asking you to confirm the removal of the media buy.
Make goods are compensation for ads that either never ran or ran incorrectly. There are many different ways a print ad or radio/tv spot can be compromised, providing less value for your client. For example, you ordered for a guaranteed position in a magazine, but the ad actually ran in a different, less desirable place.
The pre-bill function lets you bill selected media buys from a broadcast or insertion order immediately after the order is saved. This lets you bill the client prior to the ads actually running so that you get paid closer to when the media invoice from the publication or station is due. See below for step-by-step instructions.
You can easily re-visit recently viewed media orders by selecting it from the recently viewed drop-down menu.
To perform a power search, click the power search link. A power search allows you to search for specific types of orders based on clients, vendors, or materials used. These searches are saved by C&P, so you can easily perform detailed searches like this again.
If you know the number of the media order you're searching for, enter it here and click the magnifying glass icon.
You can search for media orders by order number or by the last added media order.
Use these links to edit description/status, vendor information, media order options, or to see and edit the vendor diary.
The basic information for the media order is listed here: Order number, date, client, who ordered the media order, and the amount of the order.
The vendor's name and address is listed here. If another vendor is being used for this media order, you can change the vendor by clicking the edit button. Instructions on editing media orders can be found below.
The balance due on this media order is shown here along with the order's due date, and which revision of the order is currently being used. When the media order has been paid, you can close the order by clicking the closed checkbox. Once a media order has been closed, no more changes can be made to it.
The media order's description and/or status can be displayed here.
The details of the media order are displayed here. If there is more than one media buy on the media order, all of them will be displayed here. The media order's issue date, ad size, ad number and caption, space closing date, materials due date, net and gross costs are all shown here.
When the media order has been approved, you can approve it internally by simply clicking the approved checkbox. This can only be done by users who have the proper access privileges. Once approved, the person approving this media order's initials will appear, along with the date and time that the media order was approved.
The total net and gross cost amounts for the media order will appear here.
Adding a Broadcast Order
Broadcast orders are added, edited, revised, printed, and billed like purchase orders and insertion orders. Dozens of separate media buys can be added for the same station on a broadcast order.
Like insertion orders, broadcast orders are added in two steps: first the header then the media buys. The order's header contains the vendor, date, ad name, flight dates, and description.
To add a broadcast order
1 From the Insertion/Broadcast Orders window choose Edit > Add Broadcast Order.
The Add New Broadcast Order window opens, prompting you to enter the new order’s header information.
2 Press Tab to keep the broadcast order’s order number.
New broadcast orders are numbered automatically based on your preferences, but the number can also be entered manually. The broadcast order number is limited to twelve characters.
3 Enter the broadcast order’s station (i.e., vendor).
The same vendor list is used for purchase, insertion, and broadcast orders. If you don’t know the vendor number, leave it blank then press Tab open the vendor lookup list. Double-click on a vendor to copy its number to your new broadcast order.
4 Enter the order date, commission, flight dates, ad name, and other details about this order.
The commission percentage is copied from the vendor account, but can be changed on a broadcast order without affecting other orders. These fields appear in the heading of the broadcast order. The standard field headings are designed for typical spot buys, but can be customized.
5 Enter the additional instructions and the traffic instructions.
These fields provide space for a long block of text. This text appears in the printed broadcast order.
6 Enter the broadcast order’s job and task.
The broadcast order must have a job and task for accurate cost tracking. When the order’s buys are saved, the job task’s Net PO balance is updated.
7 Enter the media buyer and media rep approval lines.
The approval lines print on the broadcast order with instructions for the media rep.
8 Click Save.
Cloning a Broadcast Order
Broadcast orders can be cloned, like purchase orders. Cloning an existing broadcast order makes an exact duplicate that you can modify then print. Changing the new broadcast order doesn't affect the original broadcast order.
1 Find a broadcast order you wish to clone, then click the clone button.
The Clone Broadcast Order window opens, displaying the details of the cloned broadcast order.
2 Make the necessary changes, then click Save.
Editing a Broadcast Order
Radio, cable, and broadcast television spots ordered on behalf of a client should be tracked with broadcast orders.
Anyone can edit a broadcast order if they have the access privileges to purchase orders. Also, broadcast orders can be edited from any computer running Clients & Profits. Many media buyers can edit orders at the same time. The same general rules for adding, editing, and printing purchase orders apply to insertion orders and broadcast orders.
To edit a broadcast order
1 Click the edit button or choose Edit > Edit Description.
The Edit Broadcast Order window opens.
2 Make any changes, then click Save.
Whenever a broadcast order is changed, you’ll be prompted to save it as a revision. Each change you make can increment the revision counter to show how many times an order has been revised. It’s optional, but appears on the printed broadcast order for easy tracking. Prior revisions aren’t saved. The revision number on an order can also be incremented manually.
Closing a Broadcast Order
There are two ways to close an order. Click the Closed checkbox to close one at a time, or select Edit > Update Order Status to close many at one time. Closing an order will set any remaining balance to zero, which is good to do after the A/P invoice has been applied against it.
Closing an order will also remove it from the Open Orders lookup list and remove it from various reports such as the Open Orders or Over & Under Orders reports. Be aware that closing an order that has not been completely billed will remove any unbilled buys on the order from the list of unbilled orders when generating a media billing.
Adding an Insertion Order
Any kind of ad space ordered on behalf of a client should be tracked with insertion orders. They are essential for accurate job costing. They allow media costs to be committed to a job before the publication’s invoice is posted. You’ll know at any given time how much media space is ordered.
Insertion orders are designed primarily for print space buys, but are completely customizable. The insertion order’s field labels can be easily tailored for outdoor, internet, and other types of media. Insertion orders can be added by users, or created automatically from media estimates or print media plans. Once insertion orders are saved, they can be pre-billed immediately (showing one insertion order by client invoice) or billed in batches on a media invoice. For easy reconciliation, each space buy is updated with the A/R invoice number and the billed amount once the insertion order is invoiced.
When the ad eventually runs, it will be invoiced by the pub. As the pub’s invoice is posted, the insertion order’s balance decreases. The open purchase/insertion order report keeps a running balance of open commitments, showing how much you’ve ordered that hasn’t been invoiced by its pubs. Once the invoice is posted into A/P, an insertion order can’t be changed.
Insertion orders can be approved by authorized users. Once an insertion order has been approved it cannot be changed. Only the user who approved the insertion order can unapprove it.
Insertion orders have separate preferences from purchase orders. The agency name, address, disclaimer, and logo can be different than purchase orders. (This is especially useful for in-house agencies that need to maintain a separate identity from the corporation in order to get agency discounts.) Insertion orders are numbered separately from purchase orders, and have a unique numbering sequence to keep them apart.
The vendor’s rep name, phone, and fax number are copied from the Publication Table when an insertion order is added, but can be edited directly on the insertion order through the Vendor Info window if needed.
Insertion orders can be cloned, like purchase orders. Cloning an existing insertion order makes an exact duplicate that you can modify then print. Changing the new insertion order doesn’t affect the original insertion order.
Anyone can add an insertion order if they have the access privileges to purchase orders. Also, insertion orders can be added from any computer running Clients & Profits. Many users can add IOs at the same time.
To add an insertion order
1 Choose Accounting > Purchase/Insertion Orders.
2 Choose Edit > Add > Insertion Order.
The Add Insertion Order window opens. The new insertion may be numbered automatically (based on your preferences); if so, you’ll see the next number. If not, you can enter your own insertion order number.
The insertion order number can contain any combination of letters, numbers, and symbols. The number is limited to twelve characters.
3 Enter the new insertion order’s vendor number.
Insertion orders are added for one vendor, so a vendor number is required. One vendor can produce many publications so the specific publication name is entered on the Publication field.
If you don’t know the vendor number, leave it blank then press Tab. The vendor lookup list opens, displaying your vendors. Double-click on a vendor to copy its number to your new insertion order.
4 Enter the insertion order’s job and task.
The insertion order must have a job and task for accurate cost tracking. When the insertion order is saved, the media’s cost will update the job task’s Net POs balance.
5 Enter the publication, issue date, ad/caption, and other details.
These fields appear in the body of the printed insertion order. The standard settings are designed for typical print buys, but can be customized (without affecting other insertion orders).
Blanket Insertion Orders
A blanket order is an order that is valid for a specified period of time and authorizes multiple orders during that time period, as long as the total dollars on the insertion order are not exceeded. Blanket insertion orders limit the types of goods or services that can be ordered, and may also limit the order amounts. Most Blanket orders are issued by one department for their own use, but soem Blanket orders cover the entire company.
Because blanket orders generate multiple invoices for various dollar amounts over their life, it is more effective to receive IN DOLLARS with blanket orders. Specific quantities of goods are not specified on the order, so it is impossible to receive a "quantity" of goods or services. You should enter a receipt for the total dollar amount of the invoice you are approving, unless you wish to pay a lesser amount.
Cloning an Insertion Order
Insertion orders can be cloned, like purchase orders. Cloning an existing insertion order makes an exact duplicate that you can modify then print. Changing the new insertion order doesn't affect the original insertion order.
1 Find an insertion order you wish to clone, then click the clone button.
The Clone Insertion Order window opens, displaying the details of the cloned insertion order.
2 Make the necessary changes, then click Save.
Editing an Insertion Order
An insertion order can be edited and reprinted as many times as needed. The edit insertion order lets you change the vendor, order date, and other details. If an insertion order has only one media buy (i.e., line item), everything about the order, including amounts, can be edited. If the insertion has multiple media buys, only the order date, status, and position can be changed here.
To edit an insertion order
1 From the insertion order window, find the insertion order you wish to edit.
2 Click the edit button.
The edit insertion order window opens, displaying the insertion orders details.
3 Make your changes, then click Save.
Closing an Insertion Order
There are two ways to close an order. Click the Closed checkbox to close one at a time, or select Edit > Update Order Status to close many at one time. Closing an order will set any remaining balance to zero, which is good to do after the A/P invoice has been applied against it.
Closing an order will also remove it from the Open Orders lookup list and remove it from various reports such as the Open Orders or Over & Under Orders reports. Be aware that closing an order that has not been completely billed will remove any unbilled buys on the order from the list of unbilled orders when generating a media billing.
Adding an Interactive Order
Interactive Orders are for ads that appear on websites. As the on-line population rapidly grows, so does the placement of ads on the internet.
One advantage it has over traditional advertising is that it enables clients to interact with the advertisement, so with a mouseclick anyone on-line can get more information about a product, subscribe for news and updates, or purchase it right then and there.
Interactive orders are designed primarily for web space buys, but are completely customizable. The Interactive order’s field labels can be easily tailored for internet, and other types of electronic media. Interactive orders can be added by users, or created automatically from media estimates or media plans. Once Interactive orders are saved, they can be pre-billed immediately (showing one Interactive order by client invoice) or billed in batches on a media invoice. For easy reconciliation, each space buy is updated with the A/R invoice number and the billed amount once the Interactive order is invoiced.
When the ad eventually runs, it will be invoiced. As the media invoices are posted for it, the Interactive order’s balance decreases. Once an invoice is posted to a media buy, it can’t be changed.
Interactive orders can be approved by authorized users. Once an Interactive order has been approved it cannot be changed. But with the proper access privileges, the Interactive order can be unapproved.
Interactive orders have separate preferences from purchase orders. The agency name, address, disclaimer, and logo can be different than purchase orders. (This is especially useful for in-house agencies that need to maintain a separate identity from the corporation in order to get agency discounts.) Interactive orders are numbered separately from purchase orders, and have a unique numbering sequence to keep them apart.
The vendor’s rep name, phone, and fax number are copied from the Publication Table when an Interactive order is added, but can be edited directly on the Interactive order through the Vendor Info window if needed.
Interactive orders can be cloned, like purchase orders. Cloning an existing Interactive order makes an exact duplicate that you can modify then print. Changing the new Interactive order doesn’t affect the original Interactive order.
Anyone can add an Interactive order if they have the access privileges to purchase orders. Also, Interactive orders can be added from any computer running Clients & Profits. Many users can add IOs at the same time.
Cloning an Interactive Order
Interactive orders can be cloned, like insertion orders. Cloning an existing Interactive order makes an exact duplicate that you can modify then print. (Changing the new Interactive order doesn't alter the original order.)
1 Find an Interactive order you wish to clone, then click the clone button.
The Clone Interactive Order window opens, displaying the details of the cloned Interactive order.
2 Make the necessary changes, then click Save.
Editing an Interactive Order
An interactive order can be edited and reprinted as many times as needed.
The edit interactive order lets you change the vendor, order date, and other details. If an interactive order has only one media buy (i.e., line item), everything about the order, including amounts, can be edited. If the interactive order has multiple media buys, only the order date, status, and position can be changed here.
To edit an interactive order
1 From the interactive order window, find the one you wish to edit.
2 Click the edit button.
The edit interactive order window opens, displaying its details.
3 Make your changes, then click Save.
Adding an Outdoor Order
Outdoor advertising can reach a lot of people and build a strong identity within a local market. Each board is assigned to a location, which displays it’s message to a percentage of the population. You can project your message on one or numerous boards, to reach a total number of impressions that equal a percentage of the area’s population.
Anyone can add an Outdoor order if they have the access privileges to purchase orders. Also, Outdoor orders can be added from any computer running Clients & Profits. Many users can add Outdoor orders at the same time.
To add an Outdoor order
1 Choose uMedia > Purchase/Insertion/Interactive/Outdoor Orders.
2 Choose Edit > Add > Outdoor Order.
The Add Outdoor Order window opens. The new Outdoor Order may be numbered automatically (based on your preferences); if so, you’ll see the next number. If not, you can enter your own Outdoor order number.
The Outdoor order number can be automatically numbered.
3 Enter the new Outdoor order’s vendor code.
Outdoor orders are added for one vendor, so a vendor number is required. One vendor can produce many types/locations so the specific type/location name is entered on the type/location field.
If you don’t know the vendor number, leave it blank then press Tab. The vendor lookup list opens, displaying your vendors. Double-click on a vendor to copy its number to your new Outdoor order.
4 Enter the Outdoor order’s job and task.
The Outdoor order must have a job and task for accurate cost tracking. When the Outdoor order is saved, the media’s cost will update the job task’s Net POs balance.
5 Enter the size/number, illumination, campaign, and other details.
These fields appear in the body of the printed Outdoor order. The standard settings are designed for typical media buys, but can be customized (without affecting other Outdoor orders).
Cloning an Outdoor Order
Outdoor orders can be cloned, like purchase orders. Cloning an existing Outdoor order makes an exact duplicate that you can modify then print. (Changing the new Outdoor order doesn't alter the original Outdoor order.)
1 Find an Outdoor order you wish to clone, then click the clone button.
The Clone Outdoor Order window opens, displaying the details of the cloned Outdoor order.
2 Make the necessary changes, then click Save.
Editing an Outdoor Order
An outdoor order can be edited and reprinted as many times as needed.
The edit outdoor order lets you change the vendor, order date, and other details. If an outdoor order has only one media buy (i.e., line item), everything about the order, including amounts, can be edited. If the Outdoor order has multiple media buys, only the order date, status, and position can be changed here.
To edit an Outdoor order
1 From the Outdoor order window, find the one you wish to edit.
2 Click the edit button.
The edit Outdoor order window opens, displaying its details.
3 Make your changes, then click Save.
Adding a Media Buy
The media estimate is incomplete without media buys. The buys indicate exactly which ads are running on each publication. A single media estimate can contain media buys for many different publications, or many buys for the same publication.
Each media buy features descriptive fields that are defined by the media estimate (the standard fields are publication, issue date, close date, ad number/caption, ad size, and gross cost).
Media buys on estimates use the Publications table, so you don't need to re-enter the publication name. However, you can also enter new or one-time publications that aren't in the Publication list. Buys on media estimates do not use the ad sizes lookup table; you'll need to enter the gross amount, close date, and space closing date by yourself on each buy.
You can add, change, and remove media buys at any time; just like tasks can be added, edited, and removed from jobs. Once you've added all of the estimate's planned buys, it can be printed for the client's approval.
To add buys to a media estimate
1 From the Media Estimates window, click the add buy button.
The Add Buys to Media Estimate window opens, listing the estimate's existing media buys. Additional media buys are added one-at-a-time.
2 Enter the publication code.
You can use the Publication lookup list or enter any publication code (which may be the same as the name). To open the lookup list, leave the publication field empty then press Tab. The Publication lookup window opens, listing your publications. Double-clicking on a publication will enter it onto this media buy. If the publication is new, a one-time pub, or not on the Publication lookup list, simply enter its name here.
3 Enter the buy's issue date.
The issue date appears on the printed media estimate, insertion order, and the client's media invoice. The issue date field can contain any kind of information.
4 Enter the ad's close date.
The close date also appears on the printed media estimate and insertion order.
5 Enter the ad number/caption.
The ad number/caption identifies the advertisement on the insertion order. It is used as a reference by the publication, and can be the code or name the client uses to track the ad's results. The ad caption is usually some version of its headline.
The ad number/caption is entirely user-defined, so you can enter anything here.
6 Enter the materials due date.
7 Enter the ad size.
Ad size describes the ad's dimensions. This field is user-defined, so you can enter the ad's mechanical size, the publication unit of measure, or some other kind of description here.
The ad size appears on the printed media estimate, insertion order, and the client's media invoice.
8 Click on the Notecard button to enter the buy's position.
The pop-up Notecard window contains space to describe the ad's position, specifications, or special instructions; anything you want to appear on the insertion order. These notes are optional, and can be left blank.
These notes can also be easily edited later by double-clicking on the media buy.
9 Enter the ad's gross cost.
The gross cost is the amount the client will eventually pay for the ad, including your media commission. It appears on the printed insertion order and client media invoice. Since the media estimate isn't linked to the Publication/Ad Size table, the ad's gross amount isn't entered automatically. Tabbing past the gross amount field saves the media buy. Note: The buy isn't saved unless you press Tab here or you can also click Save to add this new media buy.
10 Enter the period, then press Tab.
The period indicates during which month the ad will run.
11 Repeat these steps to add additional media buys to this estimate, then click Save.
Once the media buy is saved, you can enter additional buys one after another.
Removing an un-billed media buy
1 From the Interactive Order window, select the media buy you wish to remove by clicking once to highlight it.
2 Once the media buy is selected, click the remove buy button.
3 An alert appears, asking you to confirm the removal of the media buy.
Pre-billing Media
The pre-bill function lets you bill selected media buys from a broadcast or insertion order immediately after the order is saved.
This lets you bill the client prior to the ads actually running so that you get paid closer to when the media invoice from the publication or station is due. The Pre-bill window will only bill the media buy line items you’ve selected (i.e., highlighted) from the Broadcast/Insertion Order window. This means you can pre-bill an entire media order by selecting all of its line items, or pre-bill a single media buy.
Any print insertion or broadcast order can be pre-billed. Pre-billing automatically creates an invoice for the media order’s gross (i.e., billable) amounts. The “pre-billing” invoice shows the media order’s job and task, just as if you’d added it yourself in Accounts Receivable.
The pre-billing invoice is unposted, so can be proofed, posted, then printed with other invoices. Pre-billing makes it easy to bill your clients for large commitments, such as postage, printing, and media buys, then (hopefully) receive payment before the vendor’s invoice is due.
To pre-bill a media order
1 Find the insertion or broadcast order you wish to pre-bill and select (i.e., highlight) the media buys you wish to pre-bill.
2 Click the pre-Bill button (or choose Edit > Pre-bill).
3 Select the pre-bill options.
The show totals only option combines all of the media order’s amounts together, so that the invoice shows only one billing amount. The show item-by-item detail creates a separate billing amount for every line item on the media order. Which one to choose? Pick the option that the client is least likely to question.
The media order’s billing can be added to an existing invoice by entering its invoice number. Use this option to combine several pre-billed media orders together onto one invoice. The invoice must be an unposted, pre-billing invoice to have amounts appended to it.
4 Enter the pre-bill invoice’s client number.
This option bills the purchase order to a different client, such as a corporate office.
5 Click Save.
Adding a make good
Make goods are compensation for ads that either never ran or ran incorrectly. There are many different ways a print ad or radio/tv spot can be compromised, providing less value for your client.
For example, you ordered for a guaranteed position in a magazine, but the ad actually ran in a different, less desirable place. Or, you placed a radio spot to air during a certain show, but the ad ran during a different program. In these situations, the publication or station will either offer to run the ad or spot again, credit the entire amount of the ad’s cost, or issue a partial credit.
Make goods need to be added to the original insertion order or broadcast order so that the shop’s job costing is accurate. If make goods aren’t entered as they happen, your job costs won’t match up with your commitments.
It’s the media buyer’s responsibility to match the station’s affidavits or the publication’s tear sheets to verify that the ads or spots that actually ran match what the shop ordered. Any discrepancies needs to be noted on the client’s broadcast or insertion orders by adding make goods.
Make goods are simply additional media buys appended to an insertion order or broadcast order after the ads or spots have been run. They’re functionally no different from an order’s regular media buys -- each make good line item includes details about the dates, times, programs, etc. of the affected print ad or radio/tv spot. Make goods will have a negative cost amount if the station/publication is offering a credit; otherwise, free make good ads will have a no cost at all.
When make goods are added, they update the job’s commitment totals just like the original order. They appear on media reports just like other media buys. When the station or publication media invoice is added into Accounts Payable, they are reconciled along with the order’s original media buys.
To add a make good for a broadcast order
1 From the Broadcast Order window, find the broadcast order that needs the make good.
2 Click once to highlight the media buy wasn’t run or run incorrectly.
3 Click the add Make Good button or choose Edit > Add Make Good.
The Add Make Good window opens, prompting you to enter the make good’s details. The media buy’s details are copied to the make good line item except for the date, time, and program.
4 Enter the dates, days, time, and program for which this make good spot will run.
The dates, days, etc. is based the compensation negotiated with the station.
5 Enter the rate, spots, amounts, and other details for this make good, then click Save.
To add a make good for an insertion order
1 Find the insertion order that needs the make good.
2 Click once to highlight the media buy wasn’t run or run incorrectly, then click the add Make Good button or choose Edit > Add Make Good.
3 Enter the issue date, ad caption, and ad size for which this make good ad will run, based the compensation negotiated with the publication.
4 Enter the space close and materials due dates for this make good, then click Save.
Emailing media orders
For clients or shops that like to have insertion orders e-mailed to them, Clients & Profits allows you to email a change order as a PDF file. As with any window in Clients & Profits, selecting E-Mail as your print destination, then clicking the Print Order button will bring up the Send E-Mail window.
1 Choose File > Print Destination > E-Mail
2 In the Insertion Orders window, click the Print Order button.
The Send E-Mail window opens, prompting you to enter details for the email, including the subject, body, and recipients.
Clients & Profits will automatically save a PDF of the insertion order to your hard drive unless you select the "Delete PDFs after sending" checkbox.
3 Make your necessary changes then click Send, and your email (and PDF) will be on it's way to the client.

© 2024 Clients & Profits, Inc.