
Accounts Payable
Everything you buy from a vendor on account, whether for a job or for the shop, is an accounts payable entry. These purchases, which are usually recorded from vendor invoices, are added into Accounts Payable.
Click these buttons to add, clone, edit, or delete A/P invoices. For instructions on how to add, clone, or edit invoices, follow the step-by-step instructions below.
Posting a vendor invoice updates job tickets, job tasks, the vendor account, and the General Ledger. When invoices are added, they are unposted. Unposted invoices can be easily changed, letting you edit cost amounts before the account balances are updated.
Up to a year’s worth of overhead invoices can be entered as recurring payables for vendors. Any overhead expense invoice can be scheduled as a recurring payable. They look just like any other overhead expense invoice when created.
Click this button to save all recurring payables.
To print A/P reports, click the Print Reports button.
Invoices can be found by invoice number, or by simply searching for the last added invoice. To browse through all invoices, click the back and forward buttons. If you know the number of the invoice you're looking for, enter the invoice number then click the magnifying glass icon.
The vendor diary does not keep an automatic log of every vendor activity. That would create an immense number of entries. Instead, the vendor diary is used like a daily log. Anyone who works with one vendor account can make notes about phone calls, meetings, etc.
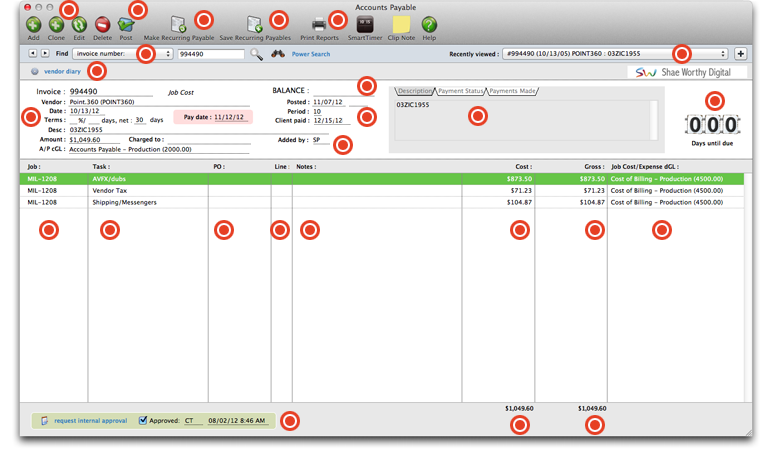
The A/P invoice number, vendor name, date, terms, description, amount, A/P cGL, and pay date are listed here.
The balance due on the invoice, if any, will be listed here.
The date the A/P invoice was posted, the period it was posted in, and the date that the client paid the invoice will appear here.
These are the initials of the person who added the A/P invoice.
Click on these tabs to see the invoice's description, the payment status, and the payments that the client has made on this invoice.
To see a list of the invoices that have been recently viewed, use this pull-down menu to browse through the list.
The days until due counter will show how many days remain until this invoice is due to be paid. If the numbers appear in red, this is the number of days the invoice is past due.
The job number included on this invoice will appear here. If you need to edit or delete the job from the invoice, click on the job in the list, and click the edit or delete button.
The task associated with the job on this invoice will be listed here.
The PO # associated with this job/task appears here.
The line number appears in this column.
Any optional notes associated with this job/task will appear here.
The cost of the job task appears in this column.
The gross cost of the job task appears in this column.
The debit general ledger job cost/expense code and description appears in this column. This cannot be changed when editing this line item.
If this A/P invoice has been internally approved, the approved checkbox will be selected and the approving person's initials will appear here along with the date and time that the A/P invoice was approved.
The total cost of all line items on this A/P invoice will appear at the bottom of the window. If the total amount is less than $0, the total will appear in red.
The total gross of all line items on this A/P invoice will appear at the bottom of the window. If the total gross amount is less than $0, the total will appear in red.
Adding New Invoices
Vendor invoices are added into Accounts Payable as they are received.
Adding invoices is a relatively easy process, since you’ll be entering information right from the
invoice. An invoice can have one or many invoice line items. Each line item is a separate job cost,
and contains a job number, task, net amount, and gross amount. Invoice line items can also account for
overhead expenses, such as office supplies, but don’t get a job number. An invoice can contain any
combination of billable job costs and unbillable expenses.
To add a new vendor invoice
1 From the Accounts Payable window, click on the Add button. You will be prompted to
choose which invoice you wish to add.
Click on an invoice type in the screenshot below for more information
on each type of vendor
invoice.
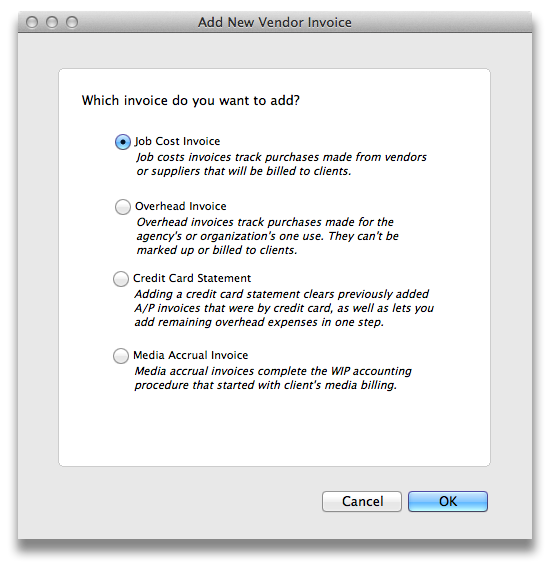
To bypass this option, simply choose Edit > Add New Invoice and choose the type of invoice you wish to
add.
If you don't know which PO line item to use, delete the line number then press tab. The Lookup PO
Lines window opens, listing the amounts from the purchase order. You'll see the job number, task,
description, and cost amount for each line item. Double-clicking on a line item copies it onto the A/P
invoice automatically.
If you write purchase orders, A/P invoices can reconcile your commitments automatically as they’re
added. When you enter the invoice’s PO number and line number, details from the purchase order --
vendor, terms, job, task, and amount -- are copied to the invoice. The line number is important, since
it matches up the right PO line item with the vendor’s invoice. This saves time, plus makes your job
costing more accurate. Also, you’ll see at a glance if the vendor is billing you for more than you
authorized on the purchase order. Insertion orders are handled like purchase orders.
Cloning A/P Invoices
Cloning duplicates an existing accounts payable invoice creating a new invoice. The
cloned invoice has all of the descriptions, instructions, options, and line items of the original.
Cloning is especially useful when you're purchasing the same kind of products or services routinely.
Since cloning copies an invoice completely, you'll spend much less time keying in the details.
Any job cost or overhead invoice can be cloned. The cloned invoice has the same vendor, but it can be
changed. In fact, anything about the cloned invoice can be changed. The cloned invoice gets its own
unique invoice number.
Cloning an accounts payable invoice is simple: First, find the invoice you wish to copy. Choose Clone
from the Edit menu, enter any changes, then save the new invoice. The original invoice's line items
will be copied, too, but they can be changed. The original accounts payable invoice is unaffected by
cloning. An invoice can be cloned any number of times.
The Clone window closely resembles the Add Job Cost Invoice or Add Overhead Invoice window (depending
on which type of invoice you are cloning). Information from the original invoice, including the
vendor, description, and amounts is copied automatically from the original invoice. Changing the new
invoice doesn't affect the original invoice.
Editing Invoices
Vendor invoices in Accounts Payable can be edited once they've been saved
Invoices are easily edited before they are posted, since they haven't updated the vendor, job, or
General Ledger yet. But once an invoice is posted, changes are limited to descriptions and notes,
unless you unpost it.
You can change an unposted invoice's number, date, accounting period, credit G/L number, and
description. If an invoice has a single amount, you can edit an invoice’s amount. If an invoice has
many line items (to many jobs and tasks), the invoice amount can't be changed. This prevents
accidental out-of-balance entries. However, an invoice’s line items can be redistributed by selecting
Redistribute from the Edit menu. Redistributing allows you to edit any existing line item’s job, task,
or amount, or add new line items, as long as the invoice’s total doesn’t change.
If an invoice is unposted, you can edit a line item's job, task markup, billable amount, debit G/L
number.
To edit a vendor invoice
1 From the Accounts Payable window, find the invoice.
2 Click the Edit button (or choose Edit > Edit).
The Edit Invoice window opens, showing the invoice's details.
Did the client pay? When a client pays their A/R invoice, the invoice’s costs are updated. Each job
cost billed on the invoice will show when the client made the payment. This helps you pay only A/P
invoices that have been billed and paid by the client.
You can edit an invoice’s date, accounting period, credit G/L account, number, and amount until it is
posted. Once the invoice is posted, only its description can be changed. The invoice’s PO number and
vendor can’t be changed.
3 Make your changes, then click Save.
You can change an invoice’s amount if it has only one line item. Changing its amount also changes the
line item’s cost, but not gross amount, automatically. Posting makes these changes permanent. The
invoice can be changed anytime before it is posted.
Distributing Job Costs
Vendor invoices can contain many line items. Each line item is a separate cost entry
on job cost reports, and creates a debit journal entry in the General Ledger. Every line item can have
a job number, task, net amount, billable amount, and a debit G/L account number.
The A/P Job Costing window lets you enter many jobs, tasks, and amounts for one invoice. These line
items, called the invoice distribution, can be changed, added to, or deleted any time before the
invoice is posted. Once an invoice is posted, its amounts can’t be changed, unless you unpost it. When
adding an invoice, the option to distribute this invoice to many jobs and tasks opens the A/P job
costing window when the invoice is saved. Once the invoice is saved, it can be redistributed by
choosing Redistribute from the Edit menu.
There are three important amounts on each line item: net cost, markup, and gross amount. The net cost
amount is what this work cost the shop, before markups, fees, or commissions. (Clients don’t see the
net cost amount, only the gross amount.) The markup is copied from the vendor account first, then the
job task (if it has one). Enter the markup as a number (17.65, not .1765). The typical agency markup
is 17.65%, which earns a 15% commission. It is user-defined, so you can use any markup. Changing it
doesn’t change the markup percentage in the vendor account or the job task. The gross amount is what
the client will later be charged, including markups, fees, and commissions. It is calculated
automatically from the commissionable net and the markup percentage. The billable amount can be
changed to a higher (or lower) amount, as needed.
To distribute an invoice to many jobs and tasks
1 From the Accounts Payable window, find an invoice.
2 Click the redistribute button.
The Redistribute Job Costs window opens.
The Redistribute Job Costs window opens, prompting you to distribute this invoice’s costs. For each
distribution line item you’ll enter a purchase order number, job number, task, net cost (which the
agency pays), markup (i.e., your commission), gross amount (what the client pays), and a job cost G/L
number. An invoice can be distributed to dozens of jobs and tasks.
3 Enter the first cost’s purchase order and line number, if applicable.
If this cost didn’t have a purchase order, leave these fields blank. If you aren’t sure about a
purchase order number, click the Lookup button. A lookup window listing the vendor’s open POs appears.
Double-clicking on a purchase order copies its information to the Job Costing window.
4 Enter the first job number, task, net cost, markup, and gross amount.
The net cost is the amount the agency will pay. It is what this work cost the shop, before markups,
fees, or commissions. As a shortcut, click the % button to distribute a percentage of the invoice’s
total to this job and task.
Enter the markup as a percentage (i.e., 17.65, not .1765). You can use any markup percentage. The
gross amount is calculated automatically as the net cost times the markup percentage. The billable
amount can be changed to a higher (or lower) amount, as needed.
To make this invoice line item unbillable, enter the gross amount as zero. The invoice’s cost amount
will update the job task, but it will not have an amount to bill the client. Also, if the job task is
unbillable, the billable amount will be zero -- and can’t be changed.
If the invoice needs to be allocated to both jobs and overhead, use job “NONE” for the overhead
expenses.
5 Enter the line item’s debit G/L account.
The debit G/L (i.e., dGL) is a job cost or expense account. It is copied from the job task, but can be
changed.
To enter a description of this cost, click on the Notecard icon. This brief description explains what
was purchased on this line item. It appears on job cost, accounting, and G/L reports. Use the
description to document what you buy on behalf of clients.
6 Repeat these steps to distribute more cost amounts on this invoice.
You can enter dozens of jobs and tasks onto an invoice’s distribution. The cost amounts on the line
items are totaled, and must equal the invoice’s net amount. If the line item cost doesn’t equal the
invoice cost, then the distribution cannot be saved. Once the invoice is saved, it can be proofed,
changed, or deleted anytime before it is posted. The invoice doesn’t update vendors, jobs, or the
General Ledger until posting. Posting creates journal entries and increases the vendor’s balance.
Unposted invoices don’t appear on job, cost, or accounting reports.
7 When you are finished, click Save.
To print a selected invoice
The A/P window now has a "print window" command that allows you to print a hard-copy of any selected invoice. Choose File > Print Window to print your selected invoice.
Printing a list of vendor invoices
Posting a vendor invoice updates job tickets, job tasks, the vendor account, and the
General Ledger
When invoices are added, they are unposted. Unposted invoices can be easily changed, letting you edit
cost amounts before the account balances are updated. Posting is a methodical process that updates
vendors, jobs and tasks, and the General Ledger. The process is the same whether you’re posting one
invoice or many invoices.
Unposted invoices don’t appear on job, accounts payable, or financial reports. This offers users an
opportunity to proof the work before posting. (Once an invoice is posted, the cost amounts, vendor
account, and credit and debit accounts can’t be changed.)
Invoices must be posted. They can be posted individually, as needed, or, invoices can be posted in
batches. Invoices should be proofed before they are posted. Proofing lets you check your invoices for
errors, then make changes. Proofing lets you avoid making time-consuming fixes to posted invoices.
Invoices should be posted regularly, even daily. Daily posting ensures that your job, accounts
payable, and vendor reports are timely and accurate. You can post invoices while others are using
Clients & Profits; however, other users may notice slower performance and possibly temporary padlocks.
If you’re batch posting many invoices, it’s best to wait until the system is relatively inactive --
this makes posting faster.
If an invoice is posted and needs to be changed, it can be “unposted.” Unposting, obviously, reverses
posting: job cost and vendor balances decrease, and reversing journal entries are posted into the
General Ledger. Once unposted, an invoice can be changed or deleted -- or posted again. Invoices can’t
be unposted if they’ve been paid or if their accounting period is locked.
Unposting invoices is a user-defined setting in Access Privileges. This means certain users can be
allowed to unpost invoices, while other users can’t.
What does posting do?
Posting is a methodical process that updates vendors, jobs and tasks, and the General Ledger. The
process is the same whether you’re posting one invoice or many invoices. Debits (i.e., line item cost
amounts) are posted first, followed by the credits (i.e., the invoice itself). Here’s what happens
during posting:
For job costs: Each cost amount is posted to a job task, increasing its cost total. The job task’s
unbilled total increases by the billable, or gross, amount. A journal entry for the cost amount is
created in the General Ledger, debiting a job cost account (or whatever account you choose). If the
job ticket was closed, it is automatically re-opened -- getting the reopened job status.
For overhead expenses: A journal entry for each cost amount is created in the General Ledger, debiting
an overhead account (or whatever account you choose).
For media accruals: A journal entry for each cost amount is created in the General Ledger, debiting a
media cost account (or whatever account you choose). The invoice’s total is credited to Accounts
Payable. Then reversing are posted to the media WIP account to reconcile the media’s pre-billing.
To proof your work
Invoices should be proofed before they are posted. Proofing lets you check your invoices for errors
and oversights, then make the appropriate changes before posting makes them permanent (of course,
there’s always unposting if an error is discovered later). There are several ways to proof your work:
Review the unposted invoices you’ve added: The proof list can display all of the invoices you’ve
added, shows each invoice’s jobs, tasks, amounts, and cost G/L numbers.
Review all unposted invoices: The proof list shows all unposted invoices, regardless of who entered
them. A separate page prints for each user’s invoices, making the proof list easy to distribute
amongst different accounting department members.
To print a proof list
1 From the Accounts Payable window, choose File > Post.
The Post Accounts Payable window opens, prompting you to choose your proofing/posting options. The
print proof list first option is always chosen by default.
2 Enter your proof list options, then click Proof.
You can proof just the invoices you added by checking the proof/post only invoices added by option
then entering your initials. You can print proof lists for a specific person’s invoices by checking
this option then entering their initials. Otherwise, all unposted invoices will be printed on the
proof list.
You can also limit the proof list to only show invoices added in a particular accounting period by
checking the batch post only invoices for period option then entering a period number. Any period can
be selected. This option and the proof/post invoices added by option can be used together.
The proof list can be printed to the printer automatically by checking the always print proof lists to
the printer option in Accounting preferences. Use this option when your company requires a hard-copy
printout of proof lists to be filed every time.
To post one invoice
1 From the Accounts Payable window, find an unposted invoice.
2 Choose File > Post.
3 Select the Post AP# option.
The currently-displayed invoice is automatically selected for posting.
4 Click Post.
To post all unposted invoices
1 Choose File > Post.
2 Click on the post all unposted invoices option.
3 Click Post.
If you have many invoices to post, the posting process may take several minutes. A progress bar shows
which invoice is currently being posted.
If a batch posting is canceled (due to a system crash, power failure, etc.) immediately batch post the
invoices again; posting will pick up where it left off.
To post only the invoices you’ve added
1 Choose File > Post.
2 Click on the Post All Unposted Invoices option.
3 Select the proof/post only invoices added by option, then enter your initials.
4 Click Post.
This option posts only the invoices that you’ve added. The batch post only entries added for period
option posts only invoices that have the same accounting period. This option lets you post invoices
from last month, for example, skipping new invoices added this month.
To unpost an invoice
Invoices can be unposted (i.e., reversed) once they’ve been posted. The unposting procedure is simple,
but it is only available under certain conditions: The invoice must not be paid; the invoice must be
part of the current fiscal year; and the invoice’s accounting period must not be locked.
1 Find the invoice you wish to unpost.
2 Choose File > Post.
3 Click on the Unpost AP# option.
4 Click Unpost.
Unposting creates reversing debit and credit entries in the General Ledger. These journal entries have
today’s date, but contain the same reference number, period, and amounts as the original entries. The
vendor’s account balance is reduced by the invoice’s amount, and the invoice’s cost amounts are
removed from jobs and tasks.
Unposting invoices is a user-defined setting in Access Privileges, so you can control which users have
the ability to unpost. Once an invoice is unposted, it can be edited, deleted, or otherwise changed
just like any other newly-added invoice. Once you’ve made any needed changes, it can be proofed and
posted.
To remove an amount from an invoice
1 From the Accounts Payable window, find an invoice.
2 Select the line item you wish to remove by clicking on it once to highlight it.
3 Click the remove amount button.
To view a vendor's diary
The vendor diary does not keep an automatic log of every vendor activity. That would
create an immense number of entries. Instead, the vendor diary is used like a daily log. Anyone who
works with one vendor account can make notes about phone calls, meetings, etc.
These entries are intended to help accounting people to manage vendor accounts and to track payables
and payments.
Each vendor diary entry includes the date and time it was added, as well as the initials of the staff
member who added it. The entry’s subject and description are user-defined. Vendor diary entries can be
useful for tracking problems, such as overdue invoices, credits pending, etc... Since each entry has a
“resolved” checkbox, the Vendor Diary window clearly shows at-a-glance which entries are still
pending. Once the vendor’s issue is closed, anyone can mark the entry as “resolved.”
To view a vendor’s diary
1 From the Accounts Payable window, click on the Vendor Diary link.
The vendor diary does not keep an automatic log of all changes or activity for the vendor, instead
meetings and events for this vendor are manually added to the diary. Staff members can be notified of
the event by e-mail sent directly from the vendor diary.
Vendor diary entries are part of the C&P e-mail system, and will automatically notify users at the
right time (either when a diary entry is added or when a scheduled entry is due.) Like other e-mail
messages, vendor diary entries can be e-mailed to any staff member. In addition, copies of the
messages can be forwarded to two other addresses. When a scheduled entry is mailed, Clients & Profits
marks the entry as “sent.”
To add a vendor diary entry
1 From the Vendor Diary window, click the add button.
2 Enter the date, subject, and description of the event or meeting. Vendor diary
entries can be scheduled for some time in the future. These entries work like a “tickler” file,
reminding people in accounting about ongoing issues with a vendor.
3 Select a staff member from the Notify pop-up menu to send an e-mail message with
the diary entry as the body of the message.
Additional staff members or someone outside the company can also be notified by typing in their e-mail
address in the cc: or bcc: fields.
4 Click Save.
Vendor diary entries can also be added from the Accounts Payable and Checkbook window. This lets users
make quick, easy notes about a vendor when payables or checks are added.
To print a vendor’s diary
1 From the Vendor Diary window, click the print button.
To view an invoice's payments
The dates on which Accounts Payable invoices are paid are updated automatically from
posted checks. You can see the check number and check date on the invoice by using the View Payments
command.
To view an invoice’s payments
1 Choose Accounting > Accounts Payable and find a vendor.
2 Click on the job you wish to view payments for.
3 Click on the payments link (or choose File > View Payments).
The Vendor Payments window opens.
Unposted invoices have no payment information. And payments don't appear on invoices until they are
posted in the Checkbook.
Posting an A/P invoice
Posting a vendor invoice updates job tickets, job tasks, the vendor account, and the
General Ledger
When invoices are added, they are unposted. Unposted invoices can be easily changed, letting you edit
cost amounts before the account balances are updated. Posting is a methodical process that updates
vendors, jobs and tasks, and the General Ledger. The process is the same whether you’re posting one
invoice or many invoices.
Unposted invoices don’t appear on job, accounts payable, or financial reports. This offers users an
opportunity to proof the work before posting. (Once an invoice is posted, the cost amounts, vendor
account, and credit and debit accounts can’t be changed.)
Invoices must be posted. They can be posted individually, as needed, or, invoices can be posted in
batches. Invoices should be proofed before they are posted. Proofing lets you check your invoices for
errors, then make changes. Proofing lets you avoid making time-consuming fixes to posted invoices.
Invoices should be posted regularly, even daily. Daily posting ensures that your job, accounts
payable, and vendor reports are timely and accurate. You can post invoices while others are using
Clients & Profits X; however, other users may notice slower performance and possibly temporary
padlocks. If you’re batch posting many invoices, it’s best to wait until the system is relatively
inactive -- this makes posting faster.
If an invoice is posted and needs to be changed, it can be “unposted.” Unposting, obviously, reverses
posting: job cost and vendor balances decrease, and reversing journal entries are posted into the
General Ledger. Once unposted, an invoice can be changed or deleted -- or posted again. Invoices can’t
be unposted if they’ve been paid or if their accounting period is locked.
Unposting invoices is a user-defined setting in Access Privileges. This means certain users can be
allowed to unpost invoices, while other users can’t.
What does posting do?
Posting is a methodical process that updates vendors, jobs and tasks, and the General Ledger. The
process is the same whether you’re posting one invoice or many invoices. Debits (i.e., line item cost
amounts) are posted first, followed by the credits (i.e., the invoice itself). Here’s what happens
during posting:
For job costs: Each cost amount is posted to a job task, increasing its cost total. The job task’s
unbilled total increases by the billable, or gross, amount. A journal entry for the cost amount is
created in the General Ledger, debiting a job cost account (or whatever account you choose). If the
job ticket was closed, it is automatically re-opened -- getting the reopened job status.
For overhead expenses: A journal entry for each cost amount is created in the General Ledger, debiting
an overhead account (or whatever account you choose).
For media accruals: A journal entry for each cost amount is created in the General Ledger, debiting a
media cost account (or whatever account you choose). The invoice’s total is credited to Accounts
Payable. Then reversing are posted to the media WIP account to reconcile the media’s pre-billing.
To proof your work
Invoices should be proofed before they are posted. Proofing lets you check your invoices for errors
and oversights, then make the appropriate changes before posting makes them permanent (of course,
there’s always unposting if an error is discovered later). There are several ways to proof your work:
Review the unposted invoices you’ve added: The proof list can display all of the invoices you’ve
added, shows each invoice’s jobs, tasks, amounts, and cost G/L numbers.
Review all unposted invoices: The proof list shows all unposted invoices, regardless of who entered
them. A separate page prints for each user’s invoices, making the proof list easy to distribute
amongst different accounting department members.
To print a proof list
1 From the Accounts Payable window, choose File > Post.
The Post Accounts Payable window opens, prompting you to choose your proofing/posting options. The
print proof list first option is always chosen by default.
2 Enter your proof list options, then click Proof.
You can proof just the invoices you added by checking the proof/post only invoices added by option
then entering your initials. You can print proof lists for a specific person’s invoices by checking
this option then entering their initials. Otherwise, all unposted invoices will be printed on the
proof list.
You can also limit the proof list to only show invoices added in a particular accounting period by
checking the batch post only invoices for period option then entering a period number. Any period can
be selected. This option and the proof/post invoices added by option can be used together.
The proof list can be printed to the printer automatically by checking the always print proof lists to
the printer option in Accounting preferences. Use this option when your company requires a hard-copy
printout of proof lists to be filed every time.
To post one invoice
1 From the Accounts Payable window, find an unposted invoice.
2 Choose File > Post.
3 Select the Post AP# option.
The currently-displayed invoice is automatically selected for posting.
4 Click Post.
To post all unposted invoices
1 Choose File > Post.
2 Click on the post all unposted invoices option.
3 Click Post.
If you have many invoices to post, the posting process may take several minutes. A progress bar shows
which invoice is currently being posted.
If a batch posting is canceled (due to a system crash, power failure, etc.) immediately batch post the
invoices again; posting will pick up where it left off.
To post only the invoices you’ve added
1 Choose File > Post.
2 Click on the Post All Unposted Invoices option.
3 Select the proof/post only invoices added by option, then enter
your initials.
4 Click Post.
This option posts only the invoices that you’ve added. The batch post only entries added for period
option posts only invoices that have the same accounting period. This option lets you post invoices
from last month, for example, skipping new invoices added this month.
To unpost an invoice
Invoices can be unposted (i.e., reversed) once they’ve been posted. The unposting procedure is simple,
but it is only available under certain conditions: The invoice must not be paid; the invoice must be
part of the current fiscal year; and the invoice’s accounting period must not be locked.
1 Find the invoice you wish to unpost.
2 Choose File > Post.
3 Click on the Unpost AP# option.
4 Click Unpost.
Unposting creates reversing debit and credit entries in the General Ledger. These journal entries have
today’s date, but contain the same reference number, period, and amounts as the original entries. The
vendor’s account balance is reduced by the invoice’s amount, and the invoice’s cost amounts are
removed from jobs and tasks.
Unposting invoices is a user-defined setting in Access Privileges, so you can control which users have
the ability to unpost. Once an invoice is unposted, it can be edited, deleted, or otherwise changed
just like any other newly-added invoice. Once you’ve made any needed changes, it can be proofed and
posted.
Making a recurring payable
Any overhead A/P invoice can be set up to be automatically added on a recurring
schedule.
This is useful for rent, insurance, or equipment lease payments that are paid monthly or quarterly.
The schedule of payments is set in increments of days.
To add a recurring payable
1 Find the overhead invoice you wish to repeat.
2 Click the Make Recurring Payable button (or choose Edit > A/P
Tools > Make Recurring Entry).
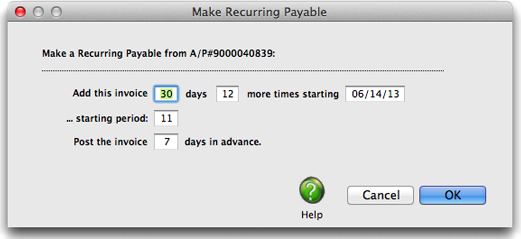
The Repeat Recurring Payable dialog box opens, prompting you to schedule the recurring payables.
Repeating payables. Any overhead payable can be automatically repeated for the upcoming year. These
recurring payables are entered as unposted invoices on their scheduled date, then are proofed and
posted like regular invoices.
3 Enter the number of days (e.g., 30 days would be once a month)
between which the invoice should be repeated.
4 Enter the number of times more this invoice should be repeated.
5 Enter the starting date and period that the recurring schedule
should begin.
6 Enter when the recurring payable should be posted.
7 Click OK.
Recurring payables can appear on proof lists. Whenever the Accounts Payable window is opened, Clients
& Profits checks for the day’s scheduled recurring payables. If found, the user is prompted to convert
them to regular invoices. Once converted, these invoices are like any other and can proofed and
posted.
Saving an A/P invoice as a PDF
For clients or shops that like to have their invoices e-mailed to them, Adobe
Acrobat allows you to save an invoice as a PDF file on your hard drive, your shop's file server, or
the client's web server. Creating PDF files from Clients & Profits is nearly as easy as printing on
paper, and involves only a few extra steps. The hardest thing about creating PDF files is choosing a
name, since each estimate you save will have its own unique file name (such as, JOB101EST.PDF).
1 Choose File > Print Destination > PDF.
2 From the A/P window, click the Print button.
The Print A/P Invoice window opens, prompting you to enter the job number you wish to print the
invoice for, as well as amounts, etc.
3 Click Print.
4 A dialog will appear, asking you to name and save the PDF file to
your hard drive. After you have finished, click save.
"Hands down, this Clients & Profits Helpdesk is the best of any support team." -- Kate Mistler, Fabiano Communications

© 2026 Clients & Profits, Inc.