
Billings/Accounts Receivable
Everything you do for a client is billed by adding an invoice into Accounts Receivable. Clients can be billed for anything you do -- whether you’re billing an estimate, an advance, a retainer, a service charge, or a job’s final costs.
Clients & Profits provides an innovative feature that can dramatically simplify your billing, called auto-billing, Auto-billing creates invoices automatically for all of your unbilled jobs.
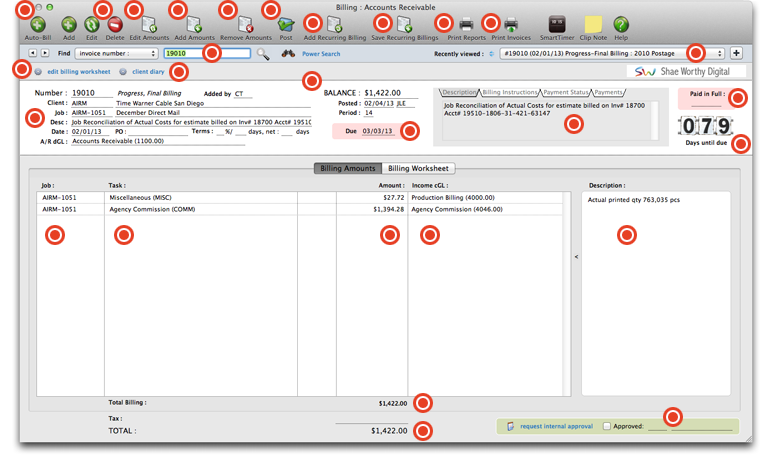
Click these buttons to add, edit, or delete invoices. Step-by-step instructions on adding and editing invoices can be found below.
Billing line items contain the real details about an invoice. Almost everything about an invoice line item can be changed until the invoice is posted. Step-by-step instructions can be found below.
Each billing amount makes a separate journal entry in the General Ledger. Each line item credits an income account, such as Creative Fees, based on the job task’s cGL. For instructions on adding line items, see below.
Removing a billing amount is permanent. Line items can be removed only from unposted invoices. Once removed, however, the same task can be added again, if needed. Invoices need billing amounts just like job tickets needs tasks.
Posting a client invoice updates job tickets, job tasks, the client account, and the General Ledger. When invoices are added, they are unposted. Posting is a methodical process that updates clients, jobs and tasks, and the G/L.
Job billing for routine monthly charges like retainers, web hosting, account management fees, and more can be scheduled then automatically added into Accounts Receivable as unposted invoices. Recurring billings can be a real time saver.
Click this button to save recurring billings.
To print A/R reports, click this button.
Click this button to print the currently selected invoice.
To see recently viewed invoices, use this drop-down menu. C&P will bookmark the last 15 recently viewed invoices, making it easier for you to access invoices without having to search.
To find an invoice, enter the invoice number then click the magnifying glass. If you do not know the invoice number, click the power search link to find A/R invoices by client, job, etc.
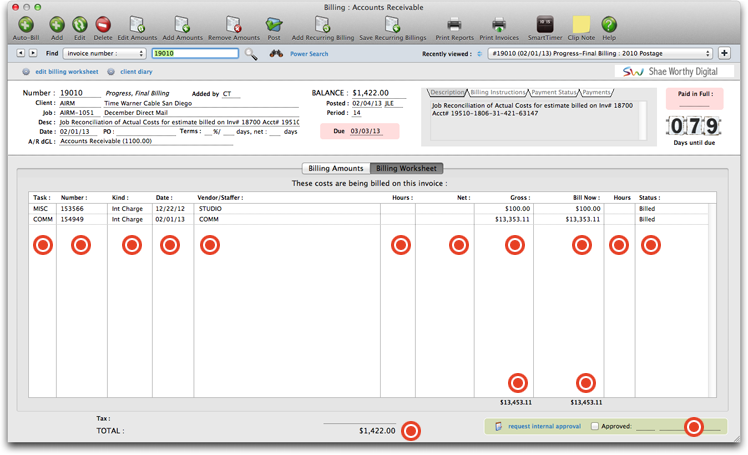
Click here to edit the billing worksheet. Editing the Billing Worksheet has no direct effect on your General Ledger. That’s because costs update the General Ledger when they are posted as accounts payable and checks.
The Client Diary lists all of the entries users have made about interacting with the client, whether it is a phone call or just a note (a diary entry) about something that is going on. The information here provides a recorded history of your shop’s relationship with it’s clients.
The remaining balance owed on the invoice, the date is was posted, and the accounting period it was posted in appears here.
If the invoice has been paid in full, the date it was paid will appear here.
The "Days until due" counter shows the number of days until the invoice is due to be paid. If the invoice is past due, the numbers will appear in red.
The invoice's description, billing instructions, payment status, and payments made by the clients can be viewed here by clicking through the tabs along the top.
The date that the invoice is due to be paid appears here.
All of the vital information about the invoice appears in this section - the invoice number, client, job, description, date, terms, and the dGL number from your chart of accounts.
The jobs associated with this invoice appear in this column. To edit a line item, highlight it from this list, then click the edit button. To remove one, highlight it, then click the delete button.
The tasks being billed for a particular job on this invoice appear here. To edit a line item, highlight it from this list, then click the edit button. To remove one, highlight it, then click the delete button.
The amount being billed for this task appears here.
The cGL number from your chart of accounts that is associated with this payment appears in this column.
An optional description of the tasks being billed goes here. It can be as detailed as is deemed necessary.
The total billing amount for this invoice is displayed here.
The gross total amount of this invoice (including tax, if applicable) appears here.
If an invoice is approved, the approved checkbox will be selected and the initials of the person who approved the invoice will appear here, along with the date and time that the invoice has been approved.
Client billings are based on job tasks, not literally the job’s costs. This means when you bill a job, the amount that’s billed is copied from the job task.
The charge number appears in this column.
The kind or type of job cost appears in this column.
The date the job cost was billed appears here.
The vendor or staff member associated with the job cost will appear in this column.
The number of hours spent on the task (if applicable) will appear here. If the job cost is for materials, this column may be blank.
The net cost of the job cost appears here.
The gross cost of the job cost will appear in this column.
This is the amount on the invoice that can be billed now.
This column lists the number of billable hours associated with the job cost.
The status of the job cost appears here.
The total billings (including tax, if applicable) appears here.
The total gross of all job costs appears here.
The total amount that can be billed now appears at the bottom of this column.
If the invoice is approved, the approved checkbox will be selected and the initials of the person who approved the invoice will appear here, along with the date and time that the invoice has been approved.
To invoice unbilled job tickets
Clients & Profits Agency provides an innovative feature that can
dramatically simplify your billing, called auto-billing. Auto-billing creates
invoices automatically for all of your unbilled jobs. It’s the same result as if
you’d entered an invoice for each of your unbilled jobs. Instead, auto-billing does
the work for you.
The auto-billing process is simple: unbilled jobs are chosen by production or
billing status. Clients & Profits searches your job database for every job with
unbilled tasks -- and with the status you’ve selected. Then an invoice is created
automatically, including a line item for every unbilled task on the job ticket. All
of the appropriate job details are copied to the invoices, so there’s no retyping.
Costs are billed automatically as invoices are saved. You can change the billing
amounts on job costs before the invoices are posted from the Billing Worksheet
window.
Jobs can be auto-billed by client or by project. Auto-billing one client’s jobs
makes it easy to make up the month’s billings quickly. Invoices are numbered
automatically, and are unposted. (The next invoice number is used by default, but
you can change it.) Once they are created, these invoices can be added to, edited,
or deleted any time until they are posted. You can even bill all of the client’s
jobs on one invoice.
Auto-billing and the job’s status
Unbilled jobs can be selected for automatic billing by production or billing status.
This is a good reason to track jobs by status, since it substantially automates your
monthly invoicing. If a job’s status is updated whenever it is ready to bill, the
work of figuring out which jobs are billable is eliminated. You’ll always know which
jobs are ready to bill by the status.
Since job lists, job summaries, and work in progress reports show jobs by billing
status, your accounting staff can print their own pre-billing reports. And using a
billing status doesn’t interfere with the production department’s job tracking,
since it’s completely separate.
Status codes are set up in the Status Table. You may not need many, but have one for
Ready to Bill, Estimate billed, On-hold, and Final Billed/Closed.
Changing the job’s production or billing status is easy: From the Job Tickets
window, find the job. Click on the Traffic button, then enter the job’s new status.
Once these changes are saved, the job and its new status appear immediately on
windows and reports.
To create invoices with the Auto-bill Job Tickets
function
1 Choose Edit > Auto-bill.
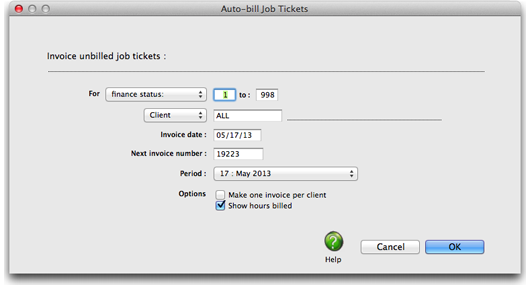
The Auto-bill Job Tickets window opens.
Invoices are created for unbilled jobs, based on your selections. Unlike estimate or
progress/final billings, your options for showing unused tasks, using a percentage
billing, etc. aren’t available. Automatic invoices are simple, but complete -- and
can be changed as needed once they’re created.
2 Choose production status or billing status from
the From pop-up menu, then enter a range of status codes.
Unbilled jobs can be selected for any range of status codes. Either production
status or billing status can be used, depending on how your jobs are categorized. To
bill all jobs with unbilled tasks, enter the status range of 0 to 999. This range of
status codes will include jobs without a billing status. To only bill jobs with a
specific status, enter a more limited range of status codes (e.g., 30 - 50).
3 Choose client or project from the and for pop-up
menu, then enter a client number or project code.
Unbilled jobs can be selected for one client or project or all clients and all
projects. This option lets you easily bill one client’s unbilled at the same time.
It also gives you the option to easily bill one project’s jobs together on the same
invoice.
To bill all jobs with unbilled costs for one client only, enter a status range then
the client number. Only unbilled jobs open for the client will be automatically
billed.
4 Enter the invoice date.
The invoice date is the date that appears on the printed invoice. The client sees
this date as the date of the billing. It is used by the aging reports to calculate
an invoice’s age (i.e., 30 days, 60 days, 90 days). The date defaults to today, but
can be changed. It does not affect the posted date.
5 Enter the starting invoice number.
The next invoice number lets you set the numbering sequence for this batch of
invoices. The next number, based on the last invoice, is entered automatically. If
the last invoice number contained letters, the next number can’t increment -- and
you’ll have to enter your own number.
6 Enter the invoice’s accounting period.
The accounting period determines into which month these invoices will be posted. You
can select any period in the fiscal year unless it is locked (only the unlocked
periods can be chosen).
7 Select the auto-billed invoices options.
Instead of creating a separate invoice for each job with unbilled amounts, the make
one invoice per client option will combine the client’s jobs on one invoice. To show
the hours billed on the printed invoices, select the Show hours billed option.
8 Click OK -- then wait while the invoices are
automatically created.
The auto-bill function creates invoices by first compiling a list of unbilled jobs,
based on your selections. The unbilled job’s tasks are analyzed, then invoice
billing amounts are saved. These line items are then compiled together by job number
to complete the finished invoices.
Automatic billing can be time consuming, especially if you’re selecting many jobs
for billing. Invoices are created methodically, starting with the first unbilled job
that it finds. The entire auto-billing procedure must finish completely or else the
invoices will be incomplete. Since auto-billing is very demanding to your computer
system (i.e., disk intensive), it’s best to bill jobs automatically during slow
periods where few users are using Clients & Profits. Other users on the network may
notice slower performance on their systems when you’re auto-billing, especially if
you’re billing many jobs.
If the auto-billing procedure stops for any reason (someone cancels it, system
crash, power failure, etc.) then your invoices will be incomplete. In this
situation, delete the auto-billed invoices (explained later) then repeat the
auto-bill process.
Once the auto-bill invoices are saved, they can be proofed, posted, and printed just
like regular invoices. In fact, they are no different. They can be deleted,
appended, and edited any time until they are posted.
To delete unposted automatic billings
If, for any reason, the automatic billing didn’t do what you’d expected you can
easily delete all of the auto-billed invoices then start the process over. The
Delete All Unposted A/R command can be used to erase all of the auto-billed invoices
at one time.
1 Choose Edit > Delete All Unposted A/R.
2 Click Yes when prompted.
Keep in mind that this command deletes all unposted invoices, not just automatic
billings. If you have unposted job billings, estimate billings, etc., they will be
erased, too. Don’t use the Delete All command unless you want to delete every
unposted A/R invoice. Otherwise, you should delete the auto-billings individually.
Once invoices are posted, they can't be deleted. However, they can be unposted,
changed, then posted again.
Auto-bill one client’s jobs on the same invoice. The Auto-bill function will combine
all of a client’s unbilled jobs together on a single invoice when the make one
invoice option is selected.
To add a Job Billing Invoice
Client billing is based on jobs, tasks, and costs you've posted
against them. Job tickets track everything you spend by task, whether it's time,
buyouts, or out-of-pocket expenses.
Billing a job for its unbilled costs is the easiest, fastest way to add an invoice.
There’s really only one thing you need to know: the job number. Since jobs are
integrated with billing and accounts receivable, there’s no rekeying to make an
invoice.
When the job task is entered, the unbilled amount from the task is copied to the
invoice line item. The line item includes the task’s billing information (i.e.
description, cGL, and taxable status). Because it’s only a copy of the information,
changing information -- like the cGL or tax status -- on the invoice doesn’t affect
the job.
1 From the Accounts Receivable window, click the
add button (or choose Edit > Add New Invoice > Job Billing).
The Add Job Billing Invoice window opens.
2 Follow the remaining steps to continue adding a
job billing:
Invoice number New invoices are numbered automatically (using the invoice number
entered in Preferences). Invoices are numbered sequentially. You can change the
invoice number by selecting it and then entering your own number. You’ll be notified
if the invoice number has been used before.
Job number The last-used job number is entered automatically as a time-saver, but
can be changed. If you’re not sure about a job number, leave the field blank then
press Tab to open the jobs lookup list. Double-click on the job to copy it to this
invoice. You can enter any job number you wish, including jobs that are new, in
progress, or closed.
If the job has a status alert, you’ll see it as you tab past the job number field.
Client number Every invoice is billed to only one client. This client is the one who
will eventually pay for the invoice. The client number is copied automatically from
the job, but can be changed -- which lets you bill the job to a different client.
Tabbing past the client number copies its name, payment terms, and sales tax
information to the invoice. Any active client can be used on an invoice.
The job ticket and invoice can have different clients. There may be instances where
several departments of a large corporation open jobs, but invoices are billed to a
third-party. This third-party, such as the corporate headquarters, would be added as
a separate client and get all of the billings.
Debit account The default A/R account, which is copied from Preferences, can be
changed to a different G/L account. This account is debited for the invoice’s total,
including sales tax, when the invoice is posted.
Notes The work you’re billing can be fully explained in the invoice notes. These
notes, which appear near the top of the printed invoice (above the billing amounts),
can summarize what’s being billed on this invoice.
Job task for the first billing amount Press Tab to see the job’s tasks. Double-click
on the task to copy it to this invoice. Tabbing past the job task copies its
description, unbilled amount, unbilled hours, and credit G/L# to the invoice.
Task description, billing amount, hours billed, and income G/L number Changing the
task’s description here only affects this invoice; the job task itself is unchanged.
This description appears in the body of the printed invoice. The billing amount is
the actual amount your client will pay. It appears on the printed invoice, and
includes all costs, fees, commissions, and markups. You can bill the job task’s
entire unbilled amount by tabbing past the amount. Or, the billing amount can be
changed by entering a larger or smaller number (there’s no limit to how much or how
little you can charge on an invoice). The hours billed are optional, but can show
the client how many hours were billed on this job task. The credit G/L number is
used to track income on the financial statements. It is copied from the job task
(which was originally copied from the Task Table). Every line item can have a
different credit account, if needed. A cGL is required.
3 Repeat these steps to bill the job’s other
tasks, then click Save.
Once the invoice is added and saved, it must be posted. Posting makes the invoice
permanent, updating the job ticket, the client account, and the General Ledger. The
invoice can be proofed before posting, then changed as needed (e.g., amounts added
or removed, descriptions changed, etc.).
The roll up billing amounts by task option lets you customize how billing amounts
appear on the printed invoice. The roll-up option gives you the most flexibility in
billing, since it combines selected tasks into another task.
Adding an Estimate Billing Invoice
An estimate billing is an invoice created using the job's estimate
amounts, and not costs.
Otherwise, it looks and acts like progress/final billings. An estimate billing is a
fast, easy way to invoice a job’s estimate. Like progress/final billings, it’s an
express way to bill a job without having to know -- or type in -- each job task.
It’s fast (and accurate) because billing amounts are created automatically from the
job’s tasks and their estimate amounts. It’s easy because all you need to enter is
the job’s number.
If you always bill jobs based on a fixed estimate, then you’ll use the estimate
billing option often. If you generally bill jobs at completion, the estimate billing
option is useful when you sometimes need to bill a job -- or any part of it -- up
front (such as a big printing job, or the first job for a new client). When you add
an invoice using the estimate billing option, Clients & Profits looks at the job’s
tasks. Every task on the job with an estimate amount is copied to the invoice. The
task’s estimate amount (or any percentage) becomes the invoice’s billing amounts.
Estimate billings look like regular job invoices (the client won’t know that it’s an
estimate billing unless you say so somewhere on the invoice). Unlike advance
billings, estimate billings affect the job’s billed totals. Estimate billings can’t
be applied to later job invoices as payments. Also, estimate billings are considered
income and appear on the Income Statement. Once an estimate billing is created, you
can add, remove, and change its billing amounts as needed. The changes you make will
update the job’s totals when the invoice is posted.
To add an estimate billing
1 From the Accounts Receivable window, choose Edit
> Add New Invoice > Estimate Billing.
The Add Estimate Billing Invoice window opens.
2 Follow the remaining steps to add an estimate
billing:
Number New invoices are
numbered automatically (using the invoice number entered in Preferences).
Invoices are numbered sequentially. You can change the invoice number by
selecting it and then entering your own number. You’ll be notified if the
invoice number has been used before.
Job number The last-used job number is entered
automatically as a time-saver, but can be changed. If you’re not sure about a
job number, leave the field blank then press Tab to open the jobs lookup list.
Double-click on the job to copy it to this invoice. You can enter any job number
you wish, including jobs that are new, in progress, or closed.
If the job has a status alert, you’ll see it as you tab past the job number field.
The job’s estimate amounts are copied to the invoice automatically. The job’s
estimate amounts are billed by default at 100%, but can be easily changed by
modifying the bill estimate percentage or actually editing the billing amounts on
the tasks themselves.
Client number Every invoice
is billed to only one client. This client is the one who will eventually pay for
the invoice. The client number is copied automatically from the job, but can be
changed -- which lets you bill the job to a different client. Tabbing past the
client number copies its name, payment terms, and sales tax information to the
invoice. Any active client can be used on an invoice.
The job ticket and invoice can have different clients. There may be instances where
several departments of a large corporation open jobs, but invoices are billed to a
third-party. This third-party, such as the corporate headquarters, would be added as
a separate client and get all of the billings.
3 Enter the invoice date, due date, accounting
period, the client’s PO number, terms, and charge number.
Debit account The default
A/R account, which is copied from Preferences, can be changed to a different G/L
account. This account is debited for the invoice’s total, including sales tax,
when the invoice is posted.
Notes The work you’re billing can
be fully explained in the invoice notes. These notes, which appear near the top
of the printed invoice (above the billing amounts), can summarize what’s being
billed on this invoice.
Bill estimate percentage You can automatically
change the billing amounts for the entire invoice by changing the bill estimate
percentage then press Tab. The new percentage will be used to calculate the
invoice’s billing amounts. Any percentage of the estimate can be billed.
4 If needed, edit the invoice’s billing amounts
then click Save.
Only checked tasks will appear on the estimate invoice. To remove a task from this
invoice, uncheck the “X” checkbox. The description, billing amount, and income G/L#
can be changed for each job task on the invoice without affecting the job itself.
Once the invoice is added and saved, it must be posted. Posting makes the invoice
permanent, updating the job ticket, the client account, and the General Ledger. The
invoice can be proofed before posting, then changed as needed (e.g., amounts added
or removed, descriptions changed, etc.).
Adding a Progress/Final Billing
A Progress/Final Billing is the faster, easier way to invoice a
job's costs. It’s an express way to bill a job, without having to know -- or type in
-- each job task. It’s fast because billing amounts are created automatically for
the job’s tasks. And it’s easy because all you need to enter is the job number.
You’ll probably use progress/final invoices most often, since most jobs are billed
while in production or at completion (instead of, for example, when the job is
started). When you add an invoice using the progress/final billing type, Clients &
Profits looks at the job’s tasks. Every task on the job with an unbilled cost will
appear as a separate line item on the invoice (which includes even tasks that have
been partially billed before). The task’s unbilled amount becomes the invoice’s
billing amount.
There’s no distinction between a progress billing and a final billing. Both kinds of
billing are treated the same way: both create an invoice using the job’s unbilled
tasks. So use the progress/final option when you need to bill a job for costs, even
if it isn’t finished.
To add a progress/final billing
1 From the Accounts Receivable window, choose Edit
> Add New Invoice > Progress/Final Billing.
The Add Job Progress/Final Billing Invoice window opens.
2 Follow the steps to continue adding a job
progress/final billing invoice:
Invoice number and job
number As you tab past the job number field, Clients & Profits copies
the job’s unbilled tasks to the invoice. For each task you’ll see its task code,
description, unbilled hours, unbilled amount, and credit (i.e., income) G/L
number. Tasks without unbilled amounts are included, too (this lets you point
out to the client the tasks that aren’t yet completed, for example). These tasks
aren’t automatically saved with the invoice; to include these tasks, check the
“X” checkbox.
Client number The client number is copied from
the job ticket, but can be changed. This lets you bill a different client (such
as an accounting department) for this job’s charges.
3 Enter the invoice date, due date, and accounting
period.
4 Enter the client’s PO number, terms, and charge
number.
Debit (i.e., A/R) account
The debit G/L number indicates which receivable account will be updated when the
invoice is posted. Posting creates one journal entry that debits an Accounts
Receivable account for the invoice’s total amount, including sales tax.
Notes The work you’re billing can be fully
explained in the invoice notes. These notes, which appear near the top of the
printed invoice (above the billing amounts), can summarize what’s being billed
on this invoice.
Progress billing’s percentage The percentage
is used to calculate the invoice’s billing amounts. Any percentage of the job’s
unbilled costs can be billed. Normally, 100% of the job’s unbilled costs are
billed. To bill a portion of the job’s unbilled costs, enter the percentage then
press Tab. The invoice’s billing amounts will change instantly, reflecting the
new percentage.
5 Mark the “X” checkbox on the tasks that should
be included on this invoice.
Some or all of the job’s tasks can be included on a progress/final billing. This
lets you bill only certain tasks on an invoice, saving the others for a future
billing (it’s always up to you, since a job can be billed many times).
To include the job’s change order amounts, select the include change orders option;
the billing amount will reflect the task’s unbilled costs plus its change orders.
The include unbilled POs/IOs option combines the task’s unbilled costs and unbilled
commitments together in the billing amount. Use this option when you want to bill
for the job’s actual, posted costs as well as leftover purchase or insertion orders.
It lets you bill for what you expect the job’s final costs to be, before the
vendor’s invoices actually arrive. When the POs are eventually invoiced by the
vendor, you’ll have already billed for them. (The job’s unbilled totals will always
show the correct balances). The roll up billing amounts by task lets you consolidate
several tasks together into a single task; use it to show your client less detail
than actually exists on the invoice. The show hours billed option copies each job
task’s unbilled hours to the invoice. Use this option if your client requests to see
billed hours for each task.
6 Click Save.
When the invoice is saved, its billing amounts for each task are applied to the
job’s costs one-by-one. The task’s oldest costs are billed first. If the task’s
unbilled costs are billed completely, then their cost statuses will be changed to
“billed” automatically. Costs up to the billing amount will be changed to “billed.”
If a cost is only partially billed, the cost status changes to “partial”, the
remaining costs will keep a status of “unbilled.” You can see how Clients & Profits
allocated billings to costs by opening the invoice’s Billing Worksheet.
The invoice’s billing amounts can be changed anytime prior to posting the invoice.
There are no restrictions to the amount billed on invoices; you can bill for less or
more than the job’s costs if the invoice calls for it. The job’s work in progress is
updated automatically.
Adding a Work In Progress Billing
WIP billing lets you invoice a job's unbilled costs for any time
period. The WIP invoice bills job costs -- time, vendor purchases, expenses, and
internal charges -- for any week, month, or other time frame of your choosing.
Adding a work in progress billing is easy: all you need to know is the job number
and a date range. When you enter a range of dates, Clients & Profits lists all of
the job's unbilled costs that were added during that time period. You'll have a
chance to edit the billing amounts (and hours, too) for each cost. But while you see
the individual time entries, vendor purchases, out of pocket expenses, and internal
charges when adding the invoice, your client will only see the total billings for
each task. That's because Clients & Profits combines the job's billed costs together
by task when the invoice is saved.
You can attach a detailed list of billed costs to the invoice by printing the
Invoice Detail Report at the same time you print the invoice.
To add a WIP billing
1 From the Accounts Receivable window choose Edit
> Add New Invoice > WIP Billing.
The Add WIP Billing Invoice opens, prompting you to enter the work in progress
invoice's details.
2 Follow the remaining steps to continue adding a
WIP billing:
Invoice number New invoices
are numbered automatically (using the invoice number entered in Preferences).
Invoices are numbered sequentially. You can change the invoice number by
selecting it and then entering your own number. You’ll be notified if the
invoice number has been used before.
Job number The last-used job number is entered
automatically as a time-saver, but can be changed. If you’re not sure about a
job number, leave the field blank then press Tab to open the jobs lookup list.
Double-click on the job to copy it to this invoice. You can enter any job number
you wish, including jobs that are new, in progress, or closed.
If the job has a status alert, you’ll see it as you tab past the job number field.
Client number Every invoice
is billed to only one client. This client is the one who will eventually pay for
the invoice. The client number is copied automatically from the job, but can be
changed -- which lets you bill the job to a different client. Tabbing past the
client number copies its name, payment terms, and sales tax information to the
invoice. Any active client can be used on an invoice.
The job ticket and invoice can have different clients. There may be instances where
several departments of a large corporation open jobs, but invoices are billed to a
third-party. This third-party, such as the corporate headquarters, would be added as
a separate client and get all of the billings.
3 Enter the invoice date, due date, accounting
period, the client’s PO number, terms, and charge number.
Debit account The default
A/R account, which is copied from Preferences, can be changed to a different G/L
account. This account is debited for the invoice’s total, including sales tax,
when the invoice is posted.
Dates Enter a range of dates for which the
job's unbilled costs should be billed. The range of dates can be a week, a
month, a quarter, or any period of time. When you tab out of the date field,
Clients & Profits will select the job's unbilled costs that were added during
the time period, sorting them chronologically (oldest first) by task. Unbilled
time entries are selected by work date (i.e., the date on which the work was
performed), while vendor purchases are selected by invoice date. Expenses and
internal charges are selected by date added.
Check the roll up billing amounts by task option is you want the client the see less
detail on their printed invoice. The roll-up option gives you the most flexibility
in billing, since it selectively combines several tasks into another.
Billing amounts If needed,
enter a different billing amount or hours for each of the job's costs. Before
the invoice is saved you have a chance to tweak a billing amount for one or more
job costs. Changing the billing amount will only affect the client's invoice --
the gross amount on the cost is unaffected.
Notes Enter the invoice’s notes. The work
you’re billing can be fully explained in the invoice notes. These notes, which
appear near the top of the printed invoice (above the billing amounts), can
summarize what’s being billed on this invoice.
4 Click Save to save this WIP billing invoice.
Once the invoice is added and saved, it must be posted. Posting makes the invoice
permanent, updating the job ticket, the client account, and the General Ledger. The
invoice can be proofed before posting, then changed as needed (e.g., amounts added
or removed, descriptions changed, etc.).
Adding a Multi-job Billing Invoice
Special invoices can be created that bill different jobs and tasks
on the same invoice.
These invoices, called multi-job billings, let you consolidate jobs from various
clients onto a single invoice -- for one client. Multi-job invoices can make billing
large companies much easier, especially when you do work for many departments or
divisions of a corporation. Sometimes you may have a single billing contact or
location that gets the invoices, regardless of which department actually requested
the job.
Multi-job billing makes invoices for franchise clients easier. The costs of many
jobs and tasks can be split among many different franchises. Each franchise would
get their own invoice showing their portion of the work performed. Each invoice may
have dozens of jobs and tasks, but with only a part of the job’s total cost.
Multi-job invoices also work well when one client has a tremendous volume of work to
bill at once. Instead of billing each job separately with an invoice, all of the
client’s unbilled jobs can be added to the same invoice. The client gets one
invoice, with one invoice number. But the invoice might have dozens of jobs and
tasks, spread over many different pages.
Like standard job billings, multi-job invoices can be edited until they are posted.
Posting makes the invoice permanent, and updates the client account, job, and
General Ledger. Once an invoice is posted, it can be printed for the client. Posting
a multi-job billing increases the billed total on job tasks. The amount you bill is
subtracted from the job task’s unbilled total. For tasks without costs, the unbilled
total will appear negative; this isn’t a problem, since the unbilled balance
increases as job costs are posted. While multi-job billings have considerable
strengths, they have some disadvantages. Some billing types are better than others,
depending on just what you need to bill.
Multi-job billings don’t have the option to include change orders or open PO totals.
They can be included, however, if you enter them yourself.
The printed invoice for multi-job billings is tightly formatted, so it doesn’t have
the flexible display amounts (hide amounts, show previous billings, etc.) as other
billing types.
Multi-job billings don’t show hours billed.
Multi-job billings update work in progress job costs just like regular job invoices.
To add a multi-job billing
1 Choose Edit > Add New Invoice > Multi-Job
Billing
The Add Multi-Job Billing window opens.
2 Enter the invoice number.
3 Enter the client number.
This client is the one who will eventually pay for the invoice. It is entered
automatically from the job ticket, but can be changed. Tabbing past the client
number displays its name, payment terms, and other account information.
4 Enter the invoice date, accounting period, and
due date.
5 Enter the client’s PO number, terms, and charge
number.
6 Enter the invoice’s debit account.
The debit G/L number indicates which receivable account will be updated when the
invoice is posted. Posting creates one journal entry that debits an Accounts
Receivable account for the invoice’s total amount, including sales tax.
7 Enter the invoice’s notes.
The work you’re billing can be fully explained in the invoice notes. These notes,
which appear near the top of the printed invoice (above the billing amounts), can
summarize what’s being billed on this invoice.
8 Enter the job number and task.
Any client’s jobs and tasks can be added to a multi-job billing. These billing
amounts will be charged to the invoice’s client -- which can be different from the
client who opened the jobs. Tabbing past the task copies the task’s unbilled amount,
hours and cGL from the job to the invoice.
9 Enter the job task’s billing amount, unbilled
hours, and credit G/L number.
The task’s unbilled costs are copied to the invoice line item. This amount can be
easily changed by typing in a different billing amount. You can bill for more or
less than the task’s unbilled costs. Each job’s billing amounts are sub-totaled
together on the printed invoice, so the client will still see the total billings for
each job.
10 Repeat steps 8-9 for any other job/task
combinations, then click Save.
A multi-job billing can contain dozens of line items from any number of jobs and
tasks. When the invoice is saved, billing amounts for each line item will be applied
to the job’s costs just like other kinds of invoices (i.e., oldest costs are billed
first), updating each job’s work in progress automatically.
To bill multiple jobs with just one amount for each job without listing all tasks,
use the roll-up option in the Job Billing window. The roll-up option gives you the
most flexibility in billing, since it selectively combines several tasks into
another.
Adding a New Media Billing
Clients & Profits makes billing insertion orders a snap, literally -
just a few clicks with your mouse.
That's because most of the work to create a media invoice is already completed: the
information is already on the insertion order. Media invoices are added for one
specific client. A single media invoice can contain dozens of insertion orders. Each
insertion order appears as a separate billing amount on the printed invoice. The
media invoice looks different than job invoices. The printed invoice shows the
publication, issue date, ad#/caption, and more directly from the insertion order.
Since media invoices are based on insertion orders, it's critical that your
insertions are added accurately - and updated in Clients & Profits when something
changes (like the gross cost or the issue date). That's because whatever information
appears on the insertion order will also appear on the client's media invoice.
Media billings are different than pre-billings. A pre-billed insertion order appears
on its own invoice before the cost has been invoiced by the publication. In this
case you don't really know the ad's final cost, so you're essentially billing from a
best-guess. Since the ad's cost is based on the publication's rate card, the cost
might not change from the date the order was placed to the date of publication.
If the cost does change, however, your pre-billing invoice will have the wrong
amount. Media billings may also have this potential problem if they're billed before
the ad runs. If so, you'll need to verify the ad's actual cost with your media
billing amount - then bill the client for any differences.
To add a media billing
1 Choose Edit > Add New Invoice > Media Billing.
The Add New Media Billing window opens.
2 Enter the client number.
3 Enter the invoice date, due date, and accounting
period.
The invoice date and the accounting period can be different, for flexibility. This
means an invoice can be dated in this month, but the invoice can be posted to next
month's financial period.
4 Enter the client's PO number and terms.
5 Enter the invoice's debit account.
The debit G/L number is copied from Preferences and indicates which receivable
account will be updated when the invoice is posted. Posting creates one journal
entry that debits an Accounts Receivable account for the invoice's total amount,
including sales tax.
6 Enter the invoice's notes.
The work you're billing can be fully explained in the invoice notes. These notes,
which appear near the top of the printed invoice (above the billing amounts), can
summarize what's being billed on this invoice.
7 Select to bill Insertion Orders or Broadcast
Orders and enter the space close date.
The Media Billing Options lists unbilled insertion orders by number, generally with
the oldest ones shown first. Checking an insertion order's checkbox selects it for
this invoice. The insertion order's billing amount can be changed (either up or
down, there's no restrictions) to tailor the invoice's billing amount.
Each selected order will appear as a separate billing amount on the printed invoice.
To bill all of the client's unbilled insertion or broadcast orders, check the Select
All option.
8 Click Save.
The design of the media invoice is different from regular job invoices, since it
shows each insertion's publication, issue date, and other information. Broadcast
Orders are billed just like Insertion Orders, but the printed invoice shows flight
dates, broadcast month, and other broadcast information. For this reason, the
standard invoice display options aren't applicable to media invoices. Unless you've
changed it in the Media Billing Options window, the insertion or broadcast order's
gross cost is copied to the line item's billing amount. You can add, change, and
remove billing amounts any time before the invoice is posted.
Billing commission only. If a client pays the
media directly, it can be billed for commission amounts only by choosing the bill
commission only option. Every media buys from the insertion or broadcast order will
appear on the invoice. The media commission is calculated as the difference between
the media buy's gross amount less its net amount.
Adding a New Retainer Billing Invoice
Client retainers are special-purpose invoices that bill clients, but
don't count as income. Retainer billings aren’t considered earned income, since you
haven’t done the work yet. Instead, retainers are billed as deposits against future
billings.
Retainers can only be billed from each client’s retainer schedule. The retainer
schedule contains descriptions and amounts for up to twelve monthly billings. When
you add a retainer invoice, you’ll be prompted to select a retainer to bill from the
client’s schedule. Details about the billing are copied from the client account to
the invoice, so there’s very little for you to type.
When a retainer is posted, the balance updates the client account -- but only the
client’s retainer balance, not the usual account balance. Retainers update the
General Ledger, crediting a liability account (which you choose) for client
deposits/retainers and debiting accounts receivable. Retainers don’t increase the
client’s account balance, so you won’t confuse regular unpaid invoices from unpaid
retainers. Instead, a special unpaid retainers’ balance tracks them separately.
Retainers can be applied to any unposted job billing. When a retainer is applied to
an invoice, the retainer amount appears as a payment. When the invoice is posted,
your client sees the invoice’s line items and billing amounts, sales tax, and grand
total -- then the balance due, less the amount applied from retainers.
There are cases where retainers shouldn’t be billed as retainers: If a client pays
you a flat monthly fee that isn’t applied to job billings, then it shouldn’t be
billed as a retainer. These fees, which usually cover the client’s account service
hours, are really earned income because you won’t give the money back if you do no
work. Remember, retainers don’t affect your income statement or the client’s balance
due. Fee invoices should be added as miscellaneous billings, not retainers.
To add a retainer billing
1 From the Accounts Receivable window, choose Edit
> Add New Invoice > Retainer Billing.
The Add New Retainer Invoice window opens.
2 Enter the invoice number.
3 Enter the invoice’s bill-to client number.
Retainer invoices are billed to one client, and only clients that have a retainer
schedule. When you tab past the client number, the client’s scheduled retainer
billings are copied to the invoice. Any unbilled retainer can be billed on a
retainer invoice. Previously billed retainers are disabled, since they have already
been billed.
4 Enter the invoice date, accounting period, the
client’s purchase order number, and payment terms.
The invoice date and the accounting period can be different, for flexibility. This
means an invoice can be dated in this month , but the invoice can be posted to next
month’s financial period.
5 Enter the invoice’s debit and credit G/L
accounts.
The retainer’s cGL and dGL are copied from the client’s retainer schedule, but can
be changed. A special A/R account can be created for tracking retainer receivables,
to keep them separate on financial statements. Likewise, a special
“deposits/advances” liability account can be created to track retainer billings.
When a retainer invoice is posted, it will post debit and credit journal entries to
these accounts.
6 Enter the invoice’s due date.
7 Click the bill these checkboxes to add retainer
billings to this invoice.
You can bill one or more monthly retainers on the same invoice, although usually
only one is billed per month. Each monthly retainer appears as a separate line item,
with its own billing amount, on the printed invoice. The retainer’s description is
copied to the line item and is what the client sees on the printed invoice. You can
change the description as needed; however, changing the description here changes the
retainer schedule as well. The retainer amount can also be changed, letting you bill
more or less than what was scheduled; changing the amount here changes the retainer
schedule.
8 Click Save.
To see a client’s retainer schedule
1 Choose My > My Clients.
2 Click on the Retainers link.
The Retainer Schedule window shows the client’s retainer history, including which
retainers have been billed so far. The status checkbox indicates which retainers
have been billed, including the date and invoice number. Billed retainers can’t be
changed. Unused retainer is the amount that can be applied as payments to the
client’s upcoming invoices. Unpaid retainers shows the balance of the client’s
unpaid retainer billings. You can use this amount to track if the client has paid
the retainer invoices (you may not want to apply retainers to new invoices unless
they’ve been paid already).
Add Advance Billing
Advances are special invoices that bill a job's estimate before the
work has started. They are special because the billing amounts on advance invoices
aren’t considered income; instead, they are counted as unearned revenue, or a
liability on the financial statements.
Advances act like client retainers, but are associated with one specific job. They
let you bill up front for a job (using any part of its estimate), then apply these
billings later when the job’s actual costs are billed. The amounts you apply to
later invoices are handled like payments; the invoice’s balance due will be the
invoice total less the applied advances. Advance billings do not involve job tasks.
You can include a complete description about the advance billing on the printed
invoice.
Here’s what happens: When an advance billing is posted, a debit journal entry is
posted into Accounts Receivable and a credit journal entry is posted into Client
Advances. Unlike retainers, advance billings do increase the client’s balance.
Advance invoices appear on aging reports, and are paid off in Client Payments just
like other invoices.
Because advanced billings are deposits (representing unearned income), they are not
taxable. The job will be taxed in full when it is finally billed.
To add an advance billing
1 Choose Edit > Add New Invoice > Advance Billing.
2 Enter the invoice number.
3 Enter the job number.
The last-used job number is entered automatically as a time-saver, but can be
changed. If you’re not sure about a job number, leave the field blank then press Tab
to open the jobs lookup list. Double-click on the job to copy it to this invoice.
You can enter any job number you wish, including jobs that are new, in progress, or
closed.
If the job has a status alert, you’ll see it as you tab past the job number field.
The job’s total estimate is calculated and displayed.
4 Enter the bill-to client number.
Every invoice is billed to only one client. This client is the one who will
eventually pay for the invoice. The client number is copied automatically from the
job, but can be changed -- which lets you bill the job to a different client.
Tabbing past the client number copies its name, payment terms, and sales tax
information to the invoice. Any active client can be used on an invoice.
5 Enter the invoice date, due date, accounting
period, the client’s PO number, terms, and charge number.
6 Enter the invoice’s debit G/L account, charge
number, and notes.
The default A/R account, which is copied from Preferences, can be changed to a
different G/L account. This account is debited for the invoice’s total when the
invoice is posted. The work you’re billing can be fully explained in the invoice
notes. These notes, which appear near the top of the printed invoice (above the
billing amounts), can summarize what’s being billed on this invoice.
7 Enter the advance billing amount.
The Add Advance Billing window totals up the job’s estimate, along with the total of
any previous advance billings. You can bill all or part of the job’s estimate by
entering any percentage up to 100%. Tabbing past the percentage calculates the
advance billing amount. This is the amount that will appear on the printed invoice.
8 Enter the invoice’s “advanced billing” credit
G/L account.
The advance billing credit G/L number should be your liability account for client
deposits/advances. The account is entered automatically from Preferences, if it was
entered there.
9 Click Save.
Posting the invoice updates the job’s advance billings total, but doesn’t affect any
tasks. Later, the advance billing amount can be applied to the job’s invoices
sometime in the future, where it’ll appear as a client payment.
To see the job’s advance billings
From the Job Ticket window, click on the Snapshot button.
The advance billing amount appears at the bottom right side of the Snapshot window.
This amount is the running total of the job’s advance billings, less any amounts
applied to the job’s invoices. When you bill a job later for its costs, this is the
amount you can apply as a payment.
The Advance Billing report can be printed by choosing View > Job Tickets > File >
Print > Print Reports > Analysis > Advance Billings. This report can be printed for
one or all clients or client projects for a specified date range. It can also be
limited to a production or billing status code range.
If you have an advance billings balance after the job’s final billing, then you’ve
overbilled the job. Since advance billings can’t be applied to other jobs, adjusting
entries will have to be made to this job: Add an invoice for the job’s remaining
balance, then apply the advance billing balance as a payment. Post this adjusting
invoice, then add another invoice for the same job and task -- but with a negative
amount. This invoice will appear on the client ledger as a credit. It can be applied
to other invoices later when new client payments are added.
Add New Miscellaneous Billing
Invoices don't have to reference a job number or task. These
billings, called miscellaneous invoices (as opposed to job invoices), let you bill
clients for non-job charges such as consulting fees, commissions,and service charges
-- as well as credits and adjustments -- without affecting job tickets.
Miscellaneous invoices aren’t commonly used, since most of your work revolves around
jobs. Adding client invoices updates your income statement, but doesn’t affect jobs
or tasks. That, after all, is the point of miscellaneous invoices: use them to bill
for anything that is not related to jobs.
Since miscellaneous invoices don’t include job numbers, they don’t contain job
tasks. So for the invoice line items you’ll simply describe what you’re billing.
Miscellaneous invoices can be edited until they are posted. They appear on proof
lists, billing reports, and client statements just like job billings, but don’t show
jobs and tasks. Posting makes client invoices permanent, updating the client account
and General Ledger. Once an invoice is posted, it can be printed for the client.
To add a miscellaneous billing
1 Choose Edit > Add New Invoice > Miscellaneous
Billing.
The Add New Miscellaneous Billing window opens.
2 Enter the invoice number.
3 Enter the bill-to client number.
4 Enter the invoice date and accounting period.
Aging reports use the invoice date to calculate an unpaid invoice’s age (i.e.,
current, 30-days, 60-days, etc.). The invoice date and the accounting period can be
different, for flexibility. This means an invoice can be dated in this month, but
the invoice can be posted to next month’s financial period.
5 Enter the client’s PO number and payment terms.
6 Enter the invoice’s debit G/L account.
The debit G/L number is copied from Preferences and indicates which receivable
account will be updated when the invoice is posted. Posting creates one journal
entry that debits an Accounts Receivable account for the invoice’s total amount.
7 Enter the invoice’s notes.
The work you’re billing can be fully explained in the invoice notes. These notes,
which appear near the top of the printed invoice (above the billing amounts), can
summarize what’s being billed on this invoice.
8 Enter the line item’s description.
The description field appears in the body of the invoice. Each invoice line item
should have a clear, concise description that explains what you’re billing. You can
enter anything you need to describe the line item.
The line item’s description becomes the credit journal entry’s description when the
invoice is posted. You’ll see this description on audit trails and journals.
9 Enter the line item’s amount (if this is a
credit, enter a negative amount) then enter the cGL.
Each line item can have a billing amount and credit G/L number, or cGL. The cGL
account is entered automatically from preferences, but can be changed.
If you don’t know which credit G/L account to use, leave it blank then choose Chart
of Accounts from the Lookup List. Your chart of accounts appears, showing your G/L
numbers. To select an account, double-click on the account name. The account number
will be entered onto the line item automatically.
10 Click Save.
Clicking the Save button saves this invoice’s line item and billing amounts.
The invoice is saved, but not posted. You can add additional line items, or change
the invoice’s billing amounts until the invoice is posted.
Miscellaneous billings don’t affect jobs. They’re ideal for one-time billings for
small charges like consulting, royalties, expense reimbursements, and fees.
Adding a Finance Charge Billing
Finance Charge Billings are like miscellaneous billings. They don’t
reference job numbers or tasks, so don’t affect job totals. Instead, they are used
to specifically bill a late-paying client for finance or service charges. These
invoices look like regular invoices, and aren’t handled differently by Clients &
Profits. They post to the General Ledger just like miscellaneous billings. The only
difference is they have the “finance charge” billing type.
To add a finance charge billing
1 From the Accounts Receivable window, choose Edit
> Add New Invoice > Finance Charge.
The Add Finance Charge window opens.
2 Follow the remaining steps to continue adding a
finance charge billing.
Client number Every invoice
is billed to only one client, and any client in your database can be used on an
invoice. This client is the one who will eventually pay for the invoice. Tabbing
past the client number displays its name, payment terms, and other account
information.
3 Enter the invoice date, due date, and accounting
period.
Aging reports use the invoice date to calculate an unpaid invoice’s age (i.e.,
current, 30-days, 60-days, etc.).
The invoice date and the accounting period can be different, for flexibility. This
means an invoice can be dated in this month, but the invoice can be posted to next
month’s financial period.
4 Enter the client’s PO number, terms, and charge
number.
Debit account The debit G/L
number is copied from Preferences and indicates which receivable account will be
updated when the invoice is posted. Posting creates one journal entry that
debits an Accounts Receivable account for the invoice’s total amount.
Notes The finance charges you’re billing can
be fully explained in the invoice notes. These notes, which appear near the top
of the printed invoice (above the billing amounts), can summarize what’s being
billed on this invoice.
Description The description field appears in
the body of the invoice. Each invoice line item should have a clear, concise
description that explains what you’re billing. You can enter anything you need
to describe the line item.
The line item’s description becomes the credit journal entry’s description when the
invoice is posted. You’ll see this description on audit trails and journals.
Finance charge amount The
finance charge amount can be calculated on the Client Account Aging or Client
Statement, then entered here. (Finance charges aren’t automatically
billed.)
cGL Each line item can have a billing amount and credit G/L number, or cGL. The cGL
account is entered automatically from preferences, but can be changed.
If you don’t know which credit G/L account to use, leave it blank then choose Chart
of Accounts from the Lookup List. Your chart of accounts appears, showing your G/L
numbers. To select an account, double-click on the account name. The account number
will be entered onto the line item automatically.
11 Click Save.
Clicking the Save button saves this invoice’s line item and billing amounts.
The invoice is saved, but not posted. You can add additional line items, or change
the invoice’s billing amounts until the invoice is posted.
Finance charges. While finance charges are calculated on aging reports, they aren’t
automatically billed to clients. Instead, separate finance charge invoices are added
then printed for the client.
Editing an Invoice
Anything on an unposted invoice can be changed, except the invoice
number, before an invoice is posted. Once an invoice is posted, you can only change
the description and other basic information.
1 From the Accounts Receivable window, find an
invoice.
2 Click the edit button.
3 Make your changes, then click Save.
Deleting an Invoice
Once an invoice is posted, it can’t be deleted -- only adjusted with
credit invoices. Or it can be unposted if it hasn’t been paid yet.
1 From the Accounts Payable window, find the
invoice.
2 Click on the delete button, or choose Edit >
Delete.
Once the invoice is deleted, its number can be used again.
Adding, Editing, and Deleting Billing Amounts
Billing line items contain the real details about an invoice. Almost
everything about an invoice line item can be changed until the invoice is posted.
The invoice itself only contains a general description of the billing, while the
line items contain the actual tasks and amounts. Almost everything about an invoice
line item can be changed until the invoice is posted. However, invoice numbers
cannot be changed.
On job billings, information from the job task is copied to the line item when the
invoice is added. These details, such as the task name, group, sort, description,
and sales tax settings appear on the printed invoice. An invoice can have dozens of
line items and billing amounts -- as many as you need to create a complete billing.
Once an invoice is posted, only the invoice’s description, group, and sort can be
changed. This information can be changed because it doesn’t affect the client
balance, job totals, or the General Ledger. The line item’s billing amount, cGL, and
sales tax settings can’t be changed because they affect the invoice’s total.
To edit an invoice’s line item
1 From the Accounts Receivable window, find an
invoice.
2 Double-click on the invoice line item you wish
to edit.
The Edit Invoice Amount window opens.
You’ll see the invoice line item’s details, including the billing amount. The
billing amount can be changed here, or can be changed with the invoice’s other line
items in the Edit Amounts window.
3 Make your changes, then click Save.
The changes you make update the invoice instantly. They will appear on the invoice
the next time it is printed. The line item’s invoice number, client, and job number
can’t be changed since they belong to the invoice, not the line item.
Invoice line items can’t be deleted or added from the Edit Invoice Amounts window.
To delete this line item, click Cancel then choose Edit > Remove Amount. To add a
new line item instead, click Cancel then choose Add Amount from the Edit menu. Each
line item on an invoice gets a billing amount. The billing amount is copied from the
job task’s unbilled total automatically. The job task’s unbilled amount is based on
the costs you’ve entered so far, less what’s been previously billed. The invoice’s
billing amounts don’t have to match the job’s totals -- so you have the freedom to
bill for more or for less than the job’s costs.
This flexibility means you can create invoices that show what you really want to
bill, and not just what the computer says should be invoiced. The billing amounts
you enter update the client balance, job totals, and General Ledger automatically
during posting, so no additional entries are needed.
Every line item on an invoice creates a separate credit journal entry in the General
Ledger. Usually, each line item credits an income account; however, you can use any
account you wish. An invoice’s billing amounts can be changed anytime, as often as
needed, until the invoice is posted. Posting updates the client, job, and financial
statements -- so an invoice can’t be changed once it’s posted.
Formatting billing amounts on the invoice
Invoice line items can be formatted in different ways on the printed invoice. These
options let you show more or less information on each invoice, depending on what
your client wants (or needs) to see. The ability to selectively show and hide
billing amounts means you can bill a job completely, adding all of its tasks to an
invoice, but hiding the details from the client.
The invoice’s display options are set on each individual invoice. The default
setting shows all of the invoice’s tasks and billing amounts. Using a different
display option doesn’t affect the client balance, job totals, or General Ledger;
instead, it’s strictly a cosmetic feature on the printed invoice.
To edit the invoice’s billing amounts
An invoice line item’s billing amount can be edited until the invoice is posted.
Once the invoice is posted, it can’t be changed.
1 From the Accounts Receivable window, find the
invoice.
2 Click on the edit Amounts button.
3 Change the billing amount (or amounts) by
tabbing from line to line
4 Click Save.
The billing amount appears on the invoice immediately.
Changing an invoice line item’s billing amount doesn’t change the cost’s billing
information for the task. If you change a billing amount for a job billing, you may
need to adjust your cost’s billed amount. To change the cost’s billing information,
choose Edit > Billing Worksheet.
To remove a billing amount
1 From the Accounts Receivable window, find an
invoice.
2 Click once on an invoice line item to select it.
3 Click the remove button (or choose Edit > Remove
Amount.)
Removing a billing amount is permanent. Line items can be removed only from unposted
invoices. Once removed, however, the same task can be added again, if needed.
Invoices need billing amounts just like job tickets needs tasks. It’s these invoice
line items that contain the important information about what you’re billing.
To add an additional billing amount to an invoice
Job tasks aren’t literally appearing on invoices. Instead, information from a job
task is copied to an invoice line item. The line item contains the task’s billing
information (including description, credit G/L accounts, taxable status, and
unbilled amount), but it is actually only a copy of the job task. That’s why you can
change an invoice line item without affecting the job task. The same job task can be
billed one or more times on the same invoice, if needed. New billing amounts (i.e.,
line items) can be added to an invoice anytime prior to posting. Each billing amount
makes a separate journal entry in the General Ledger. Each line item credits an
income account, such as Creative Fees, based on the job task’s cGL. The Add Billing
Amounts window will look different depending on the invoice’s billing type.
1 Click the add Amount button, or choose Edit >
Add Amount.
The Add Billing Amounts window opens, showing the invoice’s existing line items and
billing amounts.
2 Enter the task, then press Tab.
The job task’s description, unbilled amount, unbilled hours, group, sort, and
roll-up task are copied to the new line item. Clients see the line item’s
description, so it shouldn’t contain anything confidential.
3 Enter the billing amount, hours billed, cGL,
etc. then click Save.
The billing amount is the actual amount your client will pay. It appears on the
printed invoice, and includes all costs, fees, commissions, and markups (there’s no
limit to how much or how little you can charge on an invoice). The hours billed are
optional, but can show the client how many hours were billed on this job task. The
credit G/L number is used to track income on the financial statements. Group and
sort are used to arrange billing amounts on printed invoices. Line items are
sub-totaled by group, just like estimates. Within each group, billing amounts are
sorted in order by their sort number.
The invoice’s billing amounts are saved, but not posted. You can change the
invoice’s line items anytime until the invoice is posted.
Editing invoice amounts. Billing amounts are edited by double-click on an invoice
line item. The task can’t be changed, but the task’s description can be edited. The
task code doesn’t appear on the printed invoice.
Billing amount descriptions. The invoice’s billing amount descriptions can be edited
without affecting the original job ticket. Clients see the billing amounts and task
descriptions, but not the task code itself. Billing amounts can be combined together
by entering a roll-up task.
Credit Invoices
Credit Invoices can be made for a client by entering an invoice with
negative billing amounts. When a credit invoice is added as a job billing, the
credits will reduce the amount billed on the job ticket; if it's added as a
miscellaneous billing, the credit will only affect the client balance.
When entering a client payment against a credit invoice, in the payment column of
the invoice distribution window enter a negative amount against the negative
(credit) invoices. Doing this will net out the client payment to match the amount of
the client's check and clear both the normal positive invoices and the credit
invoices.
Printing A/R Reports
A/R Reports summarize invoices, showing what you've billed to
clients, jobs, and G/L accounts.
A/R reports can be used for reporting sales, tracking billings by client, and
auditing your accounting. There are several different reports that show your
billings from various perspectives; all reports, however, are based on posted
invoices.
Invoices can be summarized for any period of time (choosing either invoice date or
date posted), for one period or all periods, and for one client or all clients.
These options let you find the billings for a specific purpose, such as the
quarter’s billings for client ABC.
A/R reports show only posted invoices; unposted invoices appear only on proof lists.
Accounts receivable reports are different from client account agings, since they
show both paid and unpaid invoices (aging reports show only unpaid invoices).
Tips for printing A/R reports
Invoices are selected primarily by invoice date or date posted. This option lets you
show only invoices added in July, for example, instead of the entire year. By
entering a range of dates, you can select all invoices added today, last week, or
all month -- whatever time period you need. There’s no limit to which range of dates
you can use.
Reports can be printed one at a time by clicking on a report name. The print window
remains open after print the report. This allows you to run another report with the
same criteria, or edit the selections and rerun the same report. Reports can be
printed then reprinted with different selections, as often as needed.
A/R reports are normally printed either to the printer or the screen. By using Print
Destinations under the File menu, you can export to a spread-sheet compatible text
file, print in PDF or HTML format or even e-mail your billing reports.
To show the invoice description, click on the Show Description option. This option
makes your billing reports longer, but more descriptive.
To print A/R reports
1 Click the print Reports button (or choose File >
Print A/R Reports).
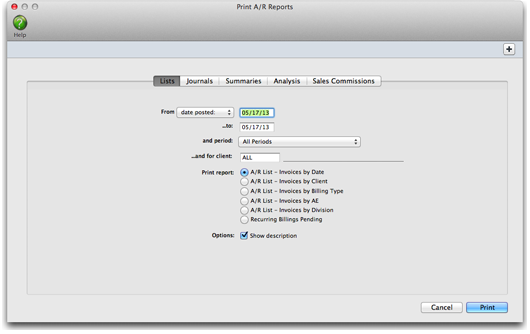
2 Select invoice date or date posted from the From
pop-up menu, then enter a range of dates.
3 Select an accounting period, or choose All
Periods to see invoices by date only.
4 Enter a client number, or leave the selection as
ALL.
To see invoices for one accounting period only, regardless of date, choose a period
from the pop-up menu then enter a very large range of dates (e.g., 1/1/12 -
12/31/12).
5 Select the report you wish to print.
6 Click Print.
To print another report repeat steps 2-6.
Billing and A/R Reports
A/R List Invoices by Date
The A/R List Invoices by Date provides a concise checklist of all invoices added for
a time period, but does not show the line item detail.
A/R List Invoices by Client
The A/R List Invoices by Client shows all invoices added for a time period and
sub-totals by client number.
A/R List Invoices by Billing Type
The A/R List Invoices by Billing Type shows all invoices added for a time period and
subtotals them by billing type. It prints one page per billing type.
A/R List Invoices by AE
The A/R List Invoices by AE shows all invoices added for a time period for an AE and
subtotals them by client. It prints one page per AE.
A/R List Invoices by Division
The A/R List Invoices by Division shows all invoices added for a time period for a
division and subtotals them by client. It prints one page per division.
Recurring Billings Pending The Recurring Billings Pending report shows all pending
invoices for a client within a specified time period. Once an invoice has been
created, it no longer appears on this report.
A/R Journal
The A/R Journal shows invoices along with line item and G/L details. Use the A/R
Journal to get a detailed listing of billings for a time period.
A/R Summary - Billings by cGL
The Billing Analysis/Billing Recap by cGL lists invoices by credit account. It is a
helpful auditing report since it corresponds to the G/L audit trail for income
accounts.
Group Billings
The Group Billings report shows billing amounts subtotaled by task groups.
Choose to show line-by-line detail (i.e. individual invoices) or task group totals
only.
Client Billing Summary (Cover Sheet)
The Client Billing Summary is a cover sheet for a batch of printed invoices. It can
be attached to a large batch of client invoices (which are printed together) to make
the billing amounts clearer to the client’s accounting department.
Sales Tax The Sales Tax Analysis report lists for a specified time period all
invoices by client with their sales tax totals. Each invoice shows the total amount,
the taxable amount for each tax rate, and the amount of sales tax calculated for
each rate. The first section of the report shows all invoices that were designated
as non taxable. The taxable sales, non-taxable sales, and sales tax totals on this
report make compiling your sales tax returns easy to do.
Media Accrual/Open Orders Summary
The Media Accrual/Open Orders Summary report lists for a specified time period all
media orders that have been billed to the client but not yet invoiced in Accounts
Payable by the vendor. There is an option to include closed orders on the report
too.
Billing Analysis - by AE
The Billing Analysis by AE lists invoices added for each account executive,
subtotaled by client. Together with the Billing Recap, these reports can be used to
compare billings for each account executive or account team.
Billing Recap - by AE
The Billing Recap by AE report shows each account executive's billings as a
percentage of total billings. Account executives and account teams are ranked by
total billings.
Billing Analysis - by Project
The Billing Analysis by Project lists invoices added for each project, subtotaled by
client.
Billing Analysis - by Group
The Billing Analysis by Group lists invoices added for each task group,
subtotaled by client.
Sales Commissions by AE
The Sales Commission by AE report lists all invoices added for each account
executive, subtotaled by client. Each invoice shows the commissionable billing
amount, commission rate, sales commission amount, and date paid. The report can be
printed for paid invoices only.
Sales Commissions by Biz Dev Exec
The Sales Commission by Biz Dev Exec report lists all invoices added for each
business development executive, subtotaled by client. Each invoice shows the
commissionable billing amount, commission rate, sales commission amount, date paid,
and the AE. The report can be printed for paid invoices only.
Sales Commissions by Spiffs
The Sales Commissions by Spiffs report lists all invoices by Account Executive,
subtotaled by client. It includes invoices of billed job tickets opened with a Job
Type Spec Sheet that includes a Spiff. Each invoice listed includes the Job Type,
Spiff amount and date the invoice was paid.
Sales Commissions Audit
The Sales Commissions Audit report lists for a specified time period all invoices
added for each account executive, subtotaled by client. Each invoice listed shows by
task the commissionable billings, sales commission rate, sales commission amount,
and date paid. The report also shows a subtotal by AE of commissionable billings and
sales commission amounts.
Printing Invoices
Client Invoices can be printed any time after they are posted.
Invoices can be printed individually, or in batches for a range of invoice numbers.
A batch of invoices can also be printed for the same client and a range of invoice
dates; this option lets you print the month’s invoices for one client quickly and
easily.
The printed invoice shows the line items, billing amounts, descriptions, and notes
you’ve entered into the invoices. Each invoice can have its own set of options and
settings (e.g., display options, group and sort, show or hide totals, etc.) that
affect the look of the billing. So printing a large number of invoices at the same
time may show a wide variety of invoice styles.
Invoices are designed to print on your letterhead. The invoice margins are
customizable, and can be set by choosing Invoice Options from the Preferences pop-up
menu. None of the invoice’s options can be changed at the time invoices are printed.
To change these options you must make your changes first, then print the invoice.
The optional agency billing address is printed from Agency Information, where it can
be changed.
An invoice can be printed then reprinted any number of times. As an option, a job
cost report can be printed showing costs billed on these invoices. This invoice
detail report can be used to back up the billing amounts on invoices, if you bill
strictly based on costs. If you bill for more than your costs, don’t print this
report -- your client will wonder why you’re overbilling them.
Unposted invoices will print if they are part of the selection, but will be printed
as “billing previews” until they are posted.
To print client invoices
1 Click on the print Invoices button, or choose
File > Print Invoices.
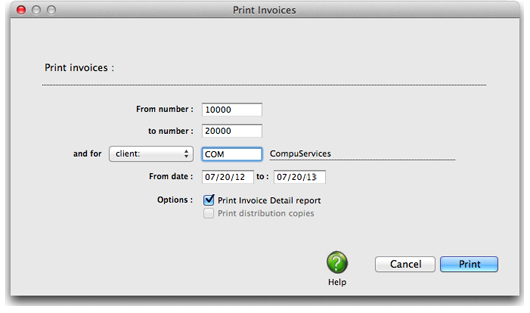
The Print Invoices window lets you select a batch of invoices selected by invoice
number (e.g., 6006 - 6015), one particular client, and a range of invoice dates. The
currently display invoice’s number is entered by default, but can be changed.
2 Enter a range of invoice numbers and an optional
client number.
Any invoice numbered within the range of numbers you enter will be printed (or
reprinted, in some cases). Enter a client number to print only invoices added for
one client; the option is useful when a client asks for a reprint of the month’s
billings.
Invoices may be printed either by Client or by AE/Team. Choose which you wish to
print from the ... and for drop-down menu.
3 Enter an optional range of invoice dates and
options.
The currently displayed invoice’s date is entered by default. Use this option only
when you need to print a set of invoices added on the same day or within the same
time period.
Use the print invoice detail report option to include a copy of the job cost report
with each invoice. Since job costs and billing amounts are linked, your clients can
easily see the costs billed specifically on an invoice. The Invoice Detail Report
shows gross amounts only, so clients won’t actually see what the agency paid for the
job’s costs.
Since each invoice can contain up to five distribution names, up to five copies of
an invoice can be printed automatically. Since laser printers don’t handle
multi-part forms, Clients & Profits prints the distribution name (e.g., Acct Exec,
Client, Job Jacket, etc.) at the bottom of each invoice.
When your print destination is selected to print to anything other than a physical
printer (i.e. E-Mail, PDF, etc.) the print distribution copies checkbox will remain
dimmed. To enable the print distribution copies option, choose File > Print
Destination > Printer.
4 Click Print.
Since an invoice can be reprinted many times, be careful not to mail out duplicate
copies of the same invoice just because it printed again.
Printing distribution copies If the Print distribution copies checkbox is greyed
out, not giving you the option to print more than one copy of the invoice, it is
likely that your print destination is set to something other than printer. To change
this setting, cancel out of the print invoices window, then choose File > Print
Destination, and choose Printer from the print destination list. Click the Print
Invoices button again, and the Print distribution copies checkbox will be active,
giving you the option to print distribution copies.
To print an estimate as a PDF file
For clients or shops that like to have their estimates e-mailed to them, Adobe
Acrobat allows you to save an estimate as a PDF file on your hard drive, your shop's
file server, or the client's web server. Creating PDF files from Clients & Profits
is nearly as easy as printing on paper, and involves only a few extra steps. The
hardest thing about creating PDF files is choosing a name, since each estimate you
save will have its own unique file name (such as, JOB101EST.PDF).
1 Choose File > Print Destination > PDF.
2 From the estimate window, click the Print
button.
The Print Job Estimates window opens, prompting you to enter the job number you wish
to print the estimate for, as well as amounts, etc.
3 Click Print.
4 A dialog will appear, asking you to name and
save the PDF file to your hard drive. After you have finished, click save.
Editing an Invoice's Description
1 From the Accounts Receivable
window, find an invoice then click the description button.
2 Make your changes, then click Save.
Changing an Invoice's Options
1 From the Accounts Receivable
window, find an invoice.
2 Click on the Options link.
3 Make your changes, then click Save.
The Billing Worksheet
Although the job's costs don't actually appear on the invoice, they
are billed when you add an invoice.
This means that you’ll always know when vendor invoices, time entries, checks, and
expenses were billed to a client, the amount billed, and the client’s invoice
number. Because Clients & Profits automatically applies what you’re billing to job
costs, extra data entry isn’t needed. Instead, billing amounts are applied to each
task’s costs, oldest first.
Every cost tracks when it was billed, the invoice number, the invoice date, and the
amount billed. This information makes it easy for anyone in the agency to see when
(or if) a cost was billed. Every cost window (A/P, checkbook, time sheets, and
expenses) shows billing information.
Client billings are based on job tasks, not literally the job’s costs. This means
when you bill a job, the amount that’s billed is copied from the job task. The job
task gets the unbilled total from job costs, but it’s a separate amount. This gives
you the ability to bill for more or less than the job’s costs, without making
adjusting cost entries. Instead, you simply bill what you want to bill -- and
Clients & Profits keeps track of the unbilled work in progress automatically.
The automatic cost billing will work for most of your invoices, since most billings
are straightforward. However, in some cases you may need to selectively bill some
costs, but not others. So the invoice’s Billing Worksheet window lets you change how
the billings are distributed to the job’s costs.
Editing the Billing Worksheet has no direct effect on your General Ledger. That’s
because costs update the General Ledger when they are posted as accounts payable and
checks.
How does billing work in progress affect the General
Ledger?
Costs from Accounts Payable or from the Checkbook debit the G/L when the vendor
invoices or checks are posted. Posting vendor invoices credits the A/P liability
account, while posting checks credits the Cash asset account. Posting client
invoices credits your income account only. A separate credit JE is posted for each
line item/billing amount on your invoice. The invoice total debits your A/R asset
account. These are the only G/L entries posted by Accounts Receivable.
The journal entries posted from A/P and A/R are automatic. You may need to make
adjusting G/L entries to accommodate complete inventory accounting for job costs.
You’ve got complete control over which debit and credit accounts are used.
Since WIP reports show costs by billing status (e.g., unbilled, unbillable, billed,
on-hold, partial, etc.) you can easily run a month-end report showing everything
billed, unbilled, etc. These reports can be used as the source for your inventory
journal entries. For more information see the WIP Accounting FAQ.
How billing amounts are applied to a job’s costs
The distribution of billing amounts to job costs is automatic. Costs are updated as
billing amounts are saved (e.g., after a new task is added to an invoice). You’ll
see a progress message while the line item is being saved. At this point, the line
item’s billing amount is applied to the task’s oldest, unbilled cost first. Then
billing amounts are applied methodically to the next-oldest cost, and so on until
there is no billing amount left.
For example: A job task ART has $1,000 in unbilled
costs, based on 10 time entries, 4 vendor purchases, and 1 check. When you add an
invoice for the job, then enter the task ART, the line item’s billing amount becomes
$1,000 automatically (it is copied from the task’s unbilled total). When the line
item is saved, the $1,000 billing amount is applied to the task’s costs (oldest
costs first). Its costs are marked as billed, one-by-one, until no billing amount
remains. If you bill less than the task’s unbilled amount, some of your costs will
remain unbilled or maybe partially billed.
Costs with a billing status of on-hold or unbillable don’t get billing amounts. You
can change the cost’s billing status in the job ticket’s Work in Progress window
prior to adding the invoice.
You can change the distribution of billing amounts to job costs before posting,
letting you change how costs were billed by an invoice.
To use the Billing Worksheet
1 From the Accounts Receivable window, find an
invoice.
2 Click on the Worksheet button (or choose Edit >
Billing Worksheet).
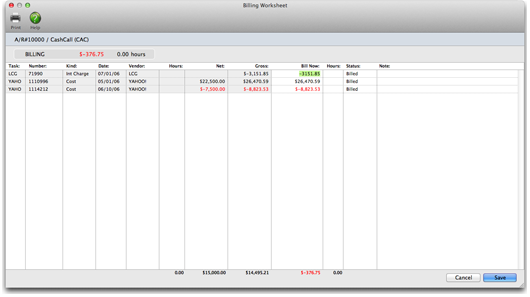
The costs that were billed by this invoice are listed, in date order. Each cost
shows the date, number, cost amount, gross (i.e., billable) amount, hours, and
amount billed. You can change the invoice’s cost billing anytime before posting.
Once an invoice is posted, its costs can’t be changed.
3 Make your changes the cost status and billing
amounts, then click Save.
Tabbing past the status field saves your changes to the cost and the next cost is
selected for editing. There are no restrictions on the billing amount, including
billing a cost for more than its gross amount. Changing a cost’s billing information
doesn’t affect the invoice, the client balance, or the General Ledger. Instead, the
changes you make will appear only on the job’s cost reports and on the work in
progress summary, which shows unbilled costs for all jobs.
To see a cost’s billing information
Every job cost remembers when and how it was billed. The cost’s billing information
is easy to see:
To see when an Accounts Payable invoice was
billed: From the Accounts Payable window, find the invoice. Then
double-click on any of its line items. You’ll see the billing information at the
bottom of the window. Since each cost on an A/P invoice could be billed at different
times, they may have different billing dates and invoice numbers.
To see when a time entry was billed: From the Time
Sheets window, find the time sheet. Then double-click on any of its entries. You’ll
see the time entry’s billing information at the bottom of the window.
To see when a check was billed: From the Checkbook
window, find a check, then double-click on any of the line items. You’ll see the
billing information at the bottom of the window. Since each cost on a check could be
billed at different times, they may have different billing dates and invoice
numbers. Checks for payments to vendor accounts won’t have billing information,
since they aren’t job costs.
To see when an expense was billed: From the
Expenses window, find the expense (by number or date, for example). You’ll see the
expense’s billing information at the bottom of the window.
To see your job’s unbilled costs
Costs and their billing information can be reviewed by task or for the entire job.
To see costs for one task: From the Job Tickets
window, click once on a job task. Then click on the View Task Costs button. The date
when the cost was billed appears on the right side of the report.
To see costs for one job: From the Job Ticket
window, choose File > Print Job Reports. Click on the Job Accounting reports
heading, then click on Job Costs reports. The billing status for each job cost
appears on the right side of the Job Costs report.
To see costs and billing information for all jobs:
Choose Snapshots > Work in Progress. From the Unbilled Cost reports, select Unbilled
Costs by Job, then enter a range of job status codes. Costs will be shown for all
jobs within the status range selected.
The cost’s billing status affects the job’s unbilled total. The job’s unbilled total
is the sum of its unbilled costs. Only costs having the status of unbilled or
partial (for partially-billed costs) will be included in the job task’s unbilled
total.
The Client Diary/Call Log
The Client Diary/Call Log window lists all of the entries users have
made about interacting with the client, whether it is a phone call or just a note (a
diary entry) about something that is going on.
The information here provides a recorded history of your shop’s relationship with
it’s clients. You’ll always have a record of who said what, and why, so there’s no
need to try to remember (or worse, guess) about what happened the last time you
worked together.
Notes made here can be added at any time, by any one (with the right access
privileges), and viewed in detail by double-clicking on the entry. Clicking on any
column heading sorts the entries by column heading to help you find the entry you’re
looking for, so there’s never any question about what was discussed, what occurred,
or who was involved.
Information entered in the Event/Action field act like a title and appear in the
Client Diary/Call Log window, while more detailed information is recorded in the
description field. The description is included in the Client Diary report, so you
can have a printed history of client interactions.
The unlimited free-form description field lets you type in as much information as
you need. You can also send an e-mail to people who should know about your client
interaction (team members, accounting, or even the client), by clicking on the names
in the notify window. You can also send a carbon copy, or blind carbon copy, e-mail
to anyone you wish. To help keep you on top of your follow-ups, you can check the
Resolved check box. A quick glance at the Client Diary/Call Log window will show you
which activities need to be resolved and which are completed.
Unlike the job diary, the client diary does not keep an automatic log of every
client activity -- it would generate an immense number of entries. Instead, the
client diary is used like a daily log. Anyone who works with one client account can
make notes about phone calls, meetings, etc. These entries are intended to help
account service manage new clients, media people track client meetings, and
accounting people track client payments.
To view a client’s diary
1 From the Clients window, find a client.
2 Click on the diary/Calls button (or choose Edit
> Client Tools > Client Diary/Call Log).
Each client diary/call log entry includes the date and time it was added, as well as
initials of the staff member who added it. The entry’s subject and description are
user-defined. Client diary entries can be useful for tracking problems, such as
overdue invoices. Since each entry has a “resolved” checkbox, the Client Diary
window clearly shows at-a-glance which entries are still pending. Once the client’s
issue is closed, anyone can mark the entry as “resolved.”
The client diary does not keep an automatic log of all changes or activity for the
client, instead meetings and events for this client are manually added to the diary.
Staff members can be notified of the event by e-mail sent directly from the client
diary.
Client diary entries are part of the C&P e-mail system, and will automatically
notify users at the right time (either when a diary entry is added or when a
scheduled entry is due). Like other e-mail messages, client diary entries can be
e-mailed to any staff member. In addition, copies of the messages can be forwarded
to two other addresses. When a scheduled entry is mailed, Clients & Profits marks
the entry as “sent.”
To add a client diary/call log entry
1 From Client Diary window, click the add button.
The Add Client Diary Entry window opens.
2 Enter the date, subject, and description of the
event or meeting. Client diary entries can be scheduled for some time in the future.
These entries work like a “tickler” file, reminding people in account service,
production, media, or accounting about upcoming activities.
3 Select a staff member from the Notify pop-up
menu to send an e-mail message with the diary entry as the body of the message.
Additional staff members or someone outside the company can also be notified by
typing in their e-mail address in the cc: or bcc: fields.
4 Click Save.
Client diary entries can also be added from the Accounts Receivable and Client
Payments window. This lets users make quick, easy notes about a client when invoices
or payments are added.
To print a client’s diary
1 From Client Diary window, click the print button
to print the client diary report.
"Hands down, this Clients & Profits Helpdesk is the best of any support team." -- Kate Mistler, Fabiano Communications

© 2026 Clients & Profits, Inc.