
Purchase Orders
Purchase, insertion, and broadcast orders account for purchases you make from vendors on a client’s behalf. They are not required by Clients & Profits, but give you control over your purchases. That’s because purchase orders provide written verification for the goods and services you order.
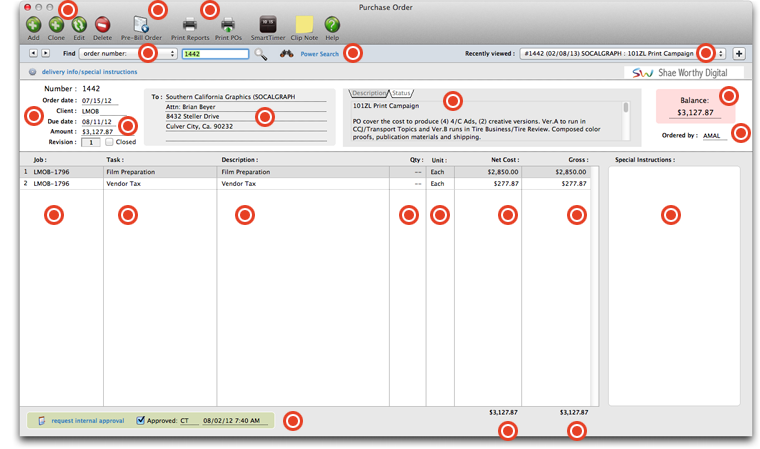
Use these buttons to add, clone, edit or delete purchase orders. Step-by-step instructions can be found below.
Any purchase order can be pre-billed. Pre-billing automatically creates an invoice for the purchase order's gross (i.e., billable) amounts. The "pre-billing" invoice shows the purchase order's job and task, just as if you'd added it yourself in Accounts Receivable. Step-by-step instructions can be found below.
Use these buttons to print individual Purchase Orders, or PO reports. Purchase order reports review, summarize, and analyze what you're ordering from vendors. Reports can be printed showing one type (such as insertion orders only) or all types.
Purchase Orders can be searched for by order number. Simply enter the PO number (if you know it) and click the magnifying glass icon.
Performing a power search narrows down your search to be more specific.
To revisit recently viewed purchase orders, use this pull-down menu. Clients & Profits automatically bookmarks the last 25 purchase orders viewed, making it easy to instantly see recently viewed POs, saving the time spent searching for them.
The details of the PO can be reviewed here, including the PO number, order date, client, due date, the amount of the purchase order, and the revision number.
If a purchase order has been closed, this checkbox will be selected. To close the PO, click the edit button, then select the closed checkbox. Only staffers with the access privileges to close POs will be able to do this. Check with your system manager.
The vendor's name and address on a purchase order can be customized. This ability lets you write a purchase order to a vendor in your database, but send the PO to a different address. See below for step-by-step instructions.
Every purchase order has a status that describes it, and it's not necessarily a number. It can be a word or short phrase that's completely customizable -- and user-defined. Click on the tabs to switch from description to status. To make changes, click the edit button.
The balance due on this purchase order appears here.
The person responsible for ordering this PO appears here.
The job number associated with this purchase order appears in this column. When editing specific line items, select the line item you wish to change, then click the edit button. To delete the line item, click the delete button.
A purchase order must have at least one job and task. Details from the job task, such as the task’s markup and billable status, are copied to the purchase order automatically. If the purchase order is for a non-job purchase, such as overhead, usually NONE will appear here.
The line item description appears in the body of the purchase order. It's used to briefly describe (in 50 letters or less) just what is being ordered. It is be copied from the task description, but can be changed.
The quantity (if applicable) will appear here.
The unit value appears in this column.
Net cost is the expected cost of the work what you will eventually pay this vendor for their work -- before commissions and markups. Markup is the percentage amount that is added to the net cost to calculate your gross amount.
Gross is the amount your client will later be billed for this work, including commissions and markups. The vendor sees the net cost on the printed purchase order, not the gross amount (except on media insertions, which show gross amounts -- not net costs). Both the net cost and gross amounts appear on the job ticket.
Any special instructions for each line item (such as delivery preferences, etc.) will appear in this area. This is totally optional.
Purchase Orders require an approval before C&P allows the next step in the workflow process. POs that have not been approved cannot be printed. If the PO has been approved, the initials of the person who has approved it will appear here, along with the time and date. For PO approval privileges, see your System Manager.
The total net cost of the PO will appear at the bottom of this column. Net cost is the expected cost of the work what you will eventually pay this vendor for their work -- before commissions and markups.
The total gross of the PO will appear here. Gross is the amount your client will later be billed for this work, including commissions and markups. The vendor sees the net cost on the printed purchase order, not the gross amount (except on media insertions, which show gross amounts -- not net costs).
Adding a purchase order
Anything purchased from a vendor should be tracked with purchase orders.They are essential for job costing, since they allow a cost to be committed to a job ticket before the vendor’s invoice is posted. Anyone can add a purchase order if they have the access privileges. A purchase order can be added from any computer running Clients & Profits.
Adding the purchase order doesn’t have to be complicated, since everything about a PO doesn’t have to be entered. Instead, all that a purchase order needs is a number, an order date, a vendor, a job and task, and an amount. The purchase order’s description, specifications, and options aren’t required. This additional information can also be entered after the PO is saved. A purchase order can be printed many times, as needed.
To add a purchase order
1 From the Purchase Order window, click the add button or choose Edit > Add Purchase Order.
The Add Purchase Order window opens.
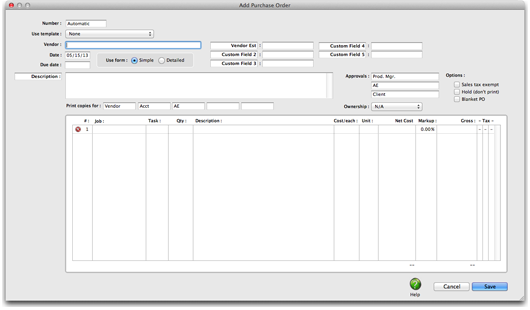
2 Enter the purchase order number.
Purchase orders are numbered automatically based on the settings in the PO preferences. If a purchase order is numbered when added, you’ll see its number immediately. If POs are numbered when saved, the number will be blank until you’ve saved the purchase order.
3 Enter the POs remaining details:
Use template The PO template automates adding the same kind of orders by entering standard information about a purchase order automatically. Selecting a template from the pop-up menu copies its settings to this purchase order, instead of having to type the information manually. Once the PO is saved, its type can’t be changed.
Vendor Every purchase order is added for only one vendor. The vendor name, address, and markup are copied to the purchase order automatically from the vendor file, and appear on the printed form.
Date, Due date, Description The order date is the date the purchase order was added. Due date is the date on which the work is to be delivered. The description can contain any kind of useful information that explains what you’re ordering.
Job, Task The job and task are essential for accurate cost accounting. A purchase order must have at least one job and task. (It can be charged to many jobs by checking the charge to many job tickets and tasks option, which is described in the To add amounts to a purchase order.) Details from the job task, such as the task’s markup and billable status, are copied to the purchase order automatically.
If the purchase order is for a non-job purchase, such as overhead, enter NONE as the job number. This tells the purchase order to ignore the task, markup, and other job costing details.
Net Cost, Markup, Gross Net cost is the expected cost of the work -- what you will eventually pay this vendor for their work -- before commissions and markups. Markup is the percentage (entered as 17.65, 25.00, etc.) amount that is added to the net cost to calculate your gross amount. Gross is the amount your client will later be billed for this work, including commissions and markups. The vendor sees the net cost on the printed purchase order, not the gross amount (except on media insertions, which show gross amounts -- not net costs). Both the net cost and gross amounts appear on the job ticket.
The amount you enter doesn’t have to be exact; instead, it can be the most you’ll allow the vendor to charge. On the printed purchase order, the line item amounts will be totaled. This total will appear at the bottom of the purchase order to the right of the label Total Not to Exceed, (which can be customized in Purchase Order Preferences).
Description The line item description appears in the body of the purchase order. It should be used to briefly describe (in 50 letters or less) just what is being ordered. It will be copied from the task description, but can be changed.
User defined fields User fields provide an easy way to include specialized information about a purchase order. These fields are completely customizable and appear on printed purchase orders. Since the vendor sees these fields, they are ideal for describing details such as print specifications (paper stock, inks, bindery, etc.).
4 Click Save.
Saving the purchase order updates the job’s commitment totals. The PO’s net cost increases the job task’s Net POs balance, while the PO’s gross amount increases the job task’s Gross POs balance. An order can be changed at any time before it is invoiced by the vendor or pre-billed to the client.
To clone a purchase order
Purchase orders can be created based on existing POs.
1 Find a purchase order you wish to clone, then click the clone button.
The Clone Purchase Order opens, including all of the details from the PO you've just cloned.
2 Make any necessary changes.
3 Click Save.
Editing a purchase order's description/status
Every purchase order has a status that describes it. Unlike the job status, the purchase order status is not necessarily a number. Instead, status can be a word or short phrase that's completely customizable -- and user-defined.
The purchase order status is used for sorting records on reports. Also, the purchase order status appears on the printed PO. The purchase order status is optional, so you don't have to use it. It's useful for tracking hundreds of open purchase orders, since it groups POs in some kind of sensible order. If you have only one purchase order to update, it's faster to change its status by clicking on the Specifications window. But if you have many purchase orders to update, the Update Status window makes it quick and easy.
To edit a purchase order's description/status
1 Choose Accounting > Purchase Orders, then find the PO that needs updating.
2 Click on the edit button.
The Edit PO window opens, displaying the purchase order's details, including revision number and current status.
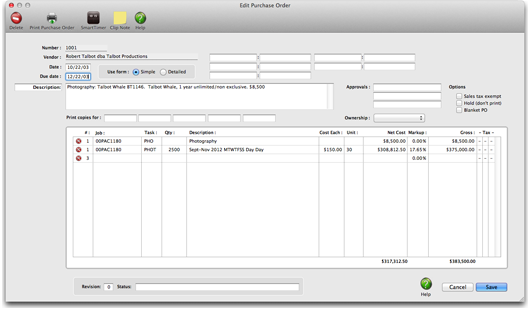
3 Make the necessary changes to the purchase order's details and status.
4 Click Save.
The order's new status will be seen and used throughout Clients & Profits. Changing the status to "closed" doesn't actually close the PO, since the PO's amounts aren't changed.
Adding and Editing Purchase Order Amounts
Purchase and insertion orders contain one or more line items. These line items include the actual dollar amounts of the items you're buying, in addition to specifications about the item itself. Each item you order on a PO can be edited anytime. These line items appear on the printed purchase order.
Line items and their amounts can be edited after a new purchase order is added and saved. Every line item can have a job number and task to track a job cost; each line item updates the job task separately. Each line item on a purchase order can contain a different job or task, if needed. Line items can also contain production specifications written specifically for the vendor, which appear on the printed purchase order.
The markup on an existing PO line item won't be automatically changed under any circumstances, which is the way its supposed to work (it preserves the markup that was entered when the line item was added). This is true even if you change the task. The markup is only calculated if the line item didn't have one originally.
To edit purchase order amounts
1 From the Purchase Order window, find a purchase order.
2 Double-click on the line item you wish to edit the amounts for.
The Edit Purchase Order Amount window opens, listing the line item's details. Every order amount (i.e., line item) has a line number that identifies the amount.
3 Make any necessary changes, then click Save.
Line number The line number is crucial for job costing, since it links the order amount with the vendor's invoice in Accounts Payable. It is also used for sorting amounts on the printed invoice. You can enter any line number, but don't use the same line number twice.
Job and task Every line item (i.e., order amount) needs a job number and task to indicate which job ticket should be updated by this purchase. When the line item is saved, the cost amount increases the job task's committed balance -- showing that you've ordered something from a vendor. If this purchase isn't for a job ticket (ie., overhead), enter the word NONE instead of a job number.
Quantity, Description, cost each, and unit The quantity, cost each, and unit of measure describe the item you're ordering. These fields are optional, and will only appear on detailed purchase order forms (the detailed form setting can be changed later in the Options window). The quantity can be useful for ordering printing (such as 10,000 copies of a brochure). The unit cost can be up to four decimal places, which is useful for specifying small costs. Unit indicates the unit of measure, such as per thousand, each, lot, or other measure.
Net cost, markup, and gross amount The net cost is the amount you're actually paying for this item, before markups and commissions. The net amount updates the net POs total on job tasks. Vendors only see the net cost amount on purchase orders. The markup is copied from the vendor account, but is replaced by the job task's markup (if one is entered). The markup is used to calculate the gross, or billable, amount. Vendors don't see the markup percentage. Gross is the amount that eventually will be billed to the client. It is calculated as the net cost times the markup, but can be changed as needed. The gross amount increases the gross POs total on the job ticket. Vendors don't see the gross amount, since it includes commissions.
If you bill a purchase order, the gross amount -- not the cost amount -- is copied to the client's invoice. To make a purchase order unbillable, don't enter a markup or gross amount. Instead, enter a net cost amount only.
To remove amounts from a purchase order
1 Find a purchase order, then click once on a task to select it.
2 Click the remove amount button (or choose Edit > Remove Order Amount)
Pre-billing a Purchase Order
A single mouse click can pre-bill a client for the purchase order.
Any purchase, insertion, or broadcast order can be pre-billed. Pre-billing automatically creates an invoice for the purchase order’s gross (i.e., billable) amounts. The “pre-billing” invoice shows the purchase order’s job and task, just as if you’d added it yourself in Accounts Receivable. The pre-billing invoice is unposted, so can be proofed, posted, then printed with other invoices. Pre-bill makes it easy to bill your clients for large commitments, such as postage, printing, and media buys, then (hopefully) receive payment before the vendor’s invoice is due.
1 Find the purchase order you wish to pre-bill.
2 Click the pre-bill button, or choose Edit > Pre-bill.

3 Select the pre-bill options.
The show totals only option combines all of the purchase order’s amounts together, so that the invoice shows only one billing amount. The show item-by-item detail creates a separate billing amount for every line item on the purchase order. Which one to choose? Pick the option that the client is least likely to question.
The purchase order’s billing can be added to an existing invoice by entering its invoice number. Use this option to combine several pre-billed purchase orders together onto one invoice. The invoice must be an unposted, pre-billing invoice to have amounts appended to it.
4 Enter the pre-bill invoice’s client number.
This option bills the purchase order to a different client, such as a corporate office.
5 Click Save.
Editing a purchase order's description/status
Every purchase order has a status that describes it. Unlike the job status, the purchase order status is not necessarily a number. Instead, status can be a word or short phrase that's completely customizable -- and user-defined.
The purchase order status is used for sorting records on reports. Also, the purchase order status appears on the printed PO. The purchase order status is optional, so you don't have to use it. It's useful for tracking hundreds of open purchase orders, since it groups POs in some kind of sensible order. If you have only one purchase order to update, it's faster to change its status by clicking on the Specifications window. But if you have many purchase orders to update, the Update Status window makes it quick and easy.
To edit a purchase order's description/status
1 From the Purchase Order window, find the PO that needs updating.
2 Click on the delivery info/special instructions link.
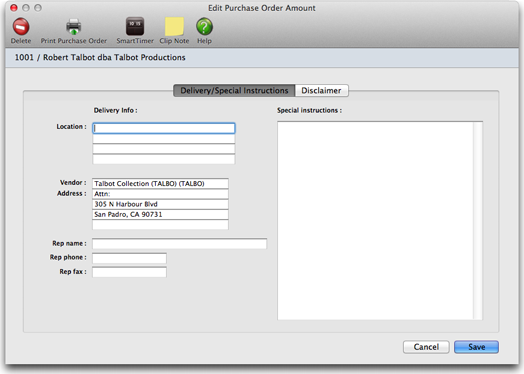
The Edit PO Description/Status window opens, displaying the purchase order's details, including revision number and current status.
3 Make the necessary changes to the purchase order's details and status.
4 Click Save.
The order's new status will be seen and used throughout Clients & Profits. Changing the status to "closed" doesn't actually close the PO, since the PO's amounts aren't changed.
To edit vendor information
The vendor's name and address on a purchase order can be customized. This ability lets you write a purchase order to a vendor in your database, but send the PO to a different address.
It's convenient for vendors with different locations, such as printers and publishers. Any changes you make appear on the printed purchase order only.
1 From the Purchase Order window, click the Vendor Info link.
The Vendor Information window opens.
The vendor's name and address is copied from the vendor account to the purchase order when it is added. The first line of the address contains the vendor's name, and it can be changed, too. The remaining address lines can contain any kind of information you need (e.g., an account number, mail stop, contact name, etc.). Changing the vendor's address on the purchase order only affects the PO. The address in the vendor account is unchanged.
2 Make your changes, then click Save.
The vendor file can contain an address for purchase orders that is separate from the vendor address.
Renumbering vendor accounts on all jobs
You can use the Renumber utility to rename a vendor on all jobs, or merge two different vendor accounts into one. For example, when one vendor is acquired by another you’ll only need one vendor account. The Renumber utility will combine the invoices and checks for both vendors together under the new account number.
Once Renumbered, the original vendor account is deleted.
To edit an order's delivery details
Every purchase order includes special delivery information. These details are intended to help the vendors deliver their work accurately -- and deliver it to the right place.
The delivery instructions should explain how the work should be delivered. The delivery address should explain where the work should be delivered.
To edit an order's delivery details
1 From the Purchase Orders window, click the delivery info/special instructions link.
The deliver information/order options window opens, prompting you to enter the purchase order's details.
To edit a purchase order's options
Every purchase order has distinct options that change the way the PO looks and behaves. These purchase order options can be set as system defaults, in Preferences, or included as part of a PO template. These settings are copied to new purchase orders automatically. In addition, these options can be tailored on individual purchase orders.
1 From the Purchase Order window, click the delivery options/info link.
The approval names appear at the bottom of the printed purchase order. Up to three names can be entered; space for signatures is included next to the name. Anyone can be entered as an approval name, such as the art director, account executive, or even a client contact. Up to five copies of the same purchase order can be printed at once using names in the distribution list. This option is designed to generate multi-part forms on laser printers, which don't use NCR forms. The names you enter appear at the bottom of the printed purchase order.
2 Make your changes, then click Save.
To close a purchase order
There are two ways to close an order. Click the Closed checkbox to close one at a time, or select Edit > Update Order Status to close many at one time.
Closing an order will set any remaining balance to zero, which is good to do after the A/P invoice has been applied against it. Closing an order will also remove it from the Open Orders lookup list and remove it from various reports such as the Open Orders or Over & Under Orders reports.
Blanket Purchase Orders
A blanket PO is a Purchase Order that is valid for a specified period of time and authorizes multiple orders during that time period, as long as the total dollars on the PO are not exceeded. Blanket POs limit the types of goods or services that can be ordered, and may also limit the order amounts. Most Blanket orders are issued by one department for their own use, but soem Blanket orders cover the entire company.
Because blanket POs generate multiple invoices for various dollar amounts over their life, it is more effective to receive IN DOLLARS with blanket orders. Specific quantities of goods are not specified on the order, so it is impossible to receive a "quantity" of goods or services. You should enter a receipt for the total dollar amount of the invoice you are approving, unless you wish to pay a lesser amount.
Purchase order approvals
Various records in C&P can require an approval before C&P allows the next step in the workflow process. In the case of orders, this would be to allow it to be printed. See the Approval Manager page for more details.
Vendor Diaries
The vendor diary does not keep an automatic log of every vendor activity. That would create an immense number of entries. Instead, the vendor diary is used like a daily log. Anyone who works with one vendor account can make notes about phone calls, meetings, etc.
These entries are intended to help accounting people to manage vendor accounts and to track payables and payments.
Each vendor diary entry includes the date and time it was added, as well as the initials of the staff member who added it. The entry’s subject and description are user-defined. Vendor diary entries can be useful for tracking problems, such as overdue invoices, credits pending, etc... Since each entry has a “resolved” checkbox, the Vendor Diary window clearly shows at-a-glance which entries are still pending. Once the vendor’s issue is closed, anyone can mark the entry as “resolved.”
To view a vendor’s diary
1 From the Accounts Payable window, click on the Vendor Diary link.
The vendor diary does not keep an automatic log of all changes or activity for the vendor, instead meetings and events for this vendor are manually added to the diary. Staff members can be notified of the event by e-mail sent directly from the vendor diary.
Vendor diary entries are part of the C&P e-mail system, and will automatically notify users at the right time (either when a diary entry is added or when a scheduled entry is due.) Like other e-mail messages, vendor diary entries can be e-mailed to any staff member. In addition, copies of the messages can be forwarded to two other addresses. When a scheduled entry is mailed, Clients & Profits marks the entry as “sent.”
To add a vendor diary entry
1 From the Vendor Diary window, click the add button.
2 Enter the date, subject, and description of the event or meeting. Vendor diary entries can be scheduled for some time in the future. These entries work like a “tickler” file, reminding people in accounting about ongoing issues with a vendor.
3 Select a staff member from the Notify pop-up menu to send an e-mail message with the diary entry as the body of the message.
Additional staff members or someone outside the company can also be notified by typing in their e-mail address in the cc: or bcc: fields.
4 Click Save.
Vendor diary entries can also be added from the Accounts Payable and Checkbook window. This lets users make quick, easy notes about a vendor when payables or checks are added.
To print a vendor’s diary
1 From the Vendor Diary window, click the print button.
Purchase Order Reports
Purchase order reports review, summarize, and analyze what you’re ordering from vendors.
Reports can be printed showing one type (such as insertion orders only) or all types. Purchase, insertion, and broadcast orders are selected for a range of dates (using date added or due date) and either vendor, client, status, or by the buyer (i.e., ordered by initials).
The Print Purchase/Insertion Order Reports window shows the different purchase order reports types (i.e., Lists, Summaries, Analysis). Clicking on a report type shows the different reports along with options for selecting POs for printing. Reports are printed by selecting a report name. Reports can be printed then reprinted with different selections, as often as needed.
Purchase orders aren’t posted, so they always appear on PO reports. For this reason, there’s also no proof list for purchase orders.
Use the Print to pop-up menu to choose where you want these reports printed. Reports can be printed to the printer (for a hard copy on paper), the window (so you can preview the reports on-screen first), or exported to disk (to create a text file that can be opened and edited in a spreadsheet).
Tips for printing PO reports
Reports select purchase orders primarily by the date ordered. By entering a range of dates, you can select all purchase orders added today, last week, or all month. There’s no limit to the range you can use.
To see only purchase orders with the same status (e.g., on-hold), choose status from the select orders by pop-up menu, then enter a status. To see all purchase orders, regardless of status, enter the status as "ALL".
To see only one type of order, such as insertion orders, select Insertion Orders from the for type pop-up menu.
To see the description for each purchase order on the reports, select the show description option.
The PO Lists can be selected by vendor, client, ordered by, or status by selecting the select orders by pop-up menu.
To print purchase order reports
1 Click the print button, or choose File > Print PO Reports.
2 Select a type of report (e.g., Lists, Summaries, Analysis, or Misc.).
3 Choose date added or due date from the pop-up menu, then enter a range of dates.
4 Choose a type from the pop-up menu to print only purchase orders, insertion orders, or broadcast orders or choose All to print all orders.
5 Choose a selection option to print orders by vendor, client, status, or ordered by initials, then enter a selection value.
The selection value is either a vendor number, client number, status, or a buyer’s initials. To print only your orders, for example, choose Ordered by from the pop-up menu then enter your initials.
6 Select the report you wish to print.
7 Choose any additional options.
The show description option can make the report very long, depending on the length of your PO descriptions.
8 Click Print.
Purchase Order Reports
PO Log
The PO Log lists orders by order number.
PO List by Type
The PO List by Type lists orders by type, showing separate sections for purchase orders, insertion orders, and broadcast orders.
PO List by Vendor
The PO List by Vendor lists orders by vendor. Use this report to analyze purchases ordered for each vendor for the last quarter, for example.
PO Status List
The PO Status List lists orders by order number, displaying each order’s current status.
PO Summary
The PO Summary shows the orders and their line items, instead of showing totals only.
Unapproved Orders
The Unapproved Orders report gives managers a list of orders awaiting their approval.
Open Orders
The Open Orders report is a comprehensive listing of the shop’s outstanding orders.
Over & Under Orders
The Over & Under Orders report shows only orders that have balances. The balance can be a positive or negative amount.
"Hands down, this Clients & Profits Helpdesk is the best of any support team." -- Kate Mistler, Fabiano Communications

© 2026 Clients & Profits, Inc.