
Media Briefs (Campaigns)
Media briefs allow users to create and organize media campaigns for easy use in media plans, media estimates and media orders. Media briefs (which are also used as campaigns) allow media and account services people to see all of a client’s media campaigns in one window.

The Add Media Brief (Campaign) window lets you create a media brief/campaign for use by media plans, media estimates, and media orders. Media briefs (which are also used as campaigns) allow media and account services people to see all of a client's media campaigns in one window.
If you’re working with a client that will have several media campaigns, and the details do not fluctuate very much, save some time by cloning (i.e., duplicating) an existing media brief. To clone a brief, lick once on a media brief in the Media Briefs (Campaigns) list to select it, then click the clone button.
To edit an existing media brief, click on a media brief from the Media Briefs (Campaigns) list, then click the edit button. Make your changes, then click Save. To delete an existing media brief, click once on a media brief in the Media Briefs (Campaigns) list to select it, then click the delete button.
A report listing all media briefs can be printed that groups open and closed media briefs together by clicking the print reports button. The Media Brief List report will show you the campaign ID (code), the client’s name and code, name of the media campaign, start and end dates, and each one’s status.
The printed media brief summarizes the campaign's details, including its budget and description, in a one-page form that can be distributed to the client, production/traffic department, and account services. Click once on a media brief in the Media Briefs (Campaigns) list to select it. Click the print brief button, or choose File > Print Brief.
Clicking the Send Brief button opens the Send E-mail window allowing you to email a PDF version of the Media Brief to the client and/or staffers.
You can filter the media briefs by client by entering a client code then clicking the Find button. To see all media briefs, enter the word "ALL" in the "find client" field then click Find. To approve a media brief, select one from the list and click the approve the selected media brief link.
These tabs allow you to view pending, approved, or killed media campaigns.
Select a campaign from the list to edit, clone, delete, or print a media brief.
When a media brief is selected from the list, the campaign's objective is shown here. The objective of a campaign is entered when the media brief is added and/or edited.
To use media briefs
Each media brief can contain details about the campaign for analysis later on. Information about the target audience, media options, and exhibits can be entered for each campaign, as well as media budget amounts for each media type.
Media briefs can keep on working for you. A lookup window for media briefs can be used by Media Buyers so they can quickly attach a media campaign to a print media plan, broadcast media plan, print media estimate, insertion order or broadcast order.
Anyone with access privileges to media can add, edit, delete, and print media briefs.
To use media briefs
1 Choose uMedia > Media Briefs.
The Media Briefs (Campaigns) window opens, listing each media campaign and it’s client, campaign code, campaign name, start and end dates, and status. All media briefs, including completed briefs, are listed by client. Media briefs can be sorted by client, campaign code, name, date, or status by clicking on a column heading.
You can filter the media briefs by client by entering a client code then clicking the Find button. To see all media briefs, enter the word "ALL" in the "find client" field then click Find.
To see a media brief
1 Double-click on a media brief from the list to open the Edit Media Brief (Campaign) window.
Clicking the previous and next toolbar buttons will highlight a media brief.
To add a new media brief (campaign)
The Add Media Brief (Campaign) window lets you create a media brief/campaign for use by media plans, media estimates, and media orders.
Media briefs (which are also used as campaigns) allow media and account services people to see all of a client’s media campaigns in one window. Users are able to see quickly and clearly the theme, status (approved, pending, etc.), start/end dates, and objective for each media campaign.
To add a new media brief (campaign)
1 Click the add button, or choose Edit > Add Media Brief.
The Add Media Brief (Campaign) window opens, prompting you to enter the new media brief's details.
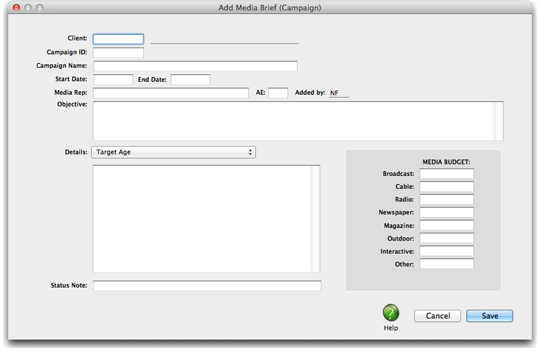
2 Enter a client number, or leave the field blank then press Tab to use the Lookup List.
This is the client who will authorize and approve the media campaign. Every media brief (campaign) must have a valid client number. A Media brief (campaign) can't be added for companies that don't have an account set up in Clients.
3 Enter the campaign ID for the media brief (campaign).
A campaign ID is required for each media brief (campaign) created. The Campaign ID is a user defined code, that should help you in quickly telling a media campaign apart from the others. It can contain up to 10 (alpha/numeric) characters, and appears when the media brief is printed, and on the media brief list report.
4 Enter the campaign name
The campaign name is the title/name of the media brief (campaign), and should refer briefly its theme or purpose. This information is optional, but is also helpful in identifying and telling media briefs apart from one another. It can contain up to 40 (alpha/numeric) characters, and is also user defined. The campaign name is listed when the media brief is printed, and also appears on the media brief list report.
5 Enter the media brief/campaign's start date and end date.
The start date refers to the first day ads will be running for a media campaign. The end date is the last day ads air/appear in a media campaign. These dates appear when the media brief is printed, and on the media brief list report.
6 Enter the name of the media rep who will be performing most of the planning/ordering for this campaign.
The rep's name will appear on the printed media brief.
7 Enter the initials of your shop's account executive who is also servicing this client.
These initials are listed on the media brief when printed.
8 Your log-in initials will appear by default under “Added by” and on the media brief when printed.
9 Enter the objective of the media brief (campaign).
The objective should include a description of what the media campaign hopes to accomplish, what its goals are, and any other details about its purpose. It can be as brief or as detailed as you want. This information is optional, but when entered it does appear on the media brief when printed.
10 Enter additional details for the media brief (campaign) by choosing a topic from the pop-up menu, then entering the text.
The pop-up menu includes headings for the media audience, media schedule, and supporting events. You’re able to record the main audience’s target age, gender, occupation, and lifestyle; any media recommendations, and/or scheduling details; plus any supporting exhibits (such as a trade show, event sponsorship, live promotion, etc.) for this media brief (campaign). Any text entered under these headings will appear when the media brief is printed.
11 Enter campaign's budget amounts for various kinds of media.
You’re able to enter media budget amounts for any kind of media. List how much the media department has been approved to spend on Broadcast, Cable, Radio, Newspaper, Magazine, Outdoor, Interactive, and/or Other types of media. Any amounts entered will appear on the printed media brief.
12 Enter the status of the media brief (campaign).
Information entered here is user-defined, and should easily tell what stage the media brief (campaign) is currently at. It will be easier to quickly determine a media campaign’s status if you work from a limited list of options and be consistent in their use. Sample options can include: pending, approved, on-hold, under review, finished + more. The media brief (campaign) status appears on both the printed media brief and media brief list report.
13 Click Save.
Once a new media brief is saved, it can be printed from the Media Briefs (Campaigns) window by clicking the print toolbar button.
To edit an existing media brief
1 Double-click on a media brief from the Media Briefs (Campaigns) list.
The Edit Media Brief window opens, displaying the media brief and its details.
2 Make your changes, then click Save.
To delete an existing media brief
If a media campaign isn’t going to move forward from the planning stages, you can always delete it from the Media Briefs window.
1 Click once on a media brief in the Media Briefs (Campaigns) list to select it.
2 Click the delete button or choose Edit > Delete Media Brief.
To clone an existing media brief
If you’re working with a client that will have several media campaigns, and the details do not fluctuate very much, save some time by cloning (i.e., duplicating) an existing media brief.
1 Click once on a media brief in the Media Briefs (Campaigns) list to select it.
2 Click the clone button.
The Clone Media Brief window opens, displaying the new copy of the media brief you selected. All of the existing media brief's details are copied to the new brief except for the campaign ID, which you'll need to enter. (The campaign ID must be unique for each media brief).
3 Enter the new media brief's details, then click Save.
To print a media brief
The printed media brief summarizes the campaign's details, including its budget and description, in a one-page form that can be distributed to the client, production/traffic department, and account services.
The form shows the media brief's campaign ID (code), the title/name of the media campaign, the name of the client, who the agency media rep is, initials/name of the account executive for this client, the start and end date of the campaign, the description of the media campaign’s goals and objectives, the status, and the initials of the user who added this media brief.
The media budget is broken down by type (i.e., Broadcast, Cable, Radio, Newspaper, Magazine, Outdoor, Interactive, and Other). Additional information will also show up on this report if you entered any details about the target audience, types of media and preferred scheduling for this campaign, and/or any supporting exhibits.
1 Click once on a media brief in the Media Briefs (Campaigns) list to select it.
2 Click the print brief button, or choose File > Print Brief.
At this time, the media brief can't be e-mailed as a PDF file.
To print a media brief report
A report listing all media briefs can be printed that groups open and closed media briefs together by clicking the print reports button. The Media Brief List report will show you the campaign ID (code), the client’s name and code, name of the media campaign, start and end dates, and each one’s status.
1 From the Media Briefs (Campaigns) window, click the print reports button.

© 2026 Clients & Profits, Inc.