
Vendors
Vendors are suppliers from whom you purchase goods and services through Accounts Payable. The vendor file contains every vendor you’ll ever do business with, including account number, name, address, and some account information.
To add a new vendor, click the add button. New vendors are not automatically numbered. Any kind of 10-character number or code can be used. To edit a vendor’s name and address, click the edit button. Anything about a vendor -- except its number, account balance, and purchase history -- can be changed at anytime. Vendors without any activity can be deleted at anytime.
Use these buttons to print vendor reports or labels for a specific vendor.
If you know the vendors number, enter it here then click the magnifying glass icon. You can browse through all vendors using the back and forward buttons.
You can also choose a vendor from this drop-down menu. All vendors in your database will appear in this list. Simply select the one you wish to view.
You may narrow the list of vendors by filtering them by type - top vendors, active vendors, inactive vendors, new vendors, vendors that are on-hold, or by a category such as animation, broadcast, media, etc.
Any overhead A/P invoice can be set up to be automatically added on a recurring schedule for a vendor. This is useful for rent, insurance, or equipment lease payments that are paid monthly or quarterly. The schedule of payments is set in increments of days.Recurring payables can appear on proof lists.
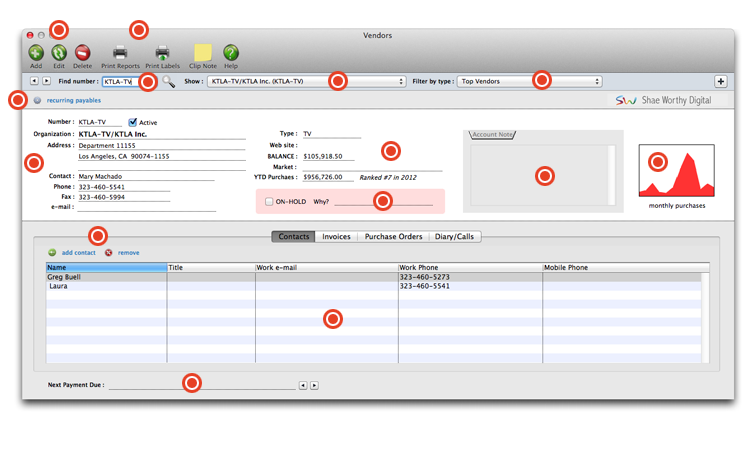
The vendor's vital information is displayed here, such as the vendor's number, organization name, address, contact name and info, email, etc.
The vendor's type, web site, balance due to the vendor, market, and year to date purchases are all displayed here. The vendor is also ranked by Clients & Profits automatically, which is also displayed. A vendor's ranking is based on your total purchases from the previous year.
If this vendor is on hold, this checkbox will be selected. A reason for the vendor being placed on hold will also appear. If you have the necessary access privileges, you can place a vendor on hold by clicking this checkbox.
Optional account notes will appear here. These can be added and edited in the Edit Vendor window.
This small graph gives you a visual representation of the monthly purchases you've made with this vendor.
To add a contact, or remove one, use these links. Clicking the Diary/Calls tab to the right will also give you links to add or remove a diary/call entry. The invoices and purchase orders tabs will display an entire history of invoices or POs associated with this vendor.
Double-clicking on a contact will bring up the Edit Contact window. Double clicking on an invoice or purchase order will open that invoice or PO. Double-clicking on a diary/call entry will open the Edit Diary/Call window. To remove any line item, simply select it from this list, then click the remove link above.
If there is a payment due to this vendor, the due date for the payment will appear here.
To find a vendor
To find a vendor, choose File > Find Vendor, enter the vendor number, then click the Find button. You can also find vendors by sequence (i.e., the order that they were added into Clients & Profits) or by company name using the Find Vendor By pop-up menu. To browse through the staff database, click the Next and Previous toolbar buttons.
To add a new vendor
1 Click the add button or choose Edit > Add New Vendor.
2 Enter the new vendor’s number, name, address and other details then click Save.
New vendors are not automatically numbered. Any kind of 10-character number or code can be used.
To edit a vendor’s name and address
1 Click the edit button, or choose Edit > Edit Vendor.
2 Make your changes, then click Save.
Anything about a vendor -- except its number, account balance, and purchase history -- can be changed at anytime.
To delete a vendor
Vendors without any activity can be deleted at anytime. A vendor with an outstanding balance can’t be deleted; if so, the vendor’s unpaid invoices wouldn’t have an account to update. A vendor with no balances, but paid invoices, can’t be deleted either. If so, the vendor’s invoices -- although paid -- wouldn’t know to which account they belong (and probably neither would any user). So for better accountability, only vendors without activity can be deleted.
1 Choose Edit > Delete.
A vendor with invoices or POs can’t be deleted. Instead, an old vendor can be made inactive by choosing Edit > Edit Vendor then unchecking the Active checkbox. Inactive vendors don’t appear on lookup lists or vendor reports and can’t be used for new purchase orders or A/P invoices. Inactive vendors can be used again by simply checking the Active checkbox.
Making a vendor active/inactive
If a vendor account's active checkbox is checked, then it is an active vendor. Vendors that are no longer used can be made in-active by unchecking the active checkbox in the Edit Vendor Account Info window. Likewise, vendors that are currently inactive that you would like to make active can also be made active in the Edit Vendor Account window at any time.
1 Choose Edit > Edit Vendor, or click the Edit button.
2 Check or uncheck the Active checkbox, then click Save.
Inactive vendors don’t appear on the lookup list nor can purchase orders or payables be added for them.
To edit a vendor’s notes
The vendor’s notes describe something about a vendor. These notes don’t usually appear on standard C&P reports, but can be used on custom reports.
1 Click the Notes link.
2 Enter the vendor’s notes then click Save.
To edit a vendor’s contacts
The names and phone numbers are tracked for each vendor using the Vendor Contacts window. They’re completely customizable, as well as optional.
1 Click the Contacts link.
2 Enter the vendor’s contact names and phone numbers, then click Save.
To see a vendor’s statistics
The Vendor Statistics window displays the total purchases (including the number of invoices) for each quarter of the current year. To see last year’s totals, choose Last Year from the Show pop-up menu. Clicking the Graph button calculates the quarterly totals and draws a graph. Clicking the Print button prints a hard-copy version of the stats window.
1 Find a vendor, then click on the Stats button.
Tracking vendor purchases. A graph comparing a vendor’s quarterly purchases identifies trends that can be useful for negotiating better terms. The graph’s totals are calculated from posted A/P invoices. Purchases from this year and last year can be compared using the “show” pop-up menu.
To print a vendor’s account ledger
The account ledger shows a detailed listing of the vendor’s invoices. The report shows at a glance just what you’ve purchased from a vendor. It can be a helpful report, giving you valuable financial data that you can use when negotiating better prices.
1 Choose File > Print Account Ledger.
To edit a vendor’s account information
Click the Acct Info link, make your changes, then click Save.
Working with vendor diary entries
The vendor diary does not keep an automatic log of every vendor activity. That would create an immense number of entries. Instead, the vendor diary is used like a daily log. Anyone who works with one vendor account can make notes about phone calls, meetings, etc.
These entries are intended to help accounting people to manage vendor accounts and to track payables and payments.
Each vendor diary entry includes the date and time it was added, as well as the initials of the staff member who added it. The entry’s subject and description are user-defined. Vendor diary entries can be useful for tracking problems, such as overdue invoices, credits pending, etc... Since each entry has a “resolved” checkbox, the Vendor Diary window clearly shows at-a-glance which entries are still pending. Once the vendor’s issue is closed, anyone can mark the entry as “resolved.”
To view a vendor’s diary
1 In the Vendor window, click the Diary/Calls tab.
The vendor diary does not keep an automatic log of all changes or activity for the vendor, instead meetings and events for this vendor are manually added to the diary. Staff members can be notified of the event by e-mail sent directly from the vendor diary.
Vendor diary entries are part of the C&P e-mail system, and will automatically notify users at the right time (either when a diary entry is added or when a scheduled entry is due.) Like other e-mail messages, vendor diary entries can be e-mailed to any staff member. In addition, copies of the messages can be forwarded to two other addresses. When a scheduled entry is mailed, Clients & Profits marks the entry as “sent.”
To add a vendor diary entry
1 In the Diary/Calls tab, click the add diary/call entry button.
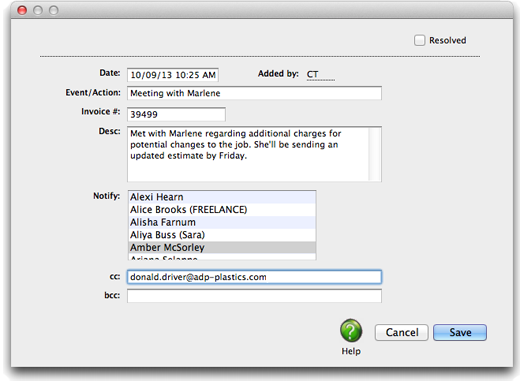
2 Enter the date, added by, event/action and invoice # related to the event or meeting. Vendor diary entries can be scheduled for some time in the future. These entries work like a “tickler” file, reminding people in accounting about ongoing issues with a vendor.
3 Select a staff member from the Notify pop-up menu to send an e-mail message with the diary entry as the body of the message.
Additional staff members or someone outside the company can also be notified by typing in their e-mail address in the cc: or bcc: fields.
4 Click Save.
Vendor diary entries can also be added from the Accounts Payable and Checkbook window. This lets users make quick, easy notes about a vendor when payables or checks are added.
Schedule recurring payables
Up to a year’s worth of overhead invoices can be entered as recurring payables for vendors.
Any overhead expense invoice can be scheduled as a recurring payable. They look just like any other overhead expense invoice when created. Recurring payables can be scheduled from either the Accounts Payable window or from the Vendor's window.
To schedule a recurring payable from Accounts Payable
Any overhead expense invoice can be used to create recurring payables.
1 Choose Setup > Vendors, then find the vendor you wish to schedule recurring payables for and double-click on the vendor name to open the Vendors window.
2 Click on the recurring payables link, or Choose Edit > Recurring Payables.
The Repeat Recurring Invoice window will open. Once a vendor has a recurring payable added, additional recurring payables can be scheduled right from the Recurring Payables window.
3 Click the Add button.
The Add Recurring Payble window will open.
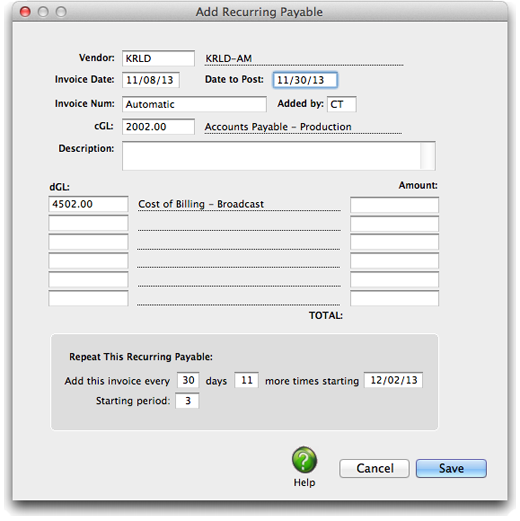
4 Enter your information, then click OK.
The new recurring payables will now be listed in the Recurring Payables window.

© 2026 Clients & Profits, Inc.