
General Ledger
Clients & Profits is built around a one-write, double-entry general ledger. This comprehensive, accrual accounting system automatically tracks your income, costs, and expenses using a custom, user-defined Chart of Accounts.
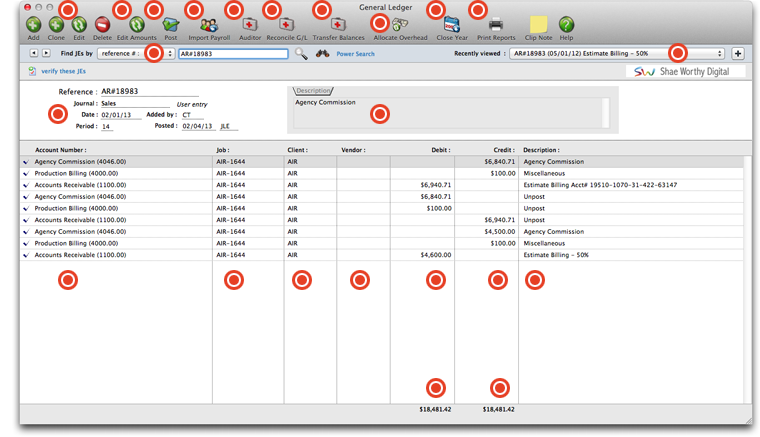
Use these buttons to add, edit, delete, or clone Journal Entries to the General Ledger. For complete step-by-step instructions, see below.
The Edit G/L Amounts window lists the transaction's debit and credit journal entries. You can edit these amounts by simply typing in the new amounts over the old ones. The total debits must equal the total credits or else your changes won't be saved. See below for step-by-step instructions.
Posting updates the account totals in your General Ledger. When a general journal transaction is added, its journal entries (there could be many) are not posted. Unposted entries can be easily and quickly changed, letting you edit an entry’s reference number, description, and other details.
Because of its frequent revisions, C&P doesn’t handle payroll accounting directly. Instead, it imports payroll from a program called CheckMark Payroll by CheckMark Software, a stand-alone system that tracks employees, deductions, and other payroll issues apart from Clients & Profits.
The Auditor performs automatic self-checks on your Accounts Payable, Accounts Receivable, and General Ledger totals. It’s used for troubleshooting data entry and posting problems. It saves users from having to print and analyze hundreds of pages of reports to find accounting problems.
The G/L Reconciliation allows you to audit your balance sheet accounts (e.g., prepaid expenses, accruals, and deposits). The vendor or client code is pulled from the journal entries to show you what vendors or clients make up the balance in that account. You can use this to prove your balance sheet account balances.
Transfer Account Balances moves a G/L account’s balances, from a selected period, to another account. This tool is helpful if you decide to reorganize your chart of accounts by renumbering some accounts or need to combine two accounts. A JE is automatically created for each accounting period in the date range selected.
The Overhead Allocation Worksheet helps calculate the true cost of servicing your clients. It works by first adding up the total hours worked by staff members on each client account, using entries from time sheets and time cards. Then the agency’s total overhead is calculated from the income statement.
Closing the year in Clients & Profits is extremely important and should be done sometime after the end of your fiscal year. C&P supports two simultaneous fiscal years for a total of 24 accounting periods, so there’s no real sense of urgency about year-end closing. The year can be closed well into the next fiscal year.
Use this button to print a multitude of GL reports (G/L Media Reconciliation, Auto-Reversing Entries, Recurring Entries), journals (General Journal, Sales Journal, Cash Receipts Journal), and audit trails.
Journal Entries can be found by reference number. Enter the number, then click the magnifying glass icon to look up JEs.
To revisit recently viewed journal entries, use this pull-down menu. Clients & Profits automatically bookmarks the last 25 journal entries viewed, making it easy to instantly see recently viewed entries, saving the time spent searching for them.
Journal entries are numbered automatically, using a sequential number beginning with JE#. To change this setting, visit Accounting Preferences. Reference numbers are customizable.
An optional description for journal entries appears here.
G/L account numbers appear here. These accounts are the basis of your accounting system, keeping monthly totals of income, costs, expenses, assets, and liabilities. The balances that appear on income statements, balance sheets, trial balances, and other financials are based on the account totals in the chart of accounts.
The job number associated with the journal entry appears in this column.
The client that the job is for appears here.
The vendor associated with the journal entry (if applicable) will appear in this column.
If the journal entry is a debit, the amount of the debit will appear in this column.
If the journal entry is a credit, the amount of the credit will appear in this column.
A brief description of the journal entry appears here.
The grand total of debits will appear here, at the bottom of the debits column.
The grand total of credits will appear here, at the bottom of the credits column.
Adding a Journal Entry
General journal entries can be added any time during the month for payroll, insurance
expenses, bank fees, etc. That is, anything that doesn’t involve Accounts Payable,
Accounts Receivable, Client Payments, Checkbook, or Employee Expense reports. All
kinds of miscellaneous entries can be added as manual journal entries: interest
income, bank service charges, transfers between bank accounts, and adjusting entries
for beginning balances.
General journal entries will appear on the bank reconciliation if they debit or
credit a checking account.
Journal entries are added in batches by transaction. Each transaction can have a
virtually unlimited number of debit and credit entries. The entries won’t be saved
unless their total debits and credits equal. New journal entries are unposted, so
they can be proofed and edited before updating the general ledger. Every journal
entry can also contain a client number, job number, and vendor number. This
information is used for printing audit trails and journals, but has no affect on
client balances, job totals, or vendor balances (to affect these balances, entries
must be added into A/P, \A/R, etc. instead).
General journal entries can be marked as recurring or auto-reversing. By checking
the “recurring” option, the same transaction will be automatically repeated in up to
23 periods. Recurring entries save you from rekeying the same depreciation,
amortization, etc. entries each month. The “auto reversing” option automatically
creates reversing debit and credit entries into the next period (i.e., the debit
entry is reversed as a credit entry, and vice versa). Auto-reversing entries keep
you from forgetting to back out entries such as month-end accruals.
Clients & Profits won't allow out of balance Journal Entries to be posted. If you
have a JE that is out of balance, it can be fixed using the Out of Balance Checker
tool in The Auditor. From the General Ledger window, choose Edit > G/L Tools > The
Auditor. Select the Out of Balance Checker, then click Start.
To add manual journal entries
1 From the General Ledger window, click the add
button (or choose Edit > Add Journal Entries).
Journal entries are numbered automatically, using a sequential number beginning with
JE# (see Accounting Preferences to change the next number). Reference numbers are
customizable.
2 Enter the transaction’s date, reference number,
period, and description. This information is the same for all debits and credits on
this journal entry.
3 Enter the first journal entry’s G/L account, an
optional job number, and a debit or credit amount.
If you’re not sure about a G/L number, leave the field blank then press Tab. The
Chart of Accounts lookup list opens, displaying your G/L accounts. Double-clicking
on an account enters it onto the journal entry.
4 Enter the transaction’s remaining debit and
credit journal entries.
If you want this transaction to be automatically reversed in the next period, click
the Auto-reversing checkbox. Auto reversing entries are posted at the same time as
their original journal entries.
5 Click Save.
To add recurring journal entries
1 From the General Ledger window, click the add
button (or choose Edit > Add Journal Entries).
2 Enter the transaction’s debits and credits, just
like you’re making a regular journal entry.
3 Click the Recurring checkbox, then click Save.
The Schedule Recurring JEs window opens (see illustration), prompting you to select
the upcoming periods into which this transaction will be posted. Click Save to save
these scheduled entries.
Recurring entries can’t be scheduled into locked accounting periods.
Recurring entries aren’t posted until the month for which they are scheduled is the
current period. They can be seen on the proof list by checking the “include
recurring entries” option.
Regular G/L entries can be scheduled. Recurring entries can be scheduled for any
unlocked period by simply clicking on the period name. A copy of the transaction’s
debit and credit JEs will be posted for each selected period
To post manual journal entries
G/L journal entries are proofed, posted, and unposted just like Accounts Payable,
checks, etc. Posting updates the balances on your financial statements and G/L
accounts.
1 Choose File > Post.
Cloning a Journal Entry
Since general journal entries don’t update the G/L balances until they are posted,
they can be easily edited and deleted.
While the General Ledger shows journal entries from all parts of Clients & Profits
(i.e., A/P, A/R, the checkbook, and Client Payments), only general journal entries
can be edited, cloned, and deleted.
To clone a journal entry
Cloning makes an exact duplicate of an existing transaction’s debit and credit
journal entries. You can clone any general journal entry, even from previous
periods.
1 Use the Find window to locate the general
journal transaction you wish to clone.
2 Choose Edit > Clone Journal Entries.
The Add Journal Entries window opens, displaying the newly-cloned transaction. The
new entry has today’s date, the current period, and the next automatic reference
number (copied from your accounting preferences). But the description and debit and
credit journal entries are identical to the original transaction.
3 Make any necessary changes to the cloned debits
and credits, then click Save.
Once saved, the cloned entry can be proofed and posted like any other entry.
Editing a Journal Entry
Since general journal entries don’t update the G/L balances until they are posted,
they can be easily edited and deleted.
While the General Ledger shows journal entries from all parts of Clients & Profits
(i.e., A/P, A/R, the checkbook, and Client Payments), only general journal entries
can be edited, cloned, and deleted.
To edit a journal entry
1 From General Ledger window, find the transaction
you wish to change.
2 Double-click on a journal entry.
The Edit Journal Entry window opens, displaying the entry’s G/L account, period,
date, description, job, client, vendor, and debit or credit amount. If the journal
entry is posted, only the description can be changed. To prevent unbalanced entries,
an entry’s accounting period and date, can’t be changed -- whether or not the entry
has been posted. The entry’s account number, reference number, description, client
number, job number, and vendor number can be changed.
3 Make your changes, then click Save.
Editing reference numbers. If you change
the reference number on one journal entry, be sure to change it on the other
entries in a transaction. Since entries are shown by reference number, entries
with different numbers won’t appear together.
Editing a Journal Entries amounts
1 Choose Edit > Edit Amounts.
The Edit G/L Amounts window lists the transaction’s debit and credit
journal entries. You can edit these amounts by simply typing in the new amounts over
the old ones.
2 Make your changes, then click Save.
The total debits must equal the total credits or else your changes won’t be saved.
Deleting a Journal Entry
Only unposted journal entries can be deleted. (Once a journal entry is posted, it
can’t be deleted -- however, adjusting entries can be made to reverse it or it can
be unposted.) Journal entries are deleted by transaction, not by individual entry,
to prevent unbalanced entries.
1 From the General Ledger window, find the
transaction you wish to delete.
2 Choose Edit > Delete
To delete all unposted journal entries, including any upcoming recurring entries,
choose Edit > Delete All Unposted JEs.
Verifying a Journal Entry
When you highlight a journal entry in the General Ledger window then click the verify button, Clients & Profits will verify the accuracy of the currently displayed journal entry. These journal entries must be posted before verifying. Clients & Profits will not verify unposted JEs. The verify function compares posted entries in the General Ledger against it's source. It will automatically fix any common problems with this posted entry.
Using the G/L Tools
Profit centers let you track the financial performance of different parts of your
business without maintaining a separate set of books. Clients & Profits Agency
provides a comprehensive set of tools to help manage your General Ledger. These
time-saving utilities are easy to use, and prevent a lot of time-consuming manual
work to audit, verify, and adjust your accounting.
Anyone with access to the General Ledger can potentially use the G/L tools. Each
tool has its own separate access privilege (see User Access & Passwords) for
flexibility. This gives different users access to some G/L tools and not others.
The G/L tools include:
Import Payroll
If you produce your own payroll checks using the CheckMark Payroll software, payroll
data can be imported into Clients & Profits. CheckMark has the ability to export
payroll information into a standard text file. Clients & Profits then imports this
text file into the General Ledger as an unposted payroll journal entries. For more
information on CheckMark Payroll, contact CheckMark at www.checkmark.com
Transfer Account Balances
A G/L account number can't be changed once it has a balance. So what happens when
you decide to reorganize your chart of accounts? One option is to wait until the
year is closed, when all of the income, cost, and expense accounts are zeroed out.
But what about asset, liability, and equity accounts that always keep their
balances? That's when you'd use the Transfer Account Balances tool. It lets you move
an account's balance to another account. It happens automatically, which simplifies
the process and keeps it more accurate.
G/L Reconciliation
The task of auditing prepaid and accrual accounts is simplified with the G/L
Reconciliation. It lists an account's entries from the General Ledger. The entries
are then marked as cleared. Once saved, the cleared items will be removed from the
reconciliation window. A G/L reconciliation report can be printed to prove your
Balance Sheet account balances.
Out of Balance Checker
The Out of Balance Checker audits your General Ledger, looking for one sided or
otherwise out-of-balance transactions. Entries will appear on the Auditing tools and
more. Each users can have different access privileges to the G/L tools. Each tool
has its own user access privilege, giving managers very specific control over who
can run them. Out of Balance Checker report shows if (1) a computer crashed during
posted and only part of a transaction was posted, (2) if a user manually entered
only one part of an adjusting journal entry, or (3) entries with the same reference
number were accidentally split over different accounting periods. The report
provides a easy-to-use checklist of the entries to fix.
Add Adjusting JE
This tool lets you make up journal entries that weren't posted with the original
transaction, typically due to a system crash or some kind of network problem during
posting. Normally, journal entries can't be saved unless the transaction's debits
equals its credits. It should only be used to fix a one-sided entry. Otherwise, the
entries you make with the Add Adjusting JE tool will make your financials out of
balance.
The Auditor
The Auditor performs automatic self-checks on your Accounts Payable, Accounts
Receivable, and General Ledger totals. It’s used for troubleshooting data entry and
posting problems. Because it automatically double-checks account totals against the
records that make them up (e.g., G/L account balances and their journal entries), it
saves users from having to print and analyze hundreds of pages of reports to find
accounting problems.
How the Auditor works:
The Auditor works by double-checking the records in your A/P, A/R, and G/L data
files. The complete auditing process includes checking for out-of-balance G/L
entries, making sure that the A/P and A/R agings equal the Balance Sheet totals, and
ensuring that billable time entries contain a client number. Each auditing step has
a different function, which is described below.
Everyone can keep working in Clients & Profits while the Auditor is working, and it
can be canceled any time without damaging the database.
The Auditor can be run any time during the month, and as frequently as needed.
Also, don’t mistake the Auditor for a traditional accountant-based financial audit.
The Auditor can only check the account totals themselves, ensuring that they add up
correctly. It can’t make value judgment about how users have entered data (for
example, it can point out that the wrong expense account was used). It doesn’t
replace a professional accounting audit. Instead, it is only a useful tool for
finding the source of accounting problems.
Auditing steps
All of the Auditor’s steps can be performed at the same time, or individual steps
can be chosen to run independently. If time allows, all of the steps can be run
together; however, if you suspect a specific problem that the Auditor can confirm
and time is tight, you can choose to run only one step at a time.
Out of Balance Checker
This step points out one-sided or otherwise unbalance journal entries from the
General Ledger. If your Trial Balance shows an out-of-balance total, the Out of
Balance Checker will show you precisely where the problem occurs. It is the same
function as the Out of Balance Checker utility in the G/L Tools menu. The only
difference is that running the Out of Balance Checker by itself lets you check one
period, instead of all periods.
Account Totals Checker
This utility compares totals on your financial statements to the journal entries in
your general ledger.
A/P Quick Check
This report compares the total of your vendor aging to the total of a/p control
accounts designated under Setup > Chart of Accounts. This is a quick way to make
sure your agings stay in balance. If the auditor shows that your A/P is out of
balance, you can rectify it with the help of the Out of Balance Prior Period Aging
Best Practice Guide.
Vendor Totals Checker
This utility compares the vendor totals listed under setup>vendors to the total
unpaid invoices on your vendor aging.
A/P Exception Report
This utility looks for incorrect uses of a/p control accounts. Example, you should
not credit accounts payable when writing a check. The a/p exception report would
flag this transaction.
A/R Quick Check
This report compares the total of your client aging to the total of a/r control
accounts designated under Setup>Chart of Accounts. This is a quick way to make sure
your agings stay in balance.
Client Totals Checker
This utility compares the client totals listed under view>clients to the total
unpaid invoices on your client aging.
A/R Exception Report
This utility looks for incorrect uses of a/r control accounts. Example, you should
not debit accounts receivable when entering a client payment. The a/r exception
report would flag this transaction.
JE Client Number Checker
The JE Client Number checker will list any je to an income or job cost account that
does not have a client code. This could affect the overhead allocation and Client P
& L report.
Time Entry Client Checker
The time entry client number checker will list any time entries in the current year
that do not have a client code. This could affect the overhead allocation and Client
P & L report.
Task Kind Checker
The task kind checker looks for tasks on open jobs that have unbilled amounts, but
the estimating/billing checkbox is not selected for that task.
To run the Auditor
1 Choose Accounting > General Ledger from the
Accounting menu.
2 Choose Edit > G/L Tools > The Auditor
The Auditor window opens.
3 Use your mouse to select the auditor steps to
perform, or click the button (i.e., All) to choose them all.
4 Click Start.
Overhead Allocation Worksheet
This tool calculates each client's share of the agency's overhead expenses for any
selected month. The overhead allocation worksheet adds up the hours worked by each
staff member, then allocates a proportion of the overhead expenses to each client
based upon the specific method. The worksheet lets you enter the month's payroll
totals for each employee, which then become part of the client's overhead
allocation. The client overhead totals are then used on the Client P&L Analysis
report.
Close Year
Clients & Profits can handle two open fiscal years, for a total of 24 accounting
periods. So while there's no real urgency to close the first year, at some point
it's necessary. Year-end closing is very easy and mostly automatic. Clients &
Profits handles everything. Once you've entered the year's remaining entries, you'll
run the Close Year procedure. It presents a checklist of steps it goes through to
close out the fiscal year. Once you've started the close year process, it runs
unattended until it finishes. Afterwards, you can print a log of steps completed by
the Close Year tool.
Auditing tools and more. Each users can have different access privileges to the G/L
tools. Each tool has its own user access privilege, giving managers very specific
control over who can run them. If you don't have access to specific G/L tools, ask
your System Manager for changes to your access privileges.
Using the Out of Balance Checker
It’s possible for your general ledger to become out-of-balance because of system
crashes during posting.
This happens when one side of a transaction (either a debit or credit) is posted,
but the system crashes before the other side is finished. The problem can happen at
any time, and it is difficult to prevent (since it is always system related). For
performance reasons, Clients & Profits doesn’t automatically warn you when you’re
out of balance. But it’s easy to see if your G/L is out of balance: simply look at
the bottom line of the Balance Sheet (it’ll show the out of balance amount), or at
Total Assets, Liabilities, and Equity section on the Trial Balance (which should
always be zero).
The key to solving an out-of-balance G/L problem is to find the missing (or
duplicated) journal entries. Since all JEs for a particular transaction have the
same reference number, it’s easy to track down the bad entries. To make
troubleshooting your G/L easy, Clients & Profits Agency provides a special Out of
Balance Checker utility.
How The Out of Balance Checker Works:
The Out of Balance Checker utility works by analyzing your G/L journal entries
transaction-by-transaction. It adds up the total of each transaction’s debits and
credits (i.e., JEs with the same reference number), then highlights the ones that
don’t balance. The Out of Balance report only shows the transactions that need
fixing.
The Out of Balance Checker only finds unbalanced entries that need to be corrected.
It does not change your general ledger in any way. You’ll need to make your own
judgments about how to correct an unbalanced entry (that is, making the appropriate
debit or credit adjusting entry).
The total debits and credits for each reference on the Out of Balance checker report
correspond to the total debits and credits in the G/L window for that transaction.
The total amount of the entries on the report should equal the out-of-balance amount
on the Balance Sheet or Trial Balance.
To run the Out of Balance Checker
1 Choose Accounting > General Ledger.
2 Choose Edit > G/L Tools > Auditor
Check totals for any period. The Out of Balance Checker can check G/L account totals
for the entire fiscal year or for a single period. If you know which period is out
of balance, checking only that period is much faster than check the entire year.
3 Select the Out of Balance Checker, then click
OK.
The journal entries are analyzed, then the Out of Balance JEs report appears. All
out of balance entries are listed and the reference numbers given for easy auditing.
You will need to research to see why the entry is out of balance by checking the
reference number in the G/L and also finding the source document. The problem is
generally in the posting and an adjusting JE needs to be added to correct the entry.
Cash vs. accrual explained
Cash basis
and accrual basis accounting are the two most widely recognized methods of
tracking a company's income and expenses. The primary difference between the two
methods has to do with when the recognition of income and expenses occur. Under
the cash method, income is recognized when a payment is received and expenses
when a check is written. This method does not let you match revenues generated
with the costs associated to them, an important financial accounting concept.
Under the accrual method (the one used by Clients & Profits), income is
recognized when the invoice is sent to the client (posted) and expenses are
recognized when the payable is recorded on the company's books. It's a better
way of recognizing income and expenses for financial purposes as it relates the
income and expenses more closely to the actual events causing them and gives you
the ability to properly match the income generated with the expenses incurred to
produce them.
Closing the year
Full guide to closing the year here.
Closing the year in Clients & Profits is extremely important and should be done
sometime after the end of your first fiscal year.
Clients & Profits supports two simultaneous fiscal years (for a total of 24
accounting periods), so there’s no real sense of urgency about year-end closing. The
year can be closed well into the next fiscal year. Throughout that time you can
enter data into both the current year and last year, then print financial statements
for any accounting period.
Once in the new fiscal year, you should run the Close Year tool as soon as you’ve
made any remaining adjusting entries. Closing is performed by a special tool that
prepares your database for the next year’s accounting work. Closing the year does
not affect job tickets, time sheets, accounts payable invoices, purchase orders,
client invoices, payments, or checks in the checkbook. Instead, closing only resets
the General Ledger.
You can’t enter accounting data into a year that is closed: Once an accounting year
is closed, its journal entries are permanently removed from the current general
ledger in preparation for the new year. Closing the year removes the journal entries
from periods 1-12. It then shifts periods 13-24 to the corresponding periods of
1-12. Closing the year gives you 12 new accounting periods to post accounting
transactions into, for a total of 24 periods.
|
Learn about the close the year process in the Clients & Profits Feature-cast. Part 1: Part 2: |
Users do not have to logout of Clients & Profits while the year is being closed, but
they should not add or post any new time entries, accounts payable invoices, client
billings, checks, client payments, deposits, or general ledger entries.
Pre-Close Year Checklist:
1 Add and post any adjusting entries into the year
being closed. Entries such as accumulated depreciation, accrued interest, and
adjusting entries you received from your tax preparer.
2 Post all unposted accounting items. Look for
unposted items by choosing Proof/Post from Accounts Payable, Checkbook, Billing:
Accounts Receivable, Client Payments, and the General Ledger. Once the year is
closed you can no longer make entries into the periods that were part of the closed
year.
3 Make sure that you have completed the
recommended monthly period closing procedures for the year being closed.
4 Print a balance sheet for Period 12 and verify
that the Suspense account has a zero balance.
The Suspense account is used as a default G/L account if you add a transaction
without a dGL or cGL account. Printing a year to date detailed G/L report for the
Suspense account will show any transactions that posted to the Suspense account.
Adjustments to the Suspense account transactions can not be made after the year is
closed if the transactions are in periods 1-12. Print this report from Snapshots >
Financials > Detailed G/L.
5 Review your Period 12 financial statements and
check all account balances for any errors you might have overlooked. If you find
something that should be corrected use the Clients & Profits Auditor tool, to help
locate and fix any errors. The Auditor tool is located in Accounting>General Ledger.
6 Review the Client Account Aging and Vendor
Account Aging reports for any issues that need to be resolved. For example, client
invoices that will not be paid and should be written off with a Write-off client
payment; and vendor invoices that will not be paid and can be removed using a vendor
credit added from the Checkbook feature.
7 Print the year end financial reports for the
year being closed as PDF files (and hard copies as well if needed).
Recommended reports:
- Balance Sheet
- Income Statement
- Trial Balance
- Detailed General Ledger
- Audit Trail (account history)
- General Ledger Journals: G/L, A/P, A/R, Checks, Payments
Also consider:
- Client Account Aging and Vendor Account Aging reports for Period 12
- Client P&L
- Budget vs Actual Reports
- Comparative financial reports
- Other financial reports you may use.
Once the year is closed financial statements, general ledger journals, audit
trails, and general ledger account detail can no longer be printed. You may
need to refer to a previous year’s journal entries some time in the future,
so having a permanent (and easily accessible) backup as PDF files or hard
copies is handy.
8 If you are using the G/L Reconciliation
Tool to reconcile accounts make sure you have reconciled the accounts
through period 12.
If you would like a an online backup of your database, we will be happy
to provide an online copy of your closed year databases for multiple
years for a flat fee.
Please call Clients & Profits Sales at 1-800-272-4488 to request this
feature before the close year process is run.
The Retained Earnings Account
The Retained Earnings account keeps track of your net income/loss from year
to year. To close the year, you must have a Retained Earnings account.
You’ll be prompted to enter the Retained Earnings account, which must be an
equity account, when closing the year. Clients & Profits calculates the
agency’s net income by subtracting job costs and overhead expenses from
total income. The amount of your profit is then posted to retained earnings,
an equity (or “net worth”) account. This is the same as manual entries which
close income, costs, and expenses into retained earnings -- it’s just
automated. Clients & Profits will prompt you if the account does not exist.
Retained Earnings is a separate Equity account, and is not the same as the
Year-to-Date Profit account 999999.00
To Close The Year
1 Choose Accounting > General Ledger, then
click on Close Year.
2 Enter your Retained Earnings account if
it is not already filled in.
The Retained Earnings account keeps track of your net income/loss from year
to year. To close the year, you must have a Retained Earnings account.
3 Click Start to close the year. Clients &
Profits will confirm that the year was closed.
4 From the Clients & Profits preferences
window review your accounting periods, current accounting period, and first
day of your fiscal year.
5 Confirm your current financials to
verify that the prior year’s ending balances were correctly transferred
during the close year process.
- Compare the balance sheet for Period 12, (that you printed before the year was closed) to the Trial Balance for Period 1, after you closed the year. The Period 12 balance sheet account balances for Asset and Liability accounts should match the Beginning Balances for Period 1 on the trial balance.
- The Retained Earnings account beginning balance will vary by the amount of the Net Earnings for the year closed. There should be no beginning balance amounts for any Income, Job Cost, Expense, Other Income, or Other Expense accounts
"Hands down, this Clients & Profits Helpdesk is the best of any support team." -- Kate Mistler, Fabiano Communications

© 2026 Clients & Profits, Inc.