
Utilities
The utilties section allows the user to renumber or purge entries

The renumber utility lets a user change the existing number for jobs, clients, tasks, vendors and more... This feature allows you change the number of an item and the connected items. For example: time entries, costs, invoices and well as other linked information.
Renumber
The Renumber utility lets you change a job number, one job's client, task code, client number, vendor number, staff initials, status codes, publication/station, job type/spec sheet, or group.
Ordinarily, these numbers can’t be changed for good reason: a job number, for example, could appear on hundreds of job tasks, job costs, purchase orders, and client invoices. If you change the job number only on the job ticket, it would no longer match its activity (other records that may reference that job number, like an invoice, etc.). The Renumber utility lets you change a number by updating every record in the database that contains this number to reflect the change.
Renumbering a job replaces one job number with another on job tasks, purchase orders, job costs, A/R invoices, checks, and journal entries in the General Ledger. Renumbering a task replaces one task code with another in the Task Table, job tasks, job costs, A/R invoices, and purchase orders. (Important note: a task can’t be merged with another task if both exist on the same job.) Renumbering a client replaces a client number on job tickets, job tasks, job costs, journal entries in the General Ledger, client invoices, and client payments. Renumbering a vendor replaces a vendor number on A/P invoices, purchase orders, journal entries in the General Ledger, and checks. Renumbering a staffer replaces a staff member’s initials on time sheets.
The option to renumber status codes should only be used when changing the same status from one number to another. For example: You've decided that the "new job" status, which is currently 10, should now be 100. Instead of adding status 100 to the status table, then updating all the jobs to status 100, just renumber status 10 to 100. Status 10 will be removed from the status table as well. Both the production and billing statuses are updated, as well as task statuses.
However, if you just want to update the status code on many jobs from one status code to another status code, do not use the renumber utility, this is rightly done with the Production Planner or Daily Job Ticket Status report, both under the Production menu.
Note: Your default status codes in Preferences aren't changed by Renumber, and might need to be changed manually.
Renumbering groups will change the group number on all job ticket tasks referencing the group number being changed.
Likewise, any orders or media estimates/plans referencing a publication or station will change this reference after a renumber to the new publication or station code. It will not change the vendor code associated with the publication or station, nor update the vendor code on orders.
When renumbering job type/spec sheets, it's not recommended that two are merged into one (renumbering to an already existing job type/spec sheet name). This is because other critical components to trafficking a job, such as milestones, are tied to the job type/spec sheet and could be lost. Rather, just renumber a job type/spec sheet to a new unique name.
The option to Renumber one job’s client allows you to edit the client code on one job ticket. If a job ticket was mistakenly added with the incorrect client code, this Renumber option allows you to edit the client code instead of deleting and re-adding the entire job.
Note: Renumbering a job to a job number with a different client code in it is not enough to change the client on the job, the job also needs to have the client code itself (one job's client) renumbered.
Renumbering a staff member will change his or her time entries and special billing rates only. Use it when an employee's name changes (e.g., marriage, divorce, etc.) and he or she wants different staff initials. The staff member's old initials will still appear on existing job tickets, job tasks, POs, invoices, etc. for performance reasons -- updating every record in your database on which that staff member appears could take several hours.
Merging two client or vendor accounts into one
The Renumber utility can merge two different client accounts or two different vendor accounts into one. For example, when one vendor is acquired by another you’ll now only need one vendor account. The Renumber utility can combine the invoices and checks for both vendors together under one vendor number. Likewise, it can combine the invoices and payments for both clients together under one client number
- After merging two vendors, the original vendor account is deleted. However, manually delete the old client record after merging two clients. This is done on purpose since the old client may have an unused retainer balance which is NOT added to the merged client. C&P will prevent you from deleting the old client in this case.
To renumber a record
-
Choose Setup > Utilities > Renumber.
The Renumber window opens, displaying the Renumbering options.
- Choose a renumbering option, such as Job number.
-
Enter the record’s original number, such as a job number.
This is the number you’re currently using in your database. Enter the existing job number, task code, client number, vendor number, or staff person’s initials. Tabbing past the number confirms that the number exists; if not, you’ll be prompted to enter the number over again.
-
Enter the record’s new number, such as the new job number.
This is the new number you wish to use. Enter the new job number, task code, client number, vendor number, or staff person’s initials. Tabbing past the new number checks it against other numbers in the database. This new number can’t be used elsewhere; if so, you’ll be prompted to enter a different number.
-
Click OK.
Clients & Profits X will methodically change every record containing the old number, giving it the new number.
Note: Only one record (i.e., one job) can be renumbered at a time. If several jobs, for example, need to be renumbered, each job must be renumbered separately. The Renumber procedure can’t be stopped, but it can be reversed if you change your mind. If so, simply Renumber the record again using the new number you just entered.
Purge Data
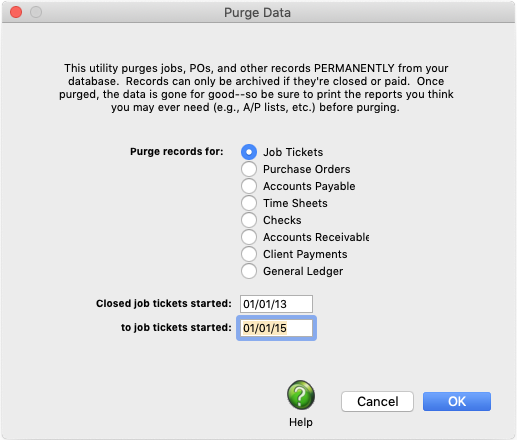
The Purge utility erases old records from your database -- permanently.
This utility can purge paid A/R and A/P invoices, checks, job tickets, time sheets, and purchase orders from your database.
Purging selects records by date, which is user-defined. You can select any records from a time period, such as last year’s work. It’s best to leave at least the current’s year’s activity in the database, since you’re more likely to need it. But once records become unneeded, especially last year’s time sheets and purchase orders, they can be purged.
If you archive/purge last year’s time sheets, they can’t be seen in the Time Sheets window. Because archiving only deletes old records, the jobs that these time entries were posted aren’t affected. The totals on the job ticket still show the hours from these time sheets. But if you try to print a cost report, the time won’t appear -- because it’s been purged. If you verified the job, its total cost would now be understated -- the time doesn’t exist anymore.
-
Before archiving, always print any report you think you might need showing the information to be purged. This is the last chance you’ll have to see this data in Clients & Profits -- because once the data is purged, it can’t be recovered.
Since archiving permanently purges records from your data, the information is no longer available for windows and reports.
Archiving checks or client payments can cause a problem: if you verify the A/P or A/R balances, you’ll have old invoices that no longer have payments. Once you’ve verified them, these old invoices will appear as unpaid -- because the payments aren’t there. That’s why you shouldn’t verify something you’ve also archived.
- If you accidentally verify A/P or A/R invoices that’s been purged, you’re data isn’t ruined. But you’ll need to call the C&P Helpdesk for assistance.
To purge old data
-
Choose Setup > Utilities > Purge
-
Select a file to purge.
-
Enter a range of dates.
-
Click OK.

© 2026 Clients & Profits, Inc.